Table of Contents
Advertisement
Quick Links
Advertisement
Table of Contents

Subscribe to Our Youtube Channel
Related Manuals for Supermicro SuperStorageSystem SSG-2028R-DN2R24L


Summary of Contents for Supermicro SuperStorageSystem SSG-2028R-DN2R24L
- Page 1 SuperStorageSystem SSG-2028R-DN2R24L User's Manual Revision 1.0...
- Page 2 This product, including software and This manual is written for professional system integrators and PC technicians. documentation, is the property of Supermicro and/or its licensors, and is supplied only under a It provides information for the installation and use of the SSG-2028R-DN2R24L license.
-
Page 3: Table Of Contents
Preface SUPERSTORAGESYSTEM SSG-2028R-DN2R24L User's Manual Table of Contents Chapter 6: Advanced Chassis Setup Refer to Chapter 6 for detailed information on the SC227TS-R2K05P2 server Chapter 1 Introduction chassis. You should follow the procedures given in this chapter when installing, removing or reconfiguring NVMe drives and when replacing system power supply Overview ...................... - Page 4 Table of Contents SUPERSTORAGESYSTEM SSG-2028R-DN2R24L User's Manual Chapter 5 Advanced Motherboard Setup Circuit Overloading ..................2-3 Reliable Ground ..................2-3 Handling the Motherboard ................5-1 Installing the System into a Rack ..............2-4 Precautions ..................... 5-1 Identifying the Sections of the Rack Rails ............2-4 Unpacking .......................
- Page 5 Table of Contents Installing the Expansion Cards ..............6-11 Installing Expansion Cards ................6-11 Changing the Power Supplies............... 6-12 6-10 Power Distributor Board ................6-13 6-11 System Fans ....................6-14 6-12 Removing and Installing the Backplanes ............6-15 Removing the Backplane ................6-15 Installing the Backplane ................
-
Page 6: Overview
One (1) set of auto-latch rail set hardware (MCP-290-00138-0N) Note: For your system to work properly, please follow the links below to download all necessary drivers/utilities and the user’s manual for your server. • Supermicro product manuals: http://www.supermicro.com/support/manuals/ • Product drivers and utilities: ftp://ftp.supermicro.com... -
Page 7: Motherboard Features
I/O Ports The rear I/O LAN ports include: one Intel X540 10-Gigabit Ethernet Dual-Channel At the heart of the SuperStorageSystem SSG-2028R-DN2R24L is the X10DSN-TS, Controller for 10G-LAN (TLAN) 1/10G-LAN (TLAN) and one IPMI-dedicated LAN a dual processor motherboard based on the C612 chipset. Below are the main supported by the ASpeed AST2400 BMC features of the system (See Figure 1-1 for a block diagram of the motherboard). -
Page 8: Front Control Panel
SUPERSTORAGESYSTEM SSG-2028R-DN2R24L User's Manual Chapter 1: Introduction Front Control Panel Figure 1-1. C612 Chipset Block Diagram Two control panels are included on each end of the SSG-2028R-DN2R24L #1-8 #2-8 #1-7 SuperStorageSystem to provide you with system monitoring and control. LEDs... -
Page 9: Contacting Supermicro
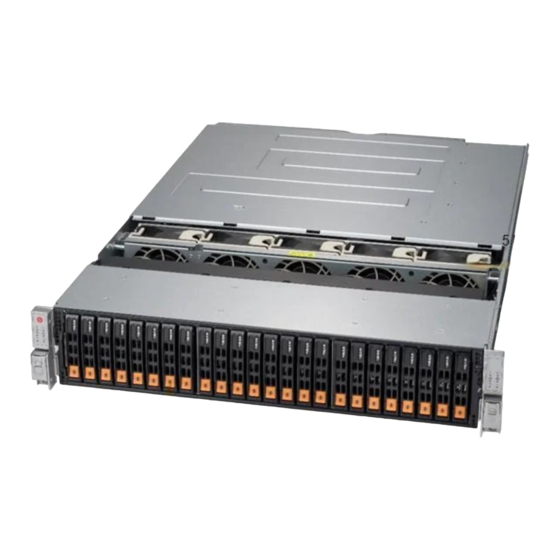
NVMe Backplane/Drives 3F, No. 150, Jian 1st Rd. Zhonghe Dist., New Taipei City 235 As a system, the SuperStorageSystem SSG-2028R-DN2R24L supports the use of Taiwan (R.O.C) twenty-four (24) 2.5" NVMe drives. The NVMe backplane works to apply system- based control for power and fan speed functions. See the Drive Bay Installation/... -
Page 10: Chapter 2 Server Installation
Chapter 2: Server Installation Chapter 2 Server Installation Overview This chapter provides a quick setup checklist to get your SSG-2028R-DN2R24L up and running. Following these steps in the order given should enable you to have the system operational within a minimum amount of time. This quick setup assumes that your system has come to you with the processors and memory preinstalled. -
Page 11: Choosing A Setup Location
SUPERSTORAGESYSTEM SSG-2028R-DN2R24L User's Manual Chapter 2: Server Installation Choosing a Setup Location Rack Mounting Considerations • Leave enough clearance in front of the rack to enable you to open the front door completely (~25 inches) and approximately 30 inches of clearance in the back Ambient Operating Temperature of the rack to allow for sufficient airflow and ease in servicing. -
Page 12: Installing The System Into A Rack
SUPERSTORAGESYSTEM SSG-2028R-DN2R24L User's Manual Chapter 2: Server Installation • Releasing the Inner Rail If the rack is provided with stabilizing devices, install the stabilizers before mounting or servicing the unit in the rack. It is necessary to release the inner rail from the middle and outer rails before installing the inner rail on the chassis. -
Page 13: Installing The Inner Rails On The Chassis
SUPERSTORAGESYSTEM SSG-2028R-DN2R24L User's Manual Chapter 2: Server Installation Installing The Inner Rails on the Chassis Installing the Outer Rails on the Rack Installing the Inner Rails Installing the Outer Rails 1. Confirm that the left and right inner rails have been correctly identified. -
Page 14: Installing Into The Rack
SUPERSTORAGESYSTEM SSG-2028R-DN2R24L User's Manual Chapter 2: Server Installation Installing into the Rack Removing the Chassis From the Rack After the rails are installed on the chassis and on the rack, the server can be installed Caution: The server is heavy and requires two to three people to lift it out. -
Page 15: Removing The Outer Rails From The Rack
Note: A small number of customers may have received a different outer rail than the one pictured. This rail features side release latch on the front of the outer rail, which opens inward to release the outer rail from the rack. Contact Supermicro's Technical Support department if you need additional assistance. -
Page 16: Overview
Chapter 3: System Interface Chapter 3 System Interface Overview There are several LEDs on two control panels as well as others on the drive carriers to keep you constantly informed of the overall status of the system as well as the activity and health of specific components. -
Page 17: Power
SUPERSTORAGESYSTEM SSG-2028R-DN2R24L User's Manual Chapter 3: System Interface Control Panel Button NIC2 Indicates network activity on the LAN2 port when flashing. Power The single button located on the right control panel is the power on/off button. Depressing this button will either power both nodes on or off. Turning off the system... -
Page 18: Drive Carrier Leds
SUPERSTORAGESYSTEM SSG-2028R-DN2R24L User's Manual Drive Carrier LEDs The chassis includes externally accessible NVMe drives. Each drive carrier displays two status LEDs on the front of the carrier. LED Color State Status Activity LED Blue Solid On NVMe drive installed Blue... -
Page 19: Chapter 4 Standardized Warning Statements For Ac Systems
The following statements are industry standard warnings, provided to warn the user of situations which have the potential for bodily injury. Should you have questions or experience difficulty, contact Supermicro's Technical Support department for assistance. Only certified technicians should attempt to install or configure components. - Page 20 SUPERSTORAGESYSTEM Warning Statements for AC Systems SSG-2028R-DN2R24L User's Manual Warnung جسذٌة اصابة ًتتسبب ف حالة ٌوكي أى ًاًك ف خطز ًٌٌع هذا الزهز !تحذٌز WICHTIGE SICHERHEITSHINWEISE الذوائز بالوخاطز الٌاجوة عي ي على علن ، ك هعذات تعول على أي قبل أى Dieses Warnsymbol bedeutet Gefahr.
-
Page 21: Installation Instructions
SUPERSTORAGESYSTEM Chapter 4: Warning Statements for AC Systems SSG-2028R-DN2R24L User's Manual Installation Instructions Circuit Breaker Warning! Warning! This product relies on the building's installation for short-circuit (overcurrent) Read the installation instructions before connecting the system to the power source. protection. Ensure that the protective device is rated not greater than: 250 V, 20 A. 設置手順書... -
Page 22: Power Disconnection Warning
SUPERSTORAGESYSTEM Chapter 4: Warning Statements for AC Systems SSG-2028R-DN2R24L User's Manual ¡Advertencia! 경고! El sistema debe ser disconnected de todas las fuentes de energía y del cable 이 제품은 전원의 단락(과전류)방지에 대해서 전적으로 건물의 관련 설비에 eléctrico quitado de los módulos de fuente de alimentación antes de tener acceso 의존합니다. -
Page 23: Equipment Installation
SUPERSTORAGESYSTEM Chapter 4: Warning Statements for AC Systems SSG-2028R-DN2R24L User's Manual Equipment Installation Waarschuwing Deze apparatuur mag alleen worden geïnstalleerd, vervangen of hersteld door Warning! geschoold en gekwalificeerd personeel. Only trained and qualified personnel should be allowed to install, replace, or service Restricted Area this equipment. -
Page 24: Battery Handling
SUPERSTORAGESYSTEM Chapter 4: Warning Statements for AC Systems SSG-2028R-DN2R24L User's Manual Warnung אזור עם גישה מוגבלת Bei Einsetzen einer falschen Batterie besteht Explosionsgefahr. Ersetzen Sie die Batterie nur durch den gleichen oder vom Hersteller empfohlenen Batterietyp. !אזהרה Entsorgen Sie die benutzten Batterien nach den Anweisungen des Herstellers. יש... -
Page 25: Redundant Power Supplies
SUPERSTORAGESYSTEM Chapter 4: Warning Statements for AC Systems SSG-2028R-DN2R24L User's Manual Redundant Power Supplies امداد الطاقة بوحدات عدة اتصاالت جهاز ال يكون لهذا قد الكهرباء عن وحدة ال لعسل كافة االتصاالت يجب إزالة 경고! Warning! This unit might have more than one power supply connection. All connections must 이... -
Page 26: Comply With Local And National Electrical Codes
SUPERSTORAGESYSTEM Chapter 4: Warning Statements for AC Systems SSG-2028R-DN2R24L User's Manual Attention מתח בפנל האחורי L'équipement doit être installé conformément aux normes électriques nationales et locales. !הרה אז קיימת סכנת מתח בפנל האחורי בזמן תפעול המערכת. יש להיזהר במהלך תיאום חוקי החשמל הארצי .העבודה... -
Page 27: Hot Swap Fan Warning
SUPERSTORAGESYSTEM Chapter 4: Warning Statements for AC Systems SSG-2028R-DN2R24L User's Manual Warnung Attention Gefährlich Bewegende Teile. Von den bewegenden Lüfterblätter fern halten. La mise au rebut ou le recyclage de ce produit sont généralement soumis à des Die Lüfter drehen sich u. U. noch, wenn die Lüfterbaugruppe aus dem Chassis lois et/ou directives de respect de l'environnement. -
Page 28: Power Cable And Ac Adapter
UL ou CSA câbles certifiés qui ont UL ou CSA indiqué sur le code power cables and AC adaptors. Using any other cables and adaptors could cause pour tous les autres appareils électriques que les produits désignés par Supermicro a malfunction or a fire. Electrical Appliance and Material Safety Law prohibits the seulement. - Page 29 SUPERSTORAGESYSTEM SSG-2028R-DN2R24L User's Manual Notes 4-20...
-
Page 30: Chapter 5 Advanced Motherboard Setup
Chapter 5: Advanced Motherboard Setup Chapter 5 Advanced Motherboard Setup This chapter covers the steps required to install the X10DSN-TS motherboard into the chassis, connect the data and power cables and install add-on cards. All motherboard jumpers and connections are also described. A layout and quick reference chart are included in this chapter for your reference. -
Page 31: Connecting Cables
Figure 5-1. Rear I/O Ports pins are bent; otherwise, contact your retailer immediately. Refer to the Supermicro website for updates on CPU support. Installing the LGA2011 Processor 1. There are two load levers on the LGA2011 socket. To open the socket cover, first press and release the load lever labeled 'Open 1st'. - Page 32 SUPERSTORAGESYSTEM SSG-2028R-DN2R24L User's Manual Chapter 5: Advanced Motherboard Setup 2. Press the second load lever labeled 'Close 1st' to release the load plate that 5. Use your thumb and index finger to hold the CPU on its edges. Align the CPU covers the CPU socket from its locking position.
-
Page 33: Installing A Passive Cpu Heatsink
SUPERSTORAGESYSTEM SSG-2028R-DN2R24L User's Manual Chapter 5: Advanced Motherboard Setup Installing a Passive CPU Heatsink 7. With the CPU inside the socket, inspect the four corners of the CPU to make sure that the CPU is properly installed. 1. Do not apply any thermal grease to the heatsink or the CPU die -- the 8. -
Page 34: Removing The Cpu And The Heatsink
Warning: We do not recommend that the CPU or the heatsink be removed. However, Note: Check Supermicro's website for a list of recommended memory modules. if you do need to uninstall the CPU or the heatsink, please follow the instructions below to uninstall the heatsink or the CPU without damaging the CPU or the motherboard. -
Page 35: Removing Memory Modules
SDRAM at 1.2V voltages. 2 CPUs & CPU1/CPU2 P1-DIMMA1/P1-DIMMB1/P1-DIMMC1/P1-DIMMD1, P2-DIMME1/P2-DIMMF1/P2- 9~16 DIMMs Note: Check the Supermicro website (www.supermicro.com) for the latest memory DIMMG1/P2-DIMMH1 + any pair of P1, P2 DIMM slots support information. Populating RDIMM/LRDIMM DDR4 Memory Modules on the Maximum Memory... -
Page 36: Adding Pci Expansion Cards
SUPERSTORAGESYSTEM SSG-2028R-DN2R24L User's Manual Chapter 5: Advanced Motherboard Setup Adding PCI Expansion Cards Motherboard Details The SSG-2028R-DN2R24L includes two preinstalled riser cards (RSC-X-68-C) Figure 5-2. X10DSN-TS Motherboard Layout (not drawn to scale) designed specifically for use in the SC227TS-R2K05P2 2U rackmount chassis. -
Page 37: Connector Definitions
SUPERSTORAGESYSTEM SSG-2028R-DN2R24L User's Manual Chapter 5: Advanced Motherboard Setup Connector Definitions X10DSN-TS Jumpers Jumper Description Default Setting Universal Serial Bus (USB) JBT1 Clear CMOS/Reset BIOS Configuration See Section 5-9 for details. Back Panel USB 0/1 (3.0) Type A USB 2 (3.0) Two USB 3.0 ports (USB 0/1) are located... -
Page 38: Jumper Settings
SUPERSTORAGESYSTEM SSG-2028R-DN2R24L User's Manual Chapter 5: Advanced Motherboard Setup Jumper Settings DOM Power Connectors DOM PWR Pin Definitions Two power connectors for SATA DOM Connector Pins Pin# Definition (Disk_On_Module) devices are located Explanation of Jumpers at JSD1/JSD2. Connect appropriate cables here to provide power supply for... -
Page 39: 5-10 Onboard Indicators
SUPERSTORAGESYSTEM SSG-2028R-DN2R24L User's Manual Chapter 5: Advanced Motherboard Setup 5-10 Onboard Indicators LAN Enable/Disable LAN Enable Jumper Settings JPL1 enables or disables onboard LAN Jumper Setting Definition Ports 1/2 on the motherboard. These GLAN LED LAN LEDs Pins 1-2 Enabled (Default) -
Page 40: 5-11 Serial Ata Connections
Figure 5-3 should appear. (If this display does not appear, are located on the motherboard. These SATA ports are used with Supermicro click on the My Computer icon and then on the icon representing your CD-ROM SuperDOM (Disk-on-Module) connectors, which are yellow SATA connectors drive. -
Page 41: Superdoctor 5
Figure 5-4. SuperDoctor 5 Interface Display Screen (Health Information) Note: The SuperDoctor 5 program and User’s Manual can be downloaded from the Supermicro web site at http://www.supermicro.com/products/nfo/sms_sd5.cfm. For Linux, we recommend that you use the SuperDoctor II application instead. 5-22... -
Page 42: 5-13 Serverboard Battery
SUPERSTORAGESYSTEM SSG-2028R-DN2R24L User's Manual 5-13 Serverboard Battery Caution: There is a danger of explosion if the onboard battery is installed upside down, which will reverse its polarities (see Figure 5-6). This battery must be replaced only with the same or an equivalent type recommended by the manufacturer (CR2032). -
Page 43: Chapter 6 Advanced Chassis Setup
Chapter 6: Advanced Chassis Setup Chapter 6 Advanced Chassis Setup This chapter covers the steps required to install components and perform maintenance on the SC227 chassis. For component installation, follow the steps in the order given to eliminate the most common problems encountered. If some steps are unnecessary, skip ahead to the step that follows. -
Page 44: Control Panel
SUPERSTORAGESYSTEM SSG-2028R-DN2R24L User's Manual Chapter 6: Advanced Chassis Setup Control Panel Control Panel Control Panel The control panels are connected to the serverboards through the midplane. The LEDs on the control panels are associated with the node on the same side of the chassis. -
Page 45: Removing The
SUPERSTORAGESYSTEM SSG-2028R-DN2R24L User's Manual Chapter 6: Advanced Chassis Setup Removing the Front Cover Removing the Rear Cover Figure 6-2. Removing the Front Cover Figure 6-3. Removing the Rear Cover Remove Fourteen Screws Remove Screw Remove Screw Removing the Rear Cover 1. -
Page 46: Installing Hard Drives
SUPERSTORAGESYSTEM SSG-2028R-DN2R24L User's Manual Chapter 6: Advanced Chassis Setup Installing Hard Drives Installing a Hard Drive into a Drive Carrier 1. Remove the dummy drive, which comes pre-installed in the drive carrier, by Figure 6-4. Removing Hard Drive removing the screws securing the dummy drive to the carrier. Note that these screws cannot be reused on the actual 2.5"... -
Page 47: Motherboard Installation
SUPERSTORAGESYSTEM SSG-2028R-DN2R24L User's Manual Chapter 6: Advanced Chassis Setup Motherboard Installation Motherboard Installation Removing and Installing the Motherboard 1. Review the documentation that came with your motherboard. Become Removing the Motherboard Modules familiar with component placement, requirements, precautions, and cable The SC227 features a removable motherboard module that allows easy access to connections. -
Page 48: Permanent And Optional Standoffs
SUPERSTORAGESYSTEM SSG-2028R-DN2R24L User's Manual Chapter 6: Advanced Chassis Setup Installing the Expansion Cards Permanent and Optional Standoffs Standoffs prevent short circuits by creating space between the motherboard and the The SC227 provides two PCI slots for low-profile expansion cards. Note that the chassis surface. -
Page 49: Changing The Power Supplies
SUPERSTORAGESYSTEM SSG-2028R-DN2R24L User's Manual Chapter 6: Advanced Chassis Setup Changing the Power Supplies 6-10 Power Distributor Board The SC227 chassis has two redundant power supplies. The power modules are The SC227 chassis requires two power distributor boards. These boards are located hot-swappable, enabling the power supplies to be changed without powering down behind the power supplies and are separated with a set of spacers. -
Page 50: 6-11 System Fans
SUPERSTORAGESYSTEM SSG-2028R-DN2R24L User's Manual Chapter 6: Advanced Chassis Setup 6-11 System Fans 6-12 Removing and Installing the Backplanes Five heavy-duty fans provide cooling for the chassis. These fans circulate air The SC227 chassis features a single backplane in the chassis. -
Page 51: Installing The Backplane
SUPERSTORAGESYSTEM SSG-2028R-DN2R24L User's Manual Chapter 6: Advanced Chassis Setup 6-13 Removing and Installing the Midplane Installing the Backplane Installing the Backplane Into the Chassis 1. Power down the system and remove the power cords as described in Section Removing the Midplane 6-3. -
Page 52: Installing The Midplane
SUPERSTORAGESYSTEM SSG-2028R-DN2R24L User's Manual Installing the Midplane Installing the Midplane Into the Chassis 1. Power down the system as described in Section 6-3 and open the chassis covers as described in Sections 6-4 and 6-5. 2. Put the midplane into the midplane bracket, aligning the holes in the midplane with those in the bracket. -
Page 53: Chapter 7 Bios
When an option is selected in the left frame, it is highlighted in white. Often a text message will accompany it. Note: the AMI BIOS has default text messages built in. Supermicro retains the option to include, omit, or change any of these text messages. -
Page 54: How To Start The Setup Utility
Flashing the wrong BIOS can cause irreparable damage to the system. In no event shall Supermicro X10DSN-TS Supermicro be liable for direct, indirect, special, incidental, or consequential damages arising from a BIOS update. If you have to update the BIOS, do not shut down or reset BIOS Version: This item displays the version of the BIOS ROM used in the the system while the BIOS is updating. -
Page 55: Advanced Setup Configurations
SUPERSTORAGESYSTEM SSG-2028R-DN2R24L User's Manual Chapter 7: AMI BIOS Advanced Setup Configurations Wait For 'F1' If Error Select Enabled to force the system to wait until the <F1> key is pressed when an Use the arrow keys to select Advanced setup and press <Enter> to access the error occurs. - Page 56 SUPERSTORAGESYSTEM SSG-2028R-DN2R24L User's Manual Chapter 7: AMI BIOS Restore on AC Power Loss Cores Enabled Use this feature to set the power state after a power outage. Select Power Off for This feature allows the user to determine the number of CPU cores to be enabled.
- Page 57 SUPERSTORAGESYSTEM SSG-2028R-DN2R24L User's Manual Chapter 7: AMI BIOS Direct Cache Access (DCA) Energy Performance Bias Setting (Available when Power Technology is set to Custom or Energy Efficient) Select Enable to use Intel DCA (Direct Cache Access) Technology to improve the efficiency of data transferring and accessing.
- Page 58 SUPERSTORAGESYSTEM SSG-2028R-DN2R24L User's Manual Chapter 7: AMI BIOS CPU C State Control (Available when Power Technology Chipset Configuration is set to Custom) Warning! Please set the correct settings for the items below. A wrong configuration setting may cause the system to malfunction.
- Page 59 SUPERSTORAGESYSTEM SSG-2028R-DN2R24L User's Manual Chapter 7: AMI BIOS IOU1 (IIO1 PCIe Port 3) IOAT Configuration This item configures the PCI-E port Bifuraction setting for a PCI-E port specified by the user. The options are x4x4x4x4, x4x4x8, x8x4x4, x8x8, x16, and Auto.
- Page 60 SUPERSTORAGESYSTEM SSG-2028R-DN2R24L User's Manual Chapter 7: AMI BIOS QPI (Quick Path Interconnect) Configuration Isoc Mode Select Enable for Isochronous support to meet QoS (Quality of Service) require- ments. This feature is especially important for Intel's Virtualization Technology. QPI General Configuration The options are Enable and Disable.
- Page 61 SUPERSTORAGESYSTEM SSG-2028R-DN2R24L User's Manual Chapter 7: AMI BIOS DIMM Information Demand Scrub Demand Scrubbing is a process that allows the CPU to correct correctable memory errors found on a memory module. When the CPU or I/O issues a This item displays the status of a DIMM module as detected by the AMI BIOS.
- Page 62 SUPERSTORAGESYSTEM SSG-2028R-DN2R24L User's Manual Chapter 7: AMI BIOS USB 3.0 Support sSATA Port 0~ Port 3 Select Enabled for USB 3.0 support. The options are Smart Auto, Auto, Enabled, This item displays the information detected on the installed on the sSATA port, and Disabled.
- Page 63 SUPERSTORAGESYSTEM SSG-2028R-DN2R24L User's Manual Chapter 7: AMI BIOS sSATA RAID Option ROM/UEFI Driver PCIE/PCI/PnP Configuration Select EFI to load the EFI driver for system boot. Select Legacy to load a legacy The following items will display: OPROM for system boot. The options are Disabled, EFI, and Legacy.
- Page 64 SUPERSTORAGESYSTEM SSG-2028R-DN2R24L User's Manual Chapter 7: AMI BIOS MMIO High Size Super IO Configuration Use this item to select the high I/O memory size according to memory-address Super IO Chip AST2400 mapping for the PCH chip. The options are 256G, 128G, 512G, and 1024G.
- Page 65 SUPERSTORAGESYSTEM SSG-2028R-DN2R24L User's Manual Chapter 7: AMI BIOS COM 1 Console Redirection Settings Recorder Mode Select Enabled to capture the data displayed on a terminal and send it as text messages to a remote server. The options are Disabled and Enabled.
- Page 66 SUPERSTORAGESYSTEM SSG-2028R-DN2R24L User's Manual Chapter 7: AMI BIOS SOL Console Redirection Settings VT-UTF8 Combo Key Support Select Enabled to enable VT-UTF8 Combination Key support for ANSI/VT100 Use this feature to specify how the host computer will exchange data with the client terminals.
- Page 67 SUPERSTORAGESYSTEM SSG-2028R-DN2R24L User's Manual Chapter 7: AMI BIOS EMS Console Redirection Settings (Available when EMS Enabling TPM in the BIOS Console Redirection is enabled) The steps below describe the proper procedure on how to enable the TPM in the Use this feature to specify how the host computer will exchange data with the client BIOS.
-
Page 68: Event Logs
Add an Attempt work properly. (EV DFX is under "IIO Configuration" in the "Chipset/North Bridge" submenu on Page 4-10). For more information on TPM, please Delete Attempts refer to the TPM manual at http://www.supermicro.com/manuals/other/ AOM-TPM-9655V_9655H.pdf Change Attempt Order ACPI Settings ... -
Page 69: Ipmi
SUPERSTORAGESYSTEM SSG-2028R-DN2R24L User's Manual Chapter 7: AMI BIOS Change SMBIOS Event Log Settings View SMBIOS Event Log This item allows the user to view the event in the SMBIOS event log. The following This feature allows the user to configure SMBIOS Event settings. -
Page 70: Security Settings
SUPERSTORAGESYSTEM SSG-2028R-DN2R24L User's Manual Chapter 7: AMI BIOS Erasing Settings Station MAC Address This item displays the Station MAC address for this computer. Mac addresses are Erase SEL 6 two-digit hexadecimal numbers. Select Yes, On next reset to erase all system event logs upon next system reboot. - Page 71 SUPERSTORAGESYSTEM SSG-2028R-DN2R24L User's Manual Chapter 7: AMI BIOS Administrator Password Enroll All Factor Default Keys Use this feature to set the administrator password which is required before entering Select Enable to install all manufacturer defaults for the following system security the BIOS setup utility.
-
Page 72: Boot Settings
SUPERSTORAGESYSTEM SSG-2028R-DN2R24L User's Manual Chapter 7: AMI BIOS Boot Settings When the item above -"Boot Mode Select" is set to Legacy, the following items will be display for configuration: This submenu allows the user to configure Boot settings for this system: •... -
Page 73: Save & Exit
SUPERSTORAGESYSTEM SSG-2028R-DN2R24L User's Manual Chapter 7: AMI BIOS Save & Exit Restore Defaults Select this item and press <Enter> to load the manufacture default settings which This submenu allows the user to configure the following Save & Exit settings: are designed for maximum system performance but not for maximum stability. - Page 74 SUPERSTORAGESYSTEM SSG-2028R-DN2R24L User's Manual Notes 7-42...
-
Page 75: Appendix A Bios Post Error Codes
Appendix A: BIOS POST Error Codes Appendix A BIOS POST Error Codes During the POST (Power-On Self-Test) routines, which are performed at each system boot, errors may occur. Non-fatal errors are those which, in most cases, allow the system to continue to boot. - Page 76 UPER ERVER SSG-2028R-DN2R24L User's Manual Notes...
-
Page 77: Appendix B System Specifications
Appendix B System Specifications Processors The system supports dual E5-2600 v3/v4 series processors in two Socket R3- LGA 2011 sockets. Note: Please refer to the Supermicro web site for a complete listing of supported processors. Chipset C612 BIOS 128 Mb SPI AMI BIOS SM Flash BIOS... - Page 78 SUPERSTORAGESYSTEM SSG-2028R-DN2R24L User's Manual Appendix B: System Specifications Serverboard Regulatory Compliance X10DSN-TS (Proprietary form factor) Electromagnetic Emissions: FCC Class A, EN 55032 Class A, EN 61000-3-2/-3-3, Dimensions: (LxW) 13.85" x 11.80" (351.79 mm x 299.72 mm) CISPR 22 Class A...
- Page 79 Notes (continued from front) The products sold by Supermicro are not intended for and will not be used in life support systems, medical equipment, nuclear facilities or systems, aircraft, aircraft devices, aircraft/emergency com- munication devices or other critical systems whose failure to perform be reasonably expected to result in significant injury or loss of life or catastrophic property damage.
-
Page 80: Appendix C Uefi Bios Recovery Instructions
Flashing the wrong BIOS can cause irreparable damage to the system. In no event shall Supermicro be liable for direct, indirect, special, incidental, or consequential damages arising from a BIOS update. If you need to update the BIOS, do not shut down or reset the system while the BIOS is updating to avoid possible boot failure. - Page 81 Root "\" Directory of a USB device or a writeable CD/DVD. Note: If you cannot locate the "Super.ROM" file in your driver disk, visit our website at www.supermicro.com to download the BIOS image into a USB flash device and rename it "Super.ROM" for BIOS recovery use.
- Page 82 SUPERSTORAGESYSTEM SSG-2028R-DN2R24L User's Manual Note: Do not interrupt the process of BIOS flashing until it is completed. 6. After the process of BIOS recovery is completed, press any key to reboot the system. 7. Using a different system, extract the BIOS package into a bootable USB flash drive.
Need help?
Do you have a question about the SuperStorageSystem SSG-2028R-DN2R24L and is the answer not in the manual?
Questions and answers