Table of Contents
Advertisement
Quick Links
Advertisement
Table of Contents

Subscribe to Our Youtube Channel
Related Manuals for ORiNG IGR-20 Series


Summary of Contents for ORiNG IGR-20 Series
- Page 1 ’ ’...
- Page 2 Please refer to the Technical Specifications section for more details. WARRANTY ORing warrants that all ORing products are free from defects in material and workmanship for a specified warranty period from the invoice date (5 years for most products). ORing will repair or replace products found by ORing to be defective within this warranty period, with shipment expenses apportioned by ORing and the distributor.
-
Page 3: Table Of Contents
Tables of Content Getting to Know your Router ............... 1 Overview .......................... 1 Software Features ......................1 Hardware Features ......................1 Hardware Installation ..................2 Installation Router on DIN-Rail ..................2 Wall Mounting Installation ....................3 Hardware Overview ..................5 Front Panel ........................ - Page 4 5.3.4 System Status ......................40 System Info .......................... 40 System Log........................... 41 Traffic Statistics ........................41 Technical Specifications ................42 Compliance ....................43...
-
Page 5: Getting To Know Your Router
LAN. In addition, multiple types of WAN connection are provided for easily access to the internet. The ORing IGR-20 router's VPN capability creates encrypted "Virtual Tunnels" through the internet, allowing remote or traveling users for secured connection with the network in your office. -
Page 6: Hardware Installation
IGR-20 Series User’s Manual Hardware Installation Installation Router on DIN-Rail Each router has a DIN-Rail kit on rear panel. The DIN-Rail kit helps router to fix on the DIN-Rail. Step 1: Slant the router and mount the metal spring to DIN-Rail. -
Page 7: Wall Mounting Installation
IGR-20 Series User’s Manual Wall Mounting Installation Each router has another installation method to fix the router. A wall mount panel can be found in the package. The following steps show how to mount the router on the wall: Step 1: Remove DIN-Rail kit. - Page 8 IGR-20 Series User’s Manual The screws specification shows in the following two pictures. In order to prevent the routers from any damage, the screws should not larger than the size that used in IGR-20 series. Pozidrive Step 3: Mount the combined on the wall.
-
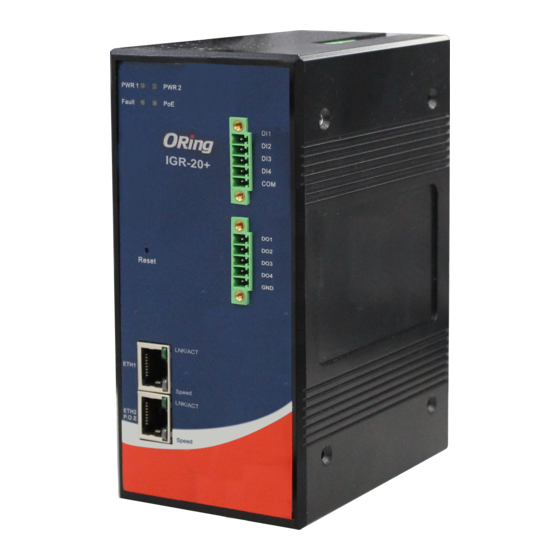
Page 9: Hardware Overview
Duplex: auto PoE PD Port ETH2 (WAN port) of IGR-20+ compliant with IEEE802.3af PoE specifications and can be connected to PoE switches.* *Note: Please refer to the products of ORing IPS series for P.O.E. Ethernet switch. ORing Industrial Networking Corp. -
Page 10: Front Panel Leds
IGR-20 Series User’s Manual Front Panel LEDs Color Status Description PWR1 Green Green On DC power 1 activated. Green Green On PWR2 DC power 2 activated. Green/Amber Port link up at 10Mbps /1000Mbps. ETH1 Port link up at 100Mbps. Green Blinking Data transmitted. -
Page 11: Management Interface
IGR-20 Series User’s Manual anagement Interface First-time Installation Before installing IGR-20, you need to access router by a computer equipped with an Ethernet card. Basic connection for IGR-20 Step 1: Select the Power Source IGR-20 router can be powered by +12~48V DC power input, or by P.O.E. (Power over Ethernet) PSE Ethernet switch. - Page 12 IGR-20 Series User’s Manual Login screen Step 4: Select WAN connection type Click the Basic Setting in the top menu to enter the WAN configuration page, select the proper connection type according to the information of your ISP. If you use modem/3G as...
-
Page 13: Configure The Router
IGR-20 Series User’s Manual Step 6: Review the router settings and check router status Click the System Status in the top of the menu, the system info page will be shown. You can check all the configuration and status of the router. -
Page 14: Main Interface
IGR-20 Series User’s Manual Main Interface The Home screen will be shown when login successfully. Main Interface In the page, you can check the Firmware version, the router running time and the WAN IP setting. The following table describes the labels in this screen. -
Page 15: Basic Setting
IGR-20 Series User’s Manual 5.3.1 Basic Setting The IGR-20 provides 2 types of WAN connection. 1. WAN Connection Type: Dynamic/Static IP Dynamic/Static IP The following table describes the labels in this screen. Label Description Obtain an IP address Select this option if you would like to have an IP address assigned automatically automatically from the WAN port by DHCP server in your network. - Page 16 IGR-20 Series User’s Manual 2. WAN Connection Type: PPPoE PPPoE Screen. The following table describes the labels in this screen. Label Description User Name / Enter the username & password provided by your Internet Password Service Provider (ISP). Service Name Enter the service name provided by your ISP.
-
Page 17: Lan
IGR-20 Series User’s Manual These are the IP settings of the LAN interface for the IGR-20. The LAN IP address is privately for your internal network and can not be exposed on the Internet. LAN Screen The following table describes the labels in this screen. - Page 18 IGR-20 Series User’s Manual 1. DHCP Sever DHCP Server Screen The following table describes the labels in this screen. Label Description DHCP Mode Select built-in DHCP server or DHCP Forwarder DHCP Server Enable or Disable the DHCP Server. The default setting is...
-
Page 19: Ddns
IGR-20 Series User’s Manual List of DHCP Range List DHCP Relay IP range for relay Choose a Client to The list shows the MAC addresses and IP addresses that are Edit already assigned by IGR-20. Choose one from the list and click Copy to button for editing. - Page 20 IGR-20 Series User’s Manual Date & Time Screen The following table describes the labels in this screen. Label Description Local Date Set local date manually. Local Time Set local time manually. Time Zone Select the time zone manually Get Current Date &...
-
Page 21: Networking Setting
IGR-20 Series User’s Manual 5.3.2 Networking Setting NAT Setting 1. Virtual Server Virtual Server is used for setting up public services on the LAN, such as DNS, FTP and Email. Virtual Server is defined as a Local Port to the LAN servers, and all requests from Internet to this Local port will be redirected to the computer specified by the Local IP. - Page 22 IGR-20 Series User’s Manual 2. DMZ It allows a computer to be exposed to the Internet. This feature is useful for gaming purposes. Enter the IP address of the internal computer that will be the DMZ host. Adding a client to the DMZ may expose your local network with variety of security risks, so only use this option carefully.
-
Page 23: Firewall Setting
IGR-20 Series User’s Manual The following table describes the labels in this screen. Label Description UPnP Enable or disable UPnP. Enable NAT-PMP NAT-PMP allows a computer in a private network (behind a NAT router) to automatically configure the router to allow parties outside the private network to contact with each other. - Page 24 IGR-20 Series User’s Manual The following table describes the labels in this screen. Label Description IP Filter Enable or disable the IP Filter. Description Enter description for the entry. Rule Select DROP, ACCEPT and REJECT rule for the entry. Direction Specify the direction of the data flow that is to be filtered.
-
Page 25: Vpn Setting
IGR-20 Series User’s Manual VPN Setting VPN Setting is settings that are used to create virtual private tunnels to remote VPN gateways. The tunnel technology supports data confidentiality, data origin, authentication and data integrity of network information by utilizing encapsulation protocols, encryption algorithms, and hashing algorithms. - Page 26 IGR-20 Series User’s Manual The following topology shows the common use of VPN connection from WAN side. 1: Open VPN Server Connection to Open VPN Server Before connecting to the Openvpn server of IGR-20 , please install openvpn client software for your windows PC. It can be download from http://openvpn.net/download.html#stablel.
- Page 27 IGR-20 Series User’s Manual 2: Open VPN Client Two routers are needed for creating site-to-site VPN connection using this mode. The following table describes the labels in this screen. Label Description Open VPN Client Enable or disable the function of Open VPN Client. You can allow or deny the Open VPN Client with this option.
- Page 28 IGR-20 Series User’s Manual The chart above displays the connection of Open VPN Server and Client. The Server IP and Client IP address should configure with the same network domain. 2. PPTP VPN The PPTP (Point to Point Tunneling Protocol) VPN feature allows PC connected to the router from WAN port, just like connecting in the LAN.
- Page 29 IGR-20 Series User’s Manual The following topology shows the common use of PPTP connection from the internet. Connection to PPTP VPN Server The following table describes the labels in this screen. Label Description PPTP Server Enable or disable PPTP VPN Server.
- Page 30 IGR-20 Series User’s Manual 3. PPTP Client If the router A want to link with the others which is not in the same network with the router A, the function of PPTP client should support in the router page. PPTP VPN Line...
- Page 31 IGR-20 Series User’s Manual Label Description PPTP Client Enable or disable PPTP Client. Server Enter the server IP address or hostname. IP/Hostname Username/Pass Enter the username and password which is signed by PPTP server. word Option Reconnect on failure: Pitch on this option, it will be reconnect when the link is on failure.
-
Page 32: Vrrp
IGR-20 Series User’s Manual VRRP Routing Protocol (Routing Setting) This page shows the information of routing table. The initial state of the router connect to the WAN, it will be based on the outside networks to access the routing table automatically. You can refer the shows about the bellow page. - Page 33 IGR-20 Series User’s Manual Use Dynamic Routing Use the dynamic routing, you should not choose “Disable” about the RIPv1 & v2 in the routers. Click “Apply”, and you can see the more information in the Current Routing Table, which shows the network segment of the other router.
- Page 34 IGR-20 Series User’s Manual Use Static Routing Use the Static routing, you should choose “Disable” about the RIPv1 & v2 in the routers. Click “Apply”, and you can see the more information in the Current Routing Table and Static Route Entry, which shows the network segment of the other router.
- Page 35 IGR-20 Series User’s Manual The Routing Topography RIP, Routing Information Protocol, is a dynamic routing protocol used in local and wide area networks. As such it is classified as an interior gateway protocol (IGP) using the distance-vector routing algorithm. After all settings, PC1 can visit PC2 which is different network segment of the PC1.
-
Page 36: System Tools
IGR-20 Series User’s Manual 5.3.3 System Tools Login Setting At this page, the administrator can change the login name and password. The default name and password is admin and admin. Login Setting Screen The following table describes the labels in this screen. -
Page 37: Router Restart
IGR-20 Series User’s Manual Port Choose the web management page port number. For HTTP, default port is 80; For HTTPS, default port is 443. HTTPS (HTTP over SSL) is a Web protocol which encrypts and decrypts user page requests as well as the pages that are returned by the Web server. -
Page 38: Save/Restore Configurations
IGR-20 Series User’s Manual Save/Restore Configurations Save/Restore Configurations Screen Save: The configuration file can be downloaded. (Internet Explorer user will need to click on the protection bar on top and click choose “download files”) The following table describes the labels in this screen. -
Page 39: Miscellaneous (Ping)
IGR-20 Series User’s Manual Miscellaneous (Ping) Miscellaneous Screen The Ping Test is used to send Ping packets to test if a computer whether it is on the Internet or test if the WAN connection is OK. Enter a domain or IP in the destination box and click Ping to test. -
Page 40: Even Warning Setting
IGR-20 Series User’s Manual Even warning setting 1. System Log System Log setting interface The following table describes the labels in this screen. Label Description Syslog Server IP Not only the syslog keeps the logs locally, it can also log to remote server. - Page 41 IGR-20 Series User’s Manual 2. E-Mail E-Mail setting interface The following table describes the labels in this screen. Label Description SMTP Server Simple Message Transfer Protocol, enter the backup host to use if primary host is unavailable while sending mail by SMTP server.
- Page 42 IGR-20 Series User’s Manual Server Port Specify the port where MTA can be contacted via SMTP server. E-mail Address 1-4 Inputs specify the destination mail address. 3.SNMP SNMP setting interface ORing Industrial Networking Corp.
- Page 43 IGR-20 Series User’s Manual The following table describes the labels in this screen. Label Description SNMP Agent SNMP (Simple Network Management Protocol) Agent is a service program that runs on the access point. The agent provides management information to the NMS by keeping track of various operational aspects of the AP system.
-
Page 44: Dido
IGR-20 Series User’s Manual DIDO 5.3.4 System Status System Info System Info Screen This page displays the details information for the router including model name, model description, firmware version, WAN, LAN settings. ORing Industrial Networking Corp. -
Page 45: System Log
IGR-20 Series User’s Manual System Log System Log Screen The router keeps a running log of events and activities occurring on the router, several filters are provided for displaying related log entries. Click the button 'Refresh' to refresh the page. -
Page 46: Technical Specifications
IGR-20 Series User’s Manual echnical Specifications LAN Interface Ethernet Ports 2 x 10/100/1000Base-T(X), Auto MDI/MDI-X Protocols IP, TCP, UDP, DHCP, BOOTP, ARP/RARP, DNS, SNMP MIB II, HTTPS, SNMPV1/V2, Trap, Private 3 x LEDs, PWR1(2)(PoE) / Ready: LED Indicators 1) Red On: Power is on and booting up. -
Page 47: Compliance
IGR-20 Series User’s Manual Rail Traffic EN60950-1 Compliance FCC Statement This device complies with Part 15 of the FCC Rules. Operation is subject to the following two conditions: (1) this device may not cause harmful interference and (2) this device must accept any interference received, including interference that may cause undesired operation. - Page 48 IGR-20 Series User’s Manual Industry Canada Statement This device complies with Industry Canada licence-exempt RSS standard(s). Operation is subject to the following two conditions: (1) this device may not cause interference, and (2) this device must accept any interference, including interference that may cause undesired operation of the device.
- Page 49 IGR-20 Series User’s Manual RF exposure warning: The equipment complies with RF exposure limits set forth for an uncontrolled environment. The antenna(s) used for this transmitter must not be co-located or operating in conjunction with any other antenna or transmitter.
Need help?
Do you have a question about the IGR-20 Series and is the answer not in the manual?
Questions and answers