Advertisement
Quick Links
I n s t a l l a t i o n Gu i d e
S i g n a t u r e 1 2 k W
S t e a m Ge n e r a t o r
S h o u l d y o u r e q u i r e a d d i t i o n a l a s s i s t a n c e wi t h t h e
i n s t a l l a t i o n o f y o u r p r o d u c t ,
p l e a s e c a l l 0 1 9 0 8 3 1 7 5 1 2
o r e ma i l
c u s t o me r s e r v i c e s @i n s i g n i a s h o we r s . c o m.
Advertisement

Subscribe to Our Youtube Channel
Related Manuals for Insignia AIO 7.5kW


Summary of Contents for Insignia AIO 7.5kW
- Page 1 I n s t a l l a t i o n Gu i d e S i g n a t u r e 1 2 k W S t e a m Ge n e r a t o r S h o u l d y o u r e q u i r e a d d i t i o n a l a s s i s t a n c e wi t h t h e i n s t a l l a t i o n o f y o u r p r o d u c t , p l e a s e c a l l 0 1 9 0 8 3 1 7 5 1 2...
- Page 2 www.insigniashowers.com Last Modified: 06/05/2022 INSTALLATION MANUAL Signature Steam Generators 30 Day Technical Support: Call 01908 317512 and request technical support for aiding your installation. Replacements Parts: Inside of your warranty period visit: https://www.insigniashowers.com, click support and make a warranty claim. Spares/Replacements Parts: Outside of your warranty period visit https://www.insigniashowers.com/replacement-parts.html...
-
Page 3: Table Of Contents
www.insigniashowers.com Last Modified: 06/05/2022 Contents Thank you for your purchase Water Processor Installation Installation Advice Emergency Alarm System Installation Commercial Mode — Fast Steam Models, Parameters and Dimensions Door Control System Steam Generator Construction Installation Diagram Installation of the Steam Generator Body Central Function Box Electrics Control Panel Installation... - Page 4 Last Modified: 06/05/2022 Thank you for your recent purchase of an Insignia steam generator. Please read this booklet with great care to ensure you get the best out of your install and have a steam unit that will last for many years to come! Like everything, in order to obtain a first class product that will serve you well for many years, the effort and correctness put into the install will reflect in the quality of your finish.
-
Page 5: Installation Advice
www.insigniashowers.com Last Modified: 06/05/2022 Installation Advice If the generator is installed at a place where access is difficult, the water supply valve must be easy to access for emergencies. A GFCI must be installed on the power supply, power wire, fuse and breaker must comply with the nameplate on the unit and the table (next page). The solenoid valve can endure maximum 0.8MPa (8kg/cm2) water pressure. - Page 6 Power Wire Breaker Room Volume Dimensions Number x kW Number x Amps m³ Length x Width x Height AIO 7.5kW 3 x 2.5 215-240/33.75 3 x 6.0 6.5—9 475 x 185 x 450 AIO 7.5kW 3 x 2.5 380-415/11.25 5 x 2.5 6.5—9...
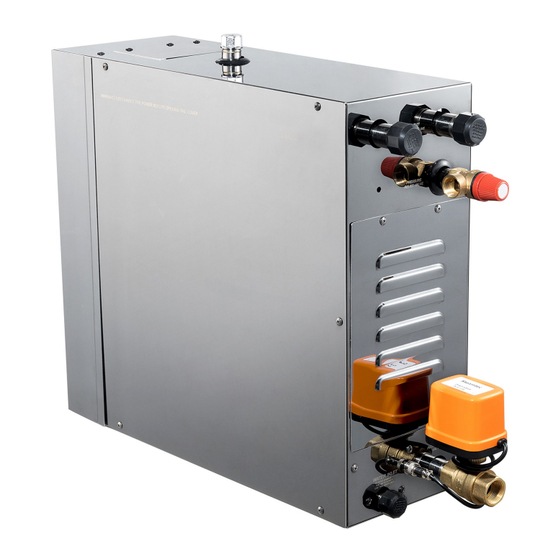
- Page 7 www.insigniashowers.com Last Modified: 06/05/2022 Steam Generator Construction Front Cover Wire entry hole Small cover Sub-board (relay board) Wire terminal U shape cover Water inlet position Steam outlet Water level sensor Inner tank Back Cover Water inlet hose Solenoid water inlet valve Element access cover Heating elements Base Plate...
- Page 8 www.insigniashowers.com Last Modified: 06/05/2022 Steam Generator Construction Steam outlet Safety valve Heating elements Solenoid water inlet valve Drain valve Drain pipe High-temperature protection Wire terminal Sub-board (relay) Water level sensor Temperature sensor Inner water tank Central box Controller...
- Page 9 www.insigniashowers.com Last Modified: 06/05/2022 Installation of steam generator body Switch off all power supply before installation, and check whether you have the correct model for your steam room according to table (page 5). Do not install the generator outdoors, in wet, freezing, or corrosive places. Do not install the generator near to inflammables such as oil paint, diluents and fuel.
-
Page 10: Central Function Box
www.insigniashowers.com Last Modified: 06/05/2022 Central Function Box APP (Not functional) Steam room temperature sensor Controller Steam room humidity sensor Fast steam switch Coloured lights Steam generator 12-core cable socket corresponding functions Salt spray generator Aroma pump Descaling pump Connector to the steam generator Power supply 12V DC... - Page 11 www.insigniashowers.com Last Modified: 06/05/2022 Control Panel Installation The control panel should be installed at chest height for the user, inside or outside the steam room, whichever is most convenient for your setup. Create a recess as shown, install the housing box, tile to the edge of the housing box, ensure cabling is pulled through, connect the control panel and then place the control panel into the recess.
- Page 12 www.insigniashowers.com Last Modified: 06/05/2022 Installation of temperature sensor The control wire and temperature wire should not be parallel to the c ontrol w ire power wire. ing b ox The control wire and temperature wire should not intersect with the w ire p ip e Ceiling power wire.
-
Page 13: Pipeline Installation
www.insigniashowers.com Last Modified: 06/05/2022 Installation of Pipeline — 7.5kW Generator 7.5 kW Generator Service hole 1/2” Steam Outlet: 3/4” Safety Valve 1/2” Water Inlet 1/2” Drain Outlet 3/4” Power Supply for Drain Valve... - Page 14 www.insigniashowers.com Last Modified: 06/05/2022 Installation of Pipeline — 10.5kW/12kW Generator 10.5kW/12kW Generator Service hole 1/2” Steam Outlet: 3/4” Safety Valve 1/2” Water Inlet 1/2” Drain Outlet 3/4” Power Supply for Drain Valve...
- Page 15 www.insigniashowers.com Last Modified: 06/05/2022 Installation of Pipeline — 15kW Generator 15kW Generator Service hole 1/2” Steam Outlet: 3/4” x2 Safety Valve 1/2” Water Inlet 1/2” Drain Outlet 3/4” Power Supply for Drain Valve heating element 1 heating element 2 heating element 3 heating element 4 heating element 5 heating element 6...
- Page 16 www.insigniashowers.com Last Modified: 06/05/2022 Installation of Pipeline — 18kW Generator 18kW Generator Service hole 1/2” Steam Outlet: 3/4” x2 Safety Valve 1/2” Water Inlet 1/2” Drain Outlet 3/4” Power Supply for Drain Valve heating element 1 heating element 2 heating element 3 heating element 4 heating element 5 heating element 6...
- Page 17 www.insigniashowers.com Last Modified: 06/05/2022 Installation of the Generator Water Inlet: First connect the water treatment cartridge (if applicable) to the water inlet solenoid valve. Then use a 1/2’’ flexible stainless steel hose to connect the other side of the water treatment cartridge and the water supply pipeline. Do not connect to metal water supply pipeline directly as it could damage the water inlet valve.
- Page 18 www.insigniashowers.com Last Modified: 06/05/2022 Installation of the Generator Safety Valve: This is to release the pressure of steam generator. Use 1/2’’ copper pipe or stainless steel pipe to connect the safety valve and the drain pipeline of the house. DO NOT block it. Steam Head: The steam head should be about 300mm from the ground and at least 150mm from the installed seating.
-
Page 19: Lights Installation
www.insigniashowers.com Last Modified: 06/05/2022 Accessories Installation: Lights Control Panel Installation of lights Power Adaptor • Light size: 68 x 50mm • Light voltage: AC 12V Control Box • Working current: 100mA • Working temperature: -10°C to +70°C • Watts: 1.22W/PC Synchroniser Open a hole 52mm on the ceiling, put the light into the hole, screw the rubber ring from the backside. - Page 20 www.insigniashowers.com Last Modified: 06/05/2022 Accessories Installation: Aroma Pump WARNING: • NEVER use pure (100% concentration) aroma oil, as it will damage the machine. You must use some carrier oil (such as grapeseed oil, wheat germ oil, sweet almond oil, evening primrose oil etc.) to dilute and make concentration less than 50%.
- Page 21 www.insigniashowers.com Last Modified: 06/05/2022...
- Page 22 www.insigniashowers.com Last Modified: 06/05/2022 Accessories Installation: Aroma Pump Locate the aroma pump system to somewhere you can easily monitor the consumption of essential oils and for easy oil replacement. The aroma pump system is designed and intended for indoor use only, should be located indoors in a dry clean location and not subject to moisture, condensation or similar high humidity environments.
- Page 23 www.insigniashowers.com Last Modified: 06/05/2022 Accessories Installation: Descaling Pump System Cautions 1. Should be installed where it’s convenient to check amount of descaling liquid. 2. Should installed indoor only and installed in a dry, clean environment. 3. Should be installed vertically, around 1.5m away from the ground. 4.
- Page 24 www.insigniashowers.com Last Modified: 06/05/2022 Accessories Installation: Fan All circuits should be installed by licensed electricians and conform to local and national codes. Mains power supply must be cut off before installation, maintenance, and repair. Pressing the on/off button on the controller does NOT cut the power from the supply.
- Page 25 www.insigniashowers.com Last Modified: 06/05/2022 Installation of the Fan Fix the support Connect the ducts Place the motor body in position and secure Carry out the connections The low profile design of the fan makes it the most effective solution for installations where space is restricted. Unscrew and open the wiring box Connect the neutral wire and live wire EU type 220 V single phase: Connect “N”...
- Page 26 www.insigniashowers.com Last Modified: 06/05/2022 Installation of the Salt Spray Generator The generator is able to atomize salt water into tiny particulates and mix in the air for breathing and absorbed by skin, this is good for health. Power supply: AC110-240V Spray head working voltage: 36V Working Current: 880mA Rated Power: 20W±5...
- Page 27 www.insigniashowers.com Last Modified: 06/05/2022 Functions and Operations—Salt Steam Generator Attention: • Do NOT turn on the salt spray generator if there is no salt water in the bottles. • The generator central box must not be installed in areas that are highly acidic, high in moisture, explosive or flammable. •...
- Page 28 www.insigniashowers.com Last Modified: 06/05/2022 Accessories Installation: Water Processor The Water Processor (magnetic scale reducer) works by reducing the random bonding of the calcium and magnesium molecules that cause limescale buildup. Magnetic scale reducers encourage coagulation, by reducing the random bonding of the calcium and magnesium molecules that cause lime- scale buildup.
- Page 29 www.insigniashowers.com Last Modified: 06/05/2022 Technical Specification: Water Treatment Cartridge • Dimensions: 51mm x 160mm • Materials: Stainless Steel 304 • Water flow: Direction noted on the side of the cartridge • Scale inhibition theory: Magnetic lines cutting • Suitable water temperature: 2°C — 120°C •...
- Page 30 www.insigniashowers.com Last Modified: 06/05/2022 Accessories Installation: Emergency Alarm System The Emergency Alarm System is designed for commercial use in places like spa centers, heath clubs, etc. With the Emergency Alarm System, the user can press the Emergency button which is located inside the steam room, then the system will send out the buzzing sound to alert the staff, whilst stopping the steam generator at the same time.
-
Page 31: Commercial Mode - Fast Steam
www.insigniashowers.com Last Modified: 06/05/2022 Accessories Installation: Commercial Mode — Fast Steam Commercial mode-fast steam function is designed for commercial use in places like spa centers, health clubs, etc. Under commercial mode, the water tank always keeps the water temperature at 80°C, once the customer enters into the steam room and presses the “fast steam”... - Page 32 www.insigniashowers.com Last Modified: 06/05/2022 Commercial model operating guide Turn on the steam generator by pressing the ON/OFF button on the main controller on the steam generator which in turn will begin to heat up the water. Once 80°C has been reached the steam generator will be in standby mode, ready for use. When the fast steam button is pressed, steam will be produced in approx.
- Page 33 www.insigniashowers.com Last Modified: 06/05/2022 Accessories Installation: Door Control System With this system, if the steam room door is opened more than one minute, the system will turn off the steam generator automatically. The system should be installed on the external wall of the steam room. Power Adapter for the door control system Glass Door Sensor—...
-
Page 34: Installation Diagram
www.insigniashowers.com Last Modified: 06/05/2022 Installation Diagram... -
Page 35: Electrics
www.insigniashowers.com Last Modified: 06/05/2022 Electrics: All circuits should be installed by licensed electricians and conform to local and national codes. Power supply must be cut off before installation, maintenance and repair. Pressing the on/off button on the controller will NOT cut off the power supply. - Page 36 Heat Drain valve preservation Commercial model instructions To see our tutorial videos for operating the Insignia Signature Control Panel, please search for “Insignia Showers” on YouTube and find our “Insignia Signature Control Panel Guide” playlist, or you can click here...
- Page 37 www.insigniashowers.com Last Modified: 06/05/2022 IMPORTANT: Each first touch will ‘wake up’ the touch panel, which is denoted by the buttons lighting up. Function and selection buttons will only work once lit. Exhaust fan: Press the Fan Button to toggle it ON/OFF. The fan operates by default for 5 minutes, which can be modified by continuously pressing ’SET’ and cycling through the interface until the ’FAN’...
- Page 38 www.insigniashowers.com Last Modified: 06/05/2022 Aroma pump: Press the Aroma Pump Button to toggle it ON/OFF. There are two aroma pumps connected. Aroma Pump A and Aroma Pump B, to allow two types of oil. To change which pump dispenses oil, continuously press ’SET’ and cycle through the interface until the aroma pump icon is shown then press the arrow to change from A to B Pump or vice versa.
- Page 39 www.insigniashowers.com Last Modified: 06/05/2022 Auto Functions Auto filling: The inlet valve will open automatically once the system has started and fill water until the water level reaches it’s maximum level. If the water level is still lower than the minimum water level 10 after minutes, it indicates a fault of the water supply system, so all heating elements will stop working. If the screen display shows “...
- Page 40 www.insigniashowers.com Last Modified: 06/05/2022 Maintenance: Any leakage of the steam will damage the equipment. To prevent any hazard, steam generators, steam head, parts and pipeline connections should be checked regularly. Clean the solenoid valve, water treatment cartridge and all the other sets in the pipeline regularly according to the local water quality and usage of the steam generator.
- Page 41 Repair can only be performed by qualified professionals, for more services or technical help please contact your retailer. Insignia Signature steam generator have a self-diagnose function, and some common faults will be displayed on the screen if they occur. Code...
- Page 42 www.insigniashowers.com Last Modified: 06/05/2022 Troubleshooting A manual resetting high temperature control switch is installed in the steam generator for over-heat protection. If temperature of the inner tank exceeds 115 °C, the switch will automatically disconnect power supply to heating element. In this case, it is necessary to disconnect the main power supply to steam generator, allow the unit to completely cool down and then carefully check heating elements, water level sensor, relay on sub-board and water supply pipeline.
-
Page 43: Warranty
For full details please visit www.insigniashowers.com/warranty-terms Tips for maintenance: If you buy the Insignia Signature auto descaling device, please follow its guideline, if not, please follow the instructions below for manually descaling your steam generator. How to descale the Steam Generator manually? There is a service hole on top of steam generator, you can pour descaling liquid through service hole, and let it sit in water tank for 4-8 hours, then flush. - Page 44 www.insigniashowers.com Last Modified: 06/05/2022 Steam Room Safety Guide Never leave children unattended in the vicinity of the steam room . Never allow children to use the steam function. This function is for ADULTS ONLY. Always be aware of the steam outlet position. Never use in close proximity to the person using it. Exit the steam room immediately if feeling dizzy, faint or short of breath.
- Page 45 (EEE) have to fulfil certain obligations. Under the WEEE directive Insignia is considered the producer of certain products we supply and in line with the demands of the legislation we are pleased to offer the op- portunity to return these products to us for treatment and recycling.
- Page 46 www.insigniashowers.com Last Modified: 06/05/2022...
Need help?
Do you have a question about the AIO 7.5kW and is the answer not in the manual?
Questions and answers