
Related Manuals for HOFFEN ASSC-H002


Summary of Contents for HOFFEN ASSC-H002
- Page 1 ASPIRADOR SEM SACO REF. ASSC-H002 BAGLESS VACUUM CLEANER REF. ASSC-H002 Manual de instruções Instruction manual...
- Page 2 Versão portuguesa pág. 3-18 Versão do manual: 06.2018 English version pag. 19-33 Last information update: 06.2018...
-
Page 3: Table Of Contents
ÍNDICE INTRODUÇÃO AVISOS DE SEGURANÇA Segurança eléctrica Utilizadores Segurança pessoal Utilização DESCRIÇÃO DO APARELHO DESCRIÇÃO GERAL ESPECIFICAÇÕES TÉCNICAS UTILIZAÇÃO DO APARELHO Montagem Funcionamento Escova multifunções Esvaziar o depósito Limpeza do filtro HEPA 14 RESOLUÇÃO DE PROBLEMAS LIMPEZA E ARRUMAÇÃO Limpeza Limpeza do exterior do aparelho Limpeza do filtro HEPA e filtro de saída de ar 17 Arrumação... -
Page 4: Introdução
INTRODUÇÃO Agradecemos a sua escolha. Este Aspirador sem Saco HOFFEN ref. ASSC-H002 irá facilitar o seu dia-a-dia. Leia este manual de instruções antes de o colocar em funcionamento, para que possa tirar o máximo partido do mesmo, e guarde-o para consulta futura. - Page 5 do aparelho ou com o cabo de alimentação. Não exponha o aparelho à humidade, não o utilize no exterior e mantenha-o afastado de fontes directas ou indirectas de água, como por exemplo, lavatórios, jarras, vasos, etc. No caso de derrame de qualquer líquido sobre a unidade do motor, desligue o aparelho imediatamente da fonte de alimentação e dirija-se à...
-
Page 6: Utilizadores
Utilizadores • Este aparelho pode ser utilizado por crianças de 8 ou mais anos e pessoas com capacidades físicas, sensoriais ou mentais reduzidas ou sem experiência e conhecimento para o seu manuseamento, se tiverem recebido supervisão ou instruções relativas à utilização do aparelho de forma segura e compreenderem os riscos envolvidos. - Page 7 perigoso e causar asfixia. Deve utilizar apenas os acessórios recomendados pelo fabricante e contidos nesta embalagem, sob o risco de acidente ou danos no aparelho. • Nunca desmonte ou tente efectuar qualquer tipo de reparação na unidade do motor. Caso não cumpra com esta norma de segurança pode colocar em risco a sua própria segurança e invalidar os termos da garantia.
-
Page 8: Utilização
• Este aparelho foi concebido apenas para uso doméstico. Qualquer outro uso será considerado impróprio e consequentemente perigoso. O fabricante não pode ser responsabilizado por nenhuns ferimentos ou danos resultantes do uso impróprio do aparelho. • Certifique-se que mantém cabelos, roupa, dedos, etc., afastados das entradas do aparelho e partes em movimento, a fim de evitar o sobreaquecimento, avaria, choque eléctrico ou... - Page 9 ou outro tipo de objectos incandescentes, sem que tenham arrefecido por completo. Não o utilize em superfícies molhadas ou cobertas de cimento, plástico, pó de pedra ou farinha. Não aspire pó demasiado fino, substâncias inflamáveis ou tóxicas quando inaladas e nunca aspire água ou qualquer outro líquido. Nota: aspirar objectos incandescentes pode incendiar o aparelho.
- Page 10 aparelho em funcionamento. • Quando o depósito estiver cheio deve ser limpo, para evitar o sobreaquecimento do aparelho. • Para evitar danos no aparelho, nunca o utilize sem que os diversos filtros estejam devidamente colocados. • No caso de dar este aparelho a alguém, certifique-se que lhe entrega também o manual de instruções. •...
-
Page 11: Descrição Do Aparelho
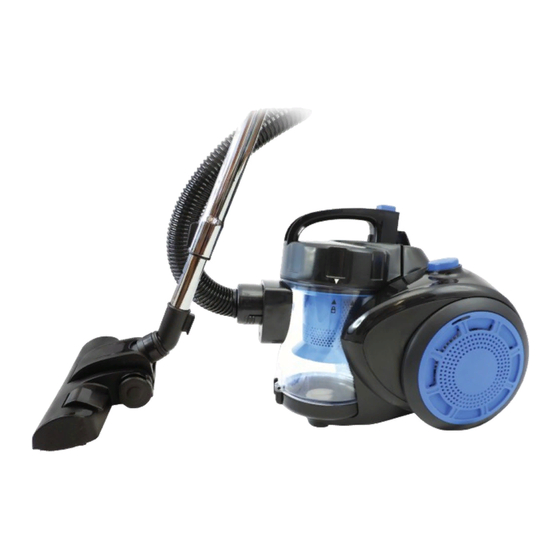
• DESCRIÇÃO DO APARELHO (Filtro de saída de ar que existe debaixo da tampa da roda traseira) [11]... -
Page 12: Descrição Geral
Potência de sucção: 180 Watts+-30W UTILIZAÇÃO DO APARELHO Com o Aspirador Sem Saco HOFFEN ASSC-H002 de elevada potência de sucção, a acção combinada de diversos filtros e o efeito ciclone, aspirar cada canto de sua casa vai ser muito mais simples e saudável. -
Page 13: Montagem
Montagem • Insira a mangueira flexível (E) na entrada (F) situada na parte frontal do depósito (H), até ouvir um clique. • Encaixe tubo extensível (C) na extremidade da mangueira (E). • Ajuste o comprimento do tubo extensível (C) deslizando para a frente botão (D) e puxando a parte inferior do tudo (C) para o comprimento desejado. Para fixar o tubo (C) no comprimento seleccionado, liberte o botão (D) para a sua posição original. • Seleccione o acessório mais indicado (A ou R), dependendo do tipo de superfície a limpar, e encaixe-o na extremidade do tubo extensível (C). • Aconselha-se a utilização dos acessórios na limpeza das seguintes superfícies: • Escova e chão de alta eficiência (A) - escova com dupla função, ideal para carpetes e soalhos; • Escova pequena para o pó com dupla função (R) - com as cerdas dobradas para trás, torna-se num bocal para fendas ideal para limpeza de fendas, cantos e superfícies de difícil acesso. Com as cerdas desdobradas torna-se ideal para a limpeza do pó... -
Page 14: Escova Multifunções
• Depois de usar, retire a mangueira flexível (E) do corpo do aparelho, pressionando a patilhas laterais existentes no encaixe da mangueira (E) e puxando-a para a retirar. • Recolha automaticamente o cabo de alimentação (K), pressionando o botão (L). Escova multifunções • Na parte de cima da escova do chão de alta eficiência (A) existe o botão (B) que liberta ou recolhe as cerdas e que devem ser libertadas ou recolhidas dependendo do tipo de superfície a limpar. • Para soalhos utilize a escova com as cerdas, pois as cerdas evitam riscos nas superfícies e permitem um deslizar mais suave. -
Page 15: Resolução De Problemas
mão rodar a tampa pela pega (G) no sentido contrário ao dos ponteiros do relógio, até alinhar a seta da tampa com o símbolo de cadeado aberto impresso no depósito (H). Depois levante a tampa, há-de então encontrar o filtro HEPA (Q) encaixado do suporte (O). Para desencaixar o filtro (Q) rode-o no sentido contrário ao dos ponteiros do relógio (siga a seta que indica “UNLOCK” (Desencaixar)). • Enxague o filtro HEPA (Q) e o suporte (O) com água corrente morna, sem utilizar quaisquer detergentes. Após enxaguar, deixe secar completamente o filtro (Q) e o suporte (O). Importante: o filtro Q) e o suporte (O) não devem ser montados no aparelho sem que tenham secado completamente. -
Page 16: Limpeza E Arrumação
A válvula para regular Feche válvula para o fluxo de ar (S) está regular o fluxo de ar (S). aberta. Desbloqueie os Os acessórios (A ou R), acessórios, removendo Fraca potência de o tubo extensível (C) ou os objectos ou lixo que sucção. mangueira flexível (E) estiverem a bloquear a estão entupidos. entrada de ar. Os diversos filtros não Verifique os filtros e estão bem colocados ou substitua-os por novos, estão demasiado sujos caso seja necessário. -
Page 17: Limpeza Do Filtro Hepa E Filtro De Saída De Ar
Limpeza do filtro HEPA e filtro de saída de ar • O filtro HEPA (Q) e o filtro de saída de ar (T) devem ser lavados utilizando simplesmente água morna corrente. Não devem ser utilizados detergentes ou quaisquer tipos de sabão, pois danificam os filtros (Q e T). • Após lavados os filtros (Q e T) só devem ser colocados no aparelho quando estiverem devidamente secos. Nunca utilize os filtros molhados ou húmidos. -
Page 18: Garantia
GARANTIA A garantia do produto é válida por dois anos. Em caso de mau funcionamento, o produto deve ser devolvido à loja onde foi comprado, juntamente com o comprovativo de compra. O produto deve estar completo e colocado na embalagem original. DECLARAÇÃO DE CONFORMIDADE UE Este aparelho está... - Page 19 INDEX INTRODUCTION SAFETY INSTRUCTIONS Electrical safety 20 Users Personal safety 22 Operation OVERVIEW OF THE APPLIANCE GENERAL DESCRIPTION 27 TECHNICAL SPECIFICATIONS 27 PREPARING FOR USE 27 Assembly 28 Operation Floor brush Empty the dust container 29 Clean the HEPA filter 29 TROUBLESHOOTING CLEANING AND STORAGE Cleaning Cleaning the appliance’s case HEPA filter and air outlet filter 31 Storage PROTECTION OF THE ENVIRONMENT WARRANTY DECLARATION OF CONFORMITY EU...
- Page 20 INTRODUCTION Thank you for your preference. This Bagless Vacuum Cleaner HOFFEN ref. ASSC-H002 will make your daily routine easier. Read this instruction manual before using the appliance to get the best results from it and keep it for future reference. SAFETY INSTRUCTIONS • THIS APPLIANCE EXCLUSIVELY DOMESTIC USE! FOR INDOOR USE ONLY. To reduce the risk of personal injury or property damage, when using electrical appliances, basic...
- Page 21 washbasins, vases, flowerpots, etc. If any fluid accidentally spills on the appliance’s electrical parts, disconnect the appliance from the wall socket and go to the store where it was bought or contact a qualify technician for repairing. • Periodically check the supply cord for any damages. If the supply cord is damaged, it must be replaced by the manufacturer, its service agent or a similar qualified person to avoid hazard.
- Page 22 the hazards involved. Children shall not play with the appliance. Cleaning and maintenance shall not be made by children without supervision. • Children are not aware of potential hazards when using electrical appliances. They should be supervised to ensure that they do not play with the appliance. • This appliance is not a toy and must be kept away from the reach of children less than 8 years.
- Page 23 appliance. • Do not operate this appliance if it is damaged, if it is not working properly or if detected any damaged on the supply cord or plug. If is detected any damage or any malfunction, you must contact the store where you bought the appliance or a qualified technician in order to repair the appliance or replace supply cord. Make sure that only original parts or components are used. • Read carefully all the instructions before assembling the appliance.
- Page 24 Operation • Never move the appliance by pulling the supply cord. Make sure the supply cord doesn’t get caught in any way and do not wind it around the appliance. • Never use the appliance near hot surfaces or heat sources. • This appliance is not a toy; it is not supposed to be sat on. • After use and before carrying out any cleaning operation, storage, repair or change any accessories, make sure that the appliance is disconnected from the wall socket.
- Page 25 • Vacuuming fine dust may cause the pores of the filters to become clogged. This will obstruct the passage of air through the filters. If this happens, the filters must be cleaned or replaced, if necessary. • Do not block the air passages and do not use the appliance if any of these passages is clogged. If this happens, unplug the appliance and remove the object or dirt that is blocking it, to avoid damages to the appliance or accidents.
- Page 26 OVERVIEW OF THE APPLIANCE (Air exhaust filter under the rear wheel cover) [26]...
- Page 27 Filter rack Dust container cover Washable HEPA filter Nozzle with dual function Airflow valve regulator Air outlet filter TECHNICAL SPECIFICATIONS Power: 800W Rated voltage: 230V ~ 50Hz Filter system: HEPA Suction power: 180W+-30W PREPARING FOR USE With the Bagless Vacuum Cleaner HOFFEN ASSC-H002 high suction power, the combined use of different filters and the cyclone effect, vacuuming each corner of your house is going to be much more simple and healthy. [27]...
- Page 28 Assembly • Insert the flexible hose (E) into the (F) on the flexible hose’s entry front of the tank (H) until a click sound is heard. • Attach the t (C) to the end of the hose (E). elescope metallic tube • Adjust the length of the t (C) by sliding the button elescope tube forward (D) and pulling the bottom of the t (C) to elescope tube the desired length. To secure the tube (C) to the selected length, release the button (D) to its original position. • Select the most appropriate accessory (A or R), depending on the type of surface to be cleaned, and attach it to the end of the extension tube (C).
- Page 29 To open the air flow regulator valve (S) push it backwards and to close push it forward. • To switch the appliance off, press the on/off button (J) and unplug the appliance from the mains. • After use, remove flexible hose (E) from the appliance body by pressing the side tabs on the hose fitting (E) and pulling it out. • Automatically rewind the supply cord (K) by pressing the button (L). Floor brush • The button (B) on the top the high efficiency floor brush (A) allows freeing or retracting the bristles, depending on the type of floor you want to clean.
- Page 30 appliance’s main body and open it by holding it with one hand and with the other hand turn the lid, by the handle (G), to the anti-clockwise direction, until arrow on the lid is aligned with the open padlock symbol printed on the dust container (H). Then lift the lid and you will find the HEPA filter (Q) fitted to the filter rack (O). To remove the filter (Q), turn it anti-clockwise (follow the arrow marked “UNLOCK”). • Rinse the HEPA filter (Q) and filter rack (O) with warm running water, without using any detergents. After rinsing them, allow the filter (Q) and the rack (O) to dry completely. Important: the filter (Q) and filter rack (O) must not be assembled on the appliance without being completely dried. • After cleaned and dried, insert the filter rack (O) into the dust container (H) and insert the HEPA filter (Q) into the rack (O). Then rotate the filter (Q) clockwise to assemble it (follow the arrow that indicates “LOCK”). • Assemble the lid on the dust container (H) by rotating it clockwise until the arrow on the lid is aligned with the lock symbol printed on the dust container (H). • Replace the dust container (H) on the appliance body and make sure that it is properly seated. TROUBLESHOOTING During use, if any irregularities are detected on the appliance’s operation, check the below table to understand the causes and solutions. If it is not possible to detect the cause, please contact the store where the appliance was bought.
- Page 31 The valve (S) is opened. Close the valve (S). The accessories (A or R), Unclog the accessories the telescope metallic by removing the objects Weak suction power. tube (C) or the flexible or dirt that are blocking hose (E) are clogged. the air inlet. The filters are not Check the filters and correctly fitted or are too replace them by new dirt. ones, if necessary. CLEANING AND STORAGE Cleaning • Always disconnect the appliance from the wall socket before cleaning, assembling or disassembling the accessories or the appliance itself. •...
- Page 32 • After wash, the filters should only be replaced on the appliance when properly dried. Never use them wet or moist. Storage • Switch off the appliance on the on/off button (J) and remove the plug from the wall socket. • Press button (L) to automatically rewind the supply cord (K). During this process, keep the plug in your hand to avoid the abrupt movement of the supply cord (K). • Retract the bristles of the floor brush (A) to avoid damaging them and close the telescope tube (C). • To store the appliance vertically, insert the parking connector located at the floor brush (A) into the parking slot on the on the back side of the appliance. • Store the appliance in a dry and ventilated place, away from sources of heat and direct sunlight. PROTECTION OF THE ENVIRONMENT •...
- Page 33 DECLARATION OF CONFORMITY EU This appliance meets the requirements of the Electromagnetic Compatibility Directive (EMC) and the low voltage Directive (LVD). Therefore, the appliance has been issued the CE mark and EX declaration of conformity. [33]...
- Page 34 (Página deixada propositadamente em branco) (Blank page) [34]...
- Page 35 (Página deixada propositadamente em branco) (Blank page) [35]...
Need help?
Do you have a question about the ASSC-H002 and is the answer not in the manual?
Questions and answers