Table of Contents
Advertisement
Quick Links
USER MANUAL
FULLY INTEGRATED BUILT IN
COOKER HOOD
eiQCHINTGY60
Thank you for choosing your electriQ cooker hood.
This instruction manual is designed to provide you with all required instructions related to
the installation, use and maintenance of the appliance. In order to operate the unit correctly
and safely, please read this instruction manual carefully before installation and usage.
Advertisement
Table of Contents

Related Manuals for ElectrIQ eiQCHINTGY60


Summary of Contents for ElectrIQ eiQCHINTGY60
- Page 1 COOKER HOOD eiQCHINTGY60 Thank you for choosing your electriQ cooker hood. This instruction manual is designed to provide you with all required instructions related to the installation, use and maintenance of the appliance. In order to operate the unit correctly...
-
Page 2: Table Of Contents
CONTENTS SAFETY PRODUCT OVERVIEW VENTILATION OPTIONS INSTALLATION OPERATION CLEANING AND MAINTENANCE FILTER INFORMATION LIGHT REPLACEMENT TECHNICAL INFORMATION TROUBLESHOOTING SUPPORT... -
Page 3: Safety
SAFETY PRECAUTIONS Whilst this product is compliant with all safety requirements, incorrect or inappropriate use can lead to both personal injury and potential damage to property. Please read the contents of this instruction booklet thoroughly before fitting or using this appliance. •... - Page 4 • When the hood is vented externally and used with appliances which burn fuel (e.g. gas, oil, wood) the area must be sufficiently ventilated to ensure safe operation. Fresh air must be allowed to freely enter the room to prevent a partial vacuum.
-
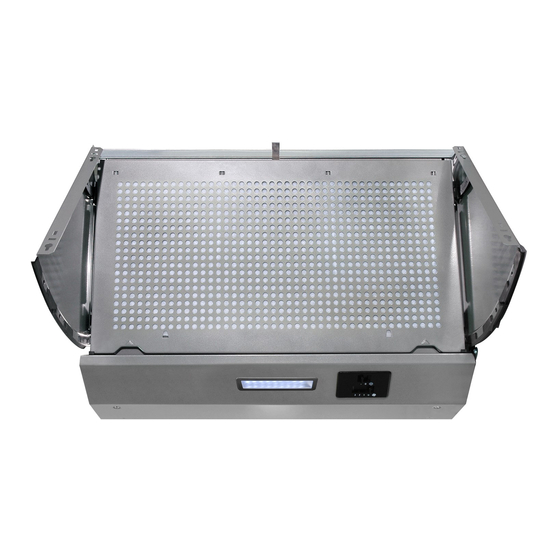
Page 5: Product Overview
PRODUCT OVERVIEW - PARTS SUPPLIED Description Illustration Qty. Cooker hood Left fan shaped frame Right fan shaped frame Adjusting plate Outlet Air Flaps (120MM) 1 pair Flat self-tapping screw ST4*14mm Flat self-tapping screw ST4×8mm... -
Page 6: Ventilation Options
OPTIONS FOR VENTILATION This hood can be set up for either external venting or recirculation of the air. The type of setup should be decided before commencing installation. EXTERNAL VENTING If you have an outlet to the outside, your cooker hood can be connected as shown in the diagram using the flexible exhaust pipe (NOT SUPPLIED). -
Page 7: Installation
INSTALLATION The cooker hood should be placed at a height of 65- 75cm above the cooking surface for best efficiency. To install the cooker hood between two cupboards. Drill a pilot hole (≤ 2mm) and insert a screw on the side of each cupboard following the measurements in the diagram. - Page 8 6. Install the air outlet onto the hood by aligning the 3 slide slots of the outlet with the three edges on the fan housing, and sliding the outlet into position. 7. Connect the air-outlet board and the vent hose and route it appropriately. Rigid kits, if preferred, can be obtained from either the retailer who supplied the hood, DIY Stores or Builders Merchants., DIY Stores or Builders Merchants.
- Page 9 3. Mark the installation position of the door and the size of the fixed screws. If the upper edge of the door is not as high as the upper edge of the cupboards, please adjust the position accordingly. Mark the positions of the screws on the door, and make sure the position is as accurate as possible.
-
Page 10: Operation
OPERATION Your electriQ hood has been designed to be very simple to use. To operate: Pull up the front panel, turn on the cooker hood, and then choose the fan speed setting. -
Page 11: Cleaning And Maintenance
CLEANING MAINTENANCE Before cleaning, switch the unit off and disconnect the power. Use a soft cloth moistened with hand-warm mildly soapy water or household cleaning detergent. Never use metal pads, chemicals, abrasive material or a stiff brush to clean the unit. -
Page 12: Filter Information
CARBON FILTER(OPTIONAL) Activated carbon filters may be used to further trap odours (optional) and are available from the same stockist your hood was purchased from: eIQCF110 (Carbon Filter Pack of 1) (1) The aluminum filter should be detached first as shown in the maintenance section. (2) The carbon filters are attached to each end of the motor housing, rotating to lock/undo. -
Page 13: Technical Information
TECHNICAL INFORMATION Symbol Value Unit eIQCHINTGY60 Model identification 33.3 kWh/a Annual Energy Consumption hood Time increase factor 11.9 Fluid Dynamic Efficiency hood Class E Fluid Dynamic Efficiency class 71.8 Energy Efficiency Index hood Class C Energy Efficiency class 128.5 Measured airflow rate at the best efficiency Measured air pressure at best efficiency point 221.7... -
Page 14: Troubleshooting
Do not dismantle the appliance in a way which is not shown in the user manual. The appliance could not be dismantled by user. At the end of life, the appliance should not be disposed of with household waste. Check with you Local Authority or retainer for recycling advice. electriQ UK SUPPORT www.electriQ.co.uk/support Call: 0330 390 3061 Office hours: 9AM - 5PM Monday to Friday www.electriQ.co.uk...
Need help?
Do you have a question about the eiQCHINTGY60 and is the answer not in the manual?
Questions and answers