Table of Contents
Advertisement
Quick Links
USER MANUAL
CANOPY COOKER HOOD
eiQCHDD60 & eiQCHDD90
Thank you for choosing your electriQ cooker hood.
This instruction manual is designed to provide you with all required instructions
related to the installation, use and maintenance of the appliance. In order to operate
the unit correctly and safely, please read this instruction manual carefully before
installation and usage.
Advertisement
Table of Contents

Related Manuals for ElectrIQ eiQCHDD60


Summary of Contents for ElectrIQ eiQCHDD60
- Page 1 CANOPY COOKER HOOD eiQCHDD60 & eiQCHDD90 Thank you for choosing your electriQ cooker hood. This instruction manual is designed to provide you with all required instructions related to the installation, use and maintenance of the appliance. In order to operate the unit correctly and safely, please read this instruction manual carefully before installation and usage.
-
Page 2: Table Of Contents
CONTENTS SAFETY INSTALLATION CONTROL PANEL FILTER INFORMATION BULB REPLACEMENT CLEANING AND MAINTENANCE TROUBLESHOOTING SUPPORT PRODUCT FICHE... -
Page 3: Safety
SAFETY PRECAUTIONS Whilst this product is compliant with all safety requirements, incorrect or inappropriate use can lead to both personal injury and potential damage to property. Please read the contents of this instruction booklet thoroughly before fitting or using this appliance. •... - Page 4 • The minimum distance between the surface of the hob and the lowest part of the hood should be at least 65cm. A distance of between 65cm and 75cm gives peak efficiency. • The air must not be discharged into a flue that is used for exhausting fumes from appliances burning gas or other fuels.
-
Page 5: Installation
INSTALLATION (VENT OUTSIDE) If you have an outlet to the outside, your cooker hood can be connected as below picture by means of an extraction duct (enamel, aluminum, flexible pipe or non- flammable material with an interior diameter of 150mm) Before installation, turn the unit off and unplug it from the outlet. - Page 6 3.Connect the cavity & hood by 8pcs screws (M10*10), the wind direction are up, down, left, right, the user can select according to the space of the cabinet.(See pic 4) Pic 4 4.Fix the pipe on the outlet, and use 4pcs screws (ST4*14) to fix the PCB box, connect the power and finish the installation.(See pic 5) The distance between the edge of cooker hood and the electrical hob or induction hob should be at least 40mm.
-
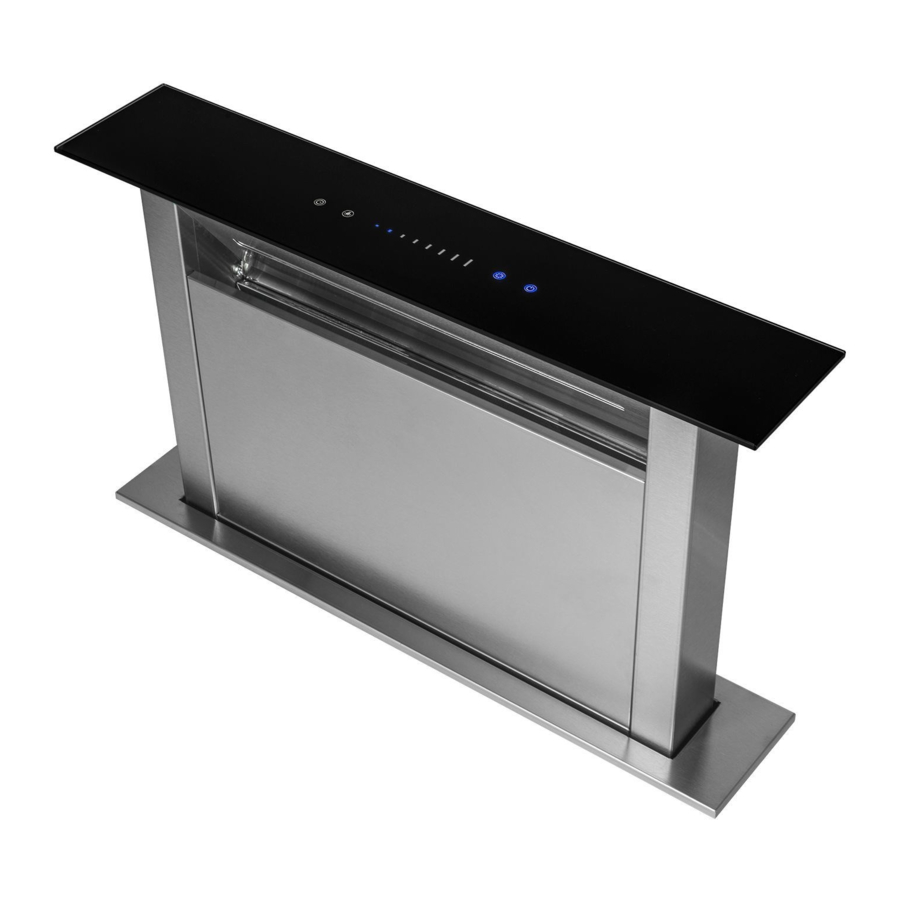
Page 7: Control Panel
CONTROL PANEL Press the timer button to enter the timer settings. To cycle through time settings, use the slide control. The timer can be set to turn off after 5-10-15-20-25- 30-35-40 minutes. TIMER When the timer has elapsed all functions will turned off and the hood will enter into standby, the decorative cover will close automatically. -
Page 8: Filter Information
GREASE MESH FILTERS The mesh filters can be cleaned by hand. • Remove the decorative board and wipe it clean with a damp cloth. Then,remove the aluminium filter by pressing and holding the 2 slots. • Place the aluminium filter upside down. Then detach the charcoal filter. •... - Page 9 • Make sure the filter is securely locked. Otherwise, it would loosen and cause danger. • When activated carbon filter attached, the suction power will be lowered. Replacements are available from the retailer the hood was purchased from under references: Model: eiQCHDD60 Grease filter: eiQGFDD Carbon filter: eiQCFDD Model: eiQCHDD90 Grease filter: eiQGF90DD...
-
Page 10: Bulb Replacement
BULB REPLACEMENT Note: • Before changing the lights, make sure that the appliance is turned off and unplugged. • Protect against danger when changing lights, such as wearing gloves. Changing the light 1. Remove the decorative board and aluminum mesh, remove the two screws of the fixed lamp board with a screwdriver. -
Page 11: Cleaning And Maintenance
MAINTENANCE Before cleaning, switch the unit off and pull out the plug, or switch off at the relevant mains switch if the unit has been hard-wired in. Make sure the unit has no power being fed to it. REGULAR CLEANING Use a soft cloth moistened with warm mildly soapy water or household cleaning detergent. -
Page 12: Support
At the end of life, the appliance should not be disposed of with household waste. Check with your Local Authority or retailer for recycling advice. electriQ UK SUPPORT www.electriQ.co.uk/support Call: 0871 984 4416 Office hours: 9AM - 5PM Monday to Friday... -
Page 13: Product Fiche
PRODUCT FICHE Symbol Value Unit Model identification eiQCHDD60 Annual Energy 40.1 kWh/a Consumption hood Time increase factor Fluid Dynamic Efficiency 29.3 hood Fluid Dynamic Efficiency Class A class Energy Efficiency Index 50.3 hood Energy Efficiency class Class A Maximum airflow 563.8... - Page 14 Symbol Value Unit Model identification eiQCHDD90 Annual Energy 46.8 kWh/a hood Consumption Time increase factor Fluid Dynamic Efficiency 31.4 hood Fluid Dynamic Efficiency Class A class Energy Efficiency Index 51.8 hood Energy Efficiency class Class A Maximum airflow 615.4 Measured airflow rate at 342.9 the best efficiency Measured air pressure at...
Need help?
Do you have a question about the eiQCHDD60 and is the answer not in the manual?
Questions and answers