Lightspeed Access Link User Manual
Hide thumbs
Also See for Access Link:
- User manual (60 pages) ,
- Registration manual (12 pages) ,
- Operation instructions (2 pages)
Table of Contents
Advertisement
Quick Links
Advertisement
Table of Contents
Troubleshooting

Related Manuals for Lightspeed Access Link


Summary of Contents for Lightspeed Access Link
- Page 1 Instructional Audio System User Manual...
-
Page 2: Table Of Contents
Safety Warnings and Certifications Microphone Cradle Charger System Specifications SET-UP & OPERATION Determine Set-Up Location Connect Access Link to Amplifier Audio Integration Setting Up the Flexmike Charging the Flexmike Daily Use of the Flexmike Using Your Microphone as a Wireless Audio Link... -
Page 3: Overview
14. CAUTION: Risk of explosion if battery is replaced by any battery other than Lightspeed Part # L3.7V... -
Page 4: System Components And Unpacking
NOTE ON PAIRING: Access Link and any wireless components (microphones, Activate Station, Media Connector) are pre-paired at the Lightspeed factory as required for proper operation. If paired components are separated and swapped during the installation process, they must be re-paired. -
Page 5: Optional Components
Optional Components Optional equipment which may be part of your Access Link system Power Status Media Media Connector Connector Push Audio Audio Tone Level Input Output Media Connector Sharemike and Power Adapter Student Microphone Power Link Input Output Activate System... -
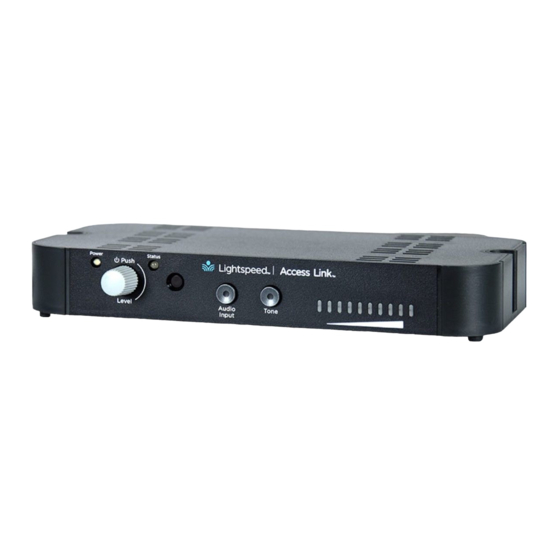
Page 6: Front Panel Controls And Indicators
AUDIO INPUT VOLUME SELECTOR: Selects Volume as the mode for the adjustment knob (2) for the audio sources connected to the audio inputs on the back of Access Link. TONE SELECTOR: Selects Tone as the mode for the adjustment knob (call out #2 below) for the microphone. -
Page 7: Rear Panel Controls And Connections
MIC/LINE LEVEL SWITCH: Changes the audio output level from low (Mic level) to high (LINE level). Desired position depends on the input level of the amplifier. BALANCED AUDIO OUTPUT: This output sends the audio from Access Link to a balanced input on an amplifier. (Recommended for longer cable runs connected to a balanced input). -
Page 8: Flexmike Controls And Connections
LANYARD INTERFACE: Insert the lanyard into this hook to wear the Flexmike. BATTERY: Remove the battery to replace the rechargeable battery pack. 10. USB INPUT: Connect audio source to send to Access Link. USB input can also be used for charging. -
Page 9: Microphone Cradle Charger
Microphone Cradle Charger DC POWER PORT: Connect the 5V/1.0A DC power cord... -
Page 10: Set-Up & Operation
If cable runs longer than 12 ft are required, we recommend using the balanced audio output with balanced audio cable. NOTE: Do not install Access Link inside a fully enclosed metal cabinet or box. This will shield the box, cutting off all wireless transmission to and ACCESS LINK from the unit. -
Page 11: Connect Access Link To Amplifier
“Microphone Input.” (Included) AUDIO AMPLIFIER INPUT CONNECTION BALANCED CONNECTION FOR LONGER CABLE RUNS In the event Access Link must be located more than 12 feet away from the amplifier, Audio Inputs Audio Outputs Unbalanced Balanced 5VDC/0.2A... - Page 12 Connect the Power Supply Plug the USB end of the power adapter into the Access Link and the other side in an outlet. The white power light on the front of Audio Inputs Audio Outputs Unbalanced Balanced 5VDC/0.2A Mic/Line Access Link will light.
-
Page 13: Audio Integration
Various classroom multimedia audio sources would typically be connected directly into the audio amplifier to then be played through the classroom speakers. However, there is an additional 3.5mm audio input directly on Access Link. That audio is passed through Access Link and back out to the amplifier. -
Page 14: Setting Up The Flexmike
While speaking in a normal voice, fine-tune the microphone volume on the front of ALIGN WITH COLLARBONE Access Link up or down. Proper volume level should be as follows: • Your voice should be clearly heard by another person on the other side of the room. -
Page 15: Charging The Flexmike
Flexmike will last for up to 8 hours of use. If microphones are used daily, they should be charged each night. Replacement lithium polymer battery packs may only be purchased through Lightspeed Technologies (part #L3.7V). CHARGING IN PROGRESS CHARGING COMPLETE... -
Page 16: Daily Use Of The Flexmike
• The Flexmike will stay powered on during charging, but will automatically be muted. • it is not necessary to turn off the Access Link at the day but you may do so by pressing the power button on the front panel. -
Page 17: Using Your Microphone As A Wireless Audio Link
You can connect your 2nd (or 3rd) microphone to your computer’s USB port to enable a wireless 2-way audio link. SEND AUDIO FROM THE COMPUTER to Access Link to ensure all audio from the computer (videos, video conferencing, audio books, music, etc) can be played through the Lightspeed Access Link system and speakers. -
Page 18: Optional Accessories
Blue: solid = Talk White: solid = Mute MICROPHONE VOLUME UP/DOWN USB INPUT: Connect audio source to send to Access Link. USB input can also be used for charging. IR TRANSMITTER: For pairing to base unit AUDIO INPUT: Plug a laptop or other audio device into this jack to... - Page 19 It takes about 5-6 hours to fully charge the battery. The light will turn green when charging is complete. PLEASE NOTE: Access Link and microphone(s) are paired together at the factory and all components should be kept together as a system.
- Page 20 Sharemike: Initial Set-Up Ensure the Access Link is on. The white power light will glow. Turn on the Sharemike by pressing and holding the power button until the LED lights. Grip the barrel in the center section. While speaking in a normal voice, increase the volume with the Sharemike until your voice is barely audible.
-
Page 21: Media Connector Controls And Indicators
Media Connector Controls and Indicators (Optional) FRONT PANEL POWER LIGHT AUDIO INPUT VOLUME SELECTOR: Selects Volume as the White light: Power on mode for the adjustment knob (2) for the audio sources connected to the audio inputs on the back of the Media POWER BUTTON / VOLUME ADJUSTMENT: Press this button Connector. - Page 22 Media Connector Controls and Indicators (Optional) BACK PANEL AUDIO INPUTS: 3.5mm stereo connectors for connecting classroom audio sources to be played through audio system. AUDIO OUTPUTS: 3.5mm stereo connectors for connecting to an assisted listening device (ALD) or to a computer for recording. USB INPUT: Plug the USB-C end of the power cable into this USB port on the Media Connector.
-
Page 23: Using The Media Connector
NOTE: The Media Connector can be used as the primary volume control for connected audio sources. When it is powered on and registered to Access Link, it locks out Master Volume and Tone controls on Access Link. - Page 24 Audio Out Audio In Power Status Media Media Connector Connector Push Power Microphone Audio In Tone Audio Audio Tone Level Input Output Access MEDIA CONNECTOR ACCESS LINK Audio Out Transmission Audio In BUILT IN AUDIO AMPLIFICATION SYSTEM Lightspeed Access transmission protocol...
- Page 25 Connect a patch cable from the ALD’s microphone jack or AUX input to the 3.5mm audio jack labeled “AUDIO OUT” on the back of the Media Connector. With Access Link and ALD turned on, speak into the Flexmike and slowly adjust the AUDIO OUT volume control on the Media Connector until the appropriate audio level is attained in the ALD’s receiver headphones.
-
Page 26: Maintenance & Troubleshooting
MAINTENANCE & TROUBLESHOOTING Flexmike Battery Replacement Battery part #L3.7V Push down on the latch and carefully pull the battery pack away from the Flexmike. Insert new battery pack as shown and make sure the latch is secure. Place the Flexmike in a cradle charger to charge the battery pack. -
Page 27: Sharemike Battery Replacement
Sharemike Battery Replacement Battery part # L3.7V Push down on the latch and carefully pull the battery pack away from the Sharemike. Insert new battery pack as shown and make sure the latch is secure. Place the Flexmike in a cradle charger to charge BATTERY REMOVAL the battery pack. -
Page 28: Troubleshooting
Activate app, then swipe the app to the right to quit. Re- • Confirm that the blue POWER light located on the front panel of Access Link is on. open the app and it should connect automatically. -
Page 29: Warranty, Safety & Specifications
(5) years, beginning at the date of the purchase invoice. If such malfunction occurs, the product will be repaired or replaced (at Lightspeed’s option) without charge during the warranty period. -
Page 30: Safety Warnings And Certifications
THE CONSTRUCTION AND OPERATION OF THE PRODUCT AND and maintenance (servicing) instruction in the literature THE HAZARDS INVOLVED. accompanying this product. USE A LIGHTSPEED SUPPLIED BATTERY ONLY CERTIFICATIONS This product is listed to UL standards and requirements for electrical safety by Underwriters Laboratories Inc. - Page 31 Européenne suivantes : 2004/108/ EC Electromagnetic Compatibility (EMC) and 2006/95/ EC Low Voltage Directive (LVD). Lightspeed Technologies a lancé un programme de recyclage de produits en Europe conformément à la directive de l’Union Européenne 2002/96/CE relative aux déchets d’équipements électriques et électroniques (directive «...
- Page 32 This device should be installed and operated with a interference to radio communications. However, there is no guarantee that minimum distance of 20cm between the radiator (Access Link) and any part of your body. interference will not occur in a particular installation.
- Page 33 Directive based on its design and type, as brought into circulation by us. In case of alteration of the system, not agreed upon by us, this declaration will lose its validity. Products: Redcat, Topcat, 975, Access Link, Flexmike, Sharemike, Pod, Activate Station, Media Connector, TCQ2, DRQ, Mobile Connector Model Numbers:...
-
Page 34: System Specifications
Type C for charging and audio Power On/off switch ACCESS LINK Registration Push button for registration with Access Link Description Wireless audio base station Dimensions (L x W x H) 2.9” x 1.1” x 0.7” (74 x 28 x 18mm) - Page 35 Access to powerful in-the-moment insights to the learning process. Our audio and video solutions improve student engagement, enable teachers to activate small groups, and encourage collaboration. 11509 SW Herman Road Tualatin, Oregon 97062 Toll Free: 800.732.8999 Phone: 503.684.5538 Fax: 503.684.3197 lightspeed-tek.com MN0513US01-7...
Need help?
Do you have a question about the Access Link and is the answer not in the manual?
Questions and answers