Advertisement
Quick Links
MicroMod Weather Carrier Board Hookup Guide
Introduction
Introducing the MicroMod Weather Carrier Board! This nifty little weather station board works with all SparkFun
MicroMod Processors so you can customize your weather station project to fit your needs.
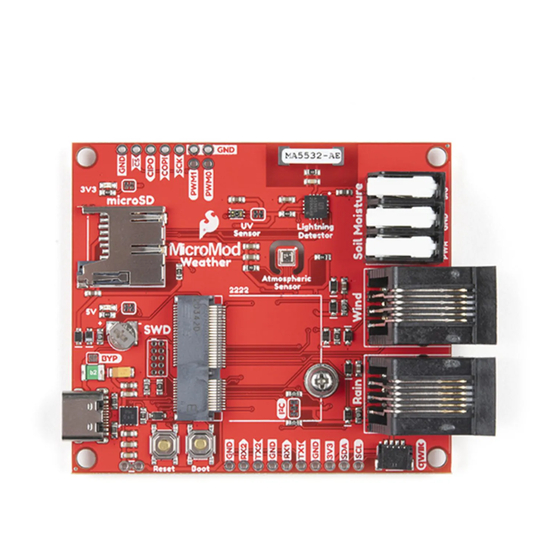
SparkFun MicroMod Weather Carrier Board
SEN-16794
Product Showcase: SparkFun MicroMod Weather C... ...
Product Showcase: SparkFun MicroMod Weather C
Advertisement

Related Manuals for sparkfun MicroMod SEN-16794


Summary of Contents for sparkfun MicroMod SEN-16794
- Page 1 MicroMod Weather Carrier Board Hookup Guide Introduction Introducing the MicroMod Weather Carrier Board! This nifty little weather station board works with all SparkFun MicroMod Processors so you can customize your weather station project to fit your needs. SparkFun MicroMod Weather Carrier Board ...
- Page 2 Like all of our MicroMod Carrier Boards, there is no processor included but instead you can plug in a processor of your choice to the MicroMod M.2 connector on the carrier. Here are few options to choose for your processor: SparkFun MicroMod ESP32 Processor SparkFun MicroMod nRF52840 Processor ...
- Page 3 Reversible USB A to C Cable - 2m CAB-14743 CAB-15424 If you want to take full advantage of the features of the Weather Carrier Board you will also need a SparkFun Soil Moisture Sensor, the Weather Meter Kit and a microSD card: Weather Meter Kit microSD Card - 16GB (Class 10) ...
- Page 4 SEN-13637 Suggested Reading The SparkFun MicroMod ecosystem offers a unique way to allow users to customize their project to their needs. Do you want to send your weather data via a wireless signal (e.g. Bluetooth or WiFi)? There's a MicroMod Processor for that.
-
Page 5: Hardware Overview
Qwiic Atmospheric Sensor (BME280) Hookup Guide Measure temperature, humidity, barometric pressure with the SparkFun Atmospheric Sensor Breakout BME280 (Qwiic). Hardware Overview In this section we'll cover the various hardware, sensors and adjustable solder jumpers on the MicroMod Weather Carrier Board, the external sensor connections and the pinout of the Carrier Board for a detailed look at how it connects to your chosen MicroMod Processor. -
Page 6: Common Components
Most SparkFun MicroMod Carrier Boards will have some common components and all MicroMod Carrier Boards will have the keyed M.2 MicroMod Connector to plug your processor into. The photo and list below outline some of the components you can expect on the Weather Carrier Board and most other SparkFun MicroMod Carrier Boards. - Page 7 The VEML6075 UV light sensor from Vishay Semiconductors measures UVA (320-400 nm, peak @365 ±10nm ) and UVB (228-320 nm, peak @330 ±10nm) irradiance so you can calculate the UV Index at your Weather Station. Example 4 - Calculate UVI in the SparkFun VEML6075 Arduino Library demonstrates how to calculate that index using this sensor.
- Page 8 The AS3935 Lightning Detector is connected to the primary SPI bus and Chip Select (CS) for the AS3935 is tied to G1/Bus1 (MicroMod pad 42). For in-depth information about the sensor, refer to the AS3935 Datasheet or our Hookup Guide for the SparkFun Lightning Detector Breakout.
- Page 9 The two RJ11 connectors allow you to connect the wind and rain sensors included with our Weather Meters Kit to monitor wind speed, wind direction and rainfall. These two sensors are great additions to an outdoor Weather Carrier Board setup to get a more complete view of weather in the area. The Weather Meters Kit includes an anemometer to measure wind speed, a wind vain to determine wind direction and a self-emptying tipping bucket collector to monitor rainfall.
- Page 10 If you have never worked with solder jumpers and PCB traces before or would like a quick refresher, check out our How to Work with Solder Jumpers and PCB Traces tutorial for detailed instructions and tips. There are a total of seven adjustable solder jumpers on the MicroMod Weather Carrier Board labeled I C, MEAS, BYP, VE, UV, 5V and 3V3.
- Page 11 Since this carrier board is designed to work with all of the MicroMod Processors we've included the table below to outline which pins are used so, if you would like, you can compare them to the pinout tables in their respective Hookup Guides.
- Page 12 I2C_SCL I2C_SCL I C clock signal for BME280, VEML6075 and other Qwiic/I C devices. UART_TX1 UART1 data output. Tied to TX1 PTH header pin. D1/CAM_TRIG RAIN Digital pin for rain meter signal. UART_RX1 UART1 data input. Tied to RX1 PTH header pin. UART_RX2 UART2 data input.
-
Page 13: Hardware Assembly
SPI_CS SD_CS µSD Chip Select. SPI_SCK SPI_SCK SPI clock signal. SPI_COPI SPI_COPI SPI Controller Out/Peripheral In signal. SPI_CIPO SPI_CIPO SPI Controller In/Peripheral Out signal. RTC_3V RTC_3V 3V output for backup battery charging. Board Dimensions The Weather Carrier Board measures 2.65" x 2.30" (67.31mm x 58.42mm) and has four mounting holes that fit a standard 4-40 screw. - Page 14 Once the board is in the socket, gently press the processor board down, grab the set screw and tighten it with a Phillip's head screwdriver: Once the processor board is secure, your assembled MicroMod system should look similar to the image below! Note: There is technically no way to insert the processor backward since the key prevents it from mating with the M.2 connector.
- Page 15 We've written a few examples to get started with the Weather Carrier Board. They can be found in the "Examples" folder of Hardware GitHub Repository and will work with any SparkFun MicroMod Processor you choose. In this section we'll only cover the comprehensive Weather Station example, but you can use the other examples to test...
- Page 16 MicroMod Processor (outlined above) as well as the BME280, VEML6075 and AS3935 Arduino Libraries. You can install them using the Arduino Library manager and searching 'SparkFun BME280', 'SparkFun VEML6075' and 'SparkFun AS3935'. Alternatively, you can download the libraries from their respective GitHub repositories linked above or you can download the .ZIP for each of them by clicking the buttons below:...
- Page 17 * Priyanka Makin @ SparkX Labs * Original Creation Date: August 20, 2020 * This code is Lemonadeware; if you see me (or any other SparkFun employee) at the * local, and you've found our code helpful, please buy us a round! * Hardware Connections: * Insert MicroMod Processor Board of your choice into the M.2 connector of the SparkFun Weather...
- Page 18 #endif int soilPin = A0; //Pin number that measures analog moisture signal int soilPower = G0; //Pin number that will power the soil moisture sensor int WSPEED = D0; //Digital I/O pin for wind speed int WDIR = A1; //Analog pin for wind direction int RAIN = D1;...
- Page 19 pinMode(lightningInt, INPUT); //Initialization for weather meter pinMode(WSPEED, INPUT_PULLUP); //Input from wind meters windspeed sensor pinMode(RAIN, INPUT_PULLUP); //Input from wind meters rain gauge sensor //attach external interrupt pins to IRQ functions attachInterrupt(digitalPinToInterrupt(RAIN), rainIRQ, FALLING); attachInterrupt(digitalPinToInterrupt(WSPEED), wspeedIRQ, FALLING); //turn on interrupts interrupts(); if(lightning.beginSPI(spiCS, 2000000) == false){ Serial.println ("Lightning Detector did not start up, freezing!");...
- Page 20 windFlag = false; // Hardware has alerted us to an event, now we read the interrupt register if(digitalRead(lightningInt) == HIGH){ intVal = lightning.readInterruptReg(); if(intVal == NOISE_INT){ Serial.println("Noise."); // Too much noise? Uncomment the code below, a higher number means better // noise rejection.
- Page 21 The code begins by checking which MicroMod Processor was selected in Arduino and adjusts a few pin settings accordingly so it will work with any SparkFun MicroMod Processor. Next, it initializes all the on board sensors and checks for proper responses as well as checking for external sensors (wind, rain and soil).
- Page 22 Because some of our boards need to be re-humidified Instructions on hooking up to and communicating with after reflow, we decided to make our own humidor. This the Si4707 Weather Band Radio Breakout using an tutorial will focus on how to model a project in 3D and Arduino.
Need help?
Do you have a question about the MicroMod SEN-16794 and is the answer not in the manual?
Questions and answers