Advertisement
Quick Links
SparkFun RFID Starter Kit Hookup Guide
Introduction
The SparkFun RFID Starter Kit gives you the tools you need to start
reading RFID tags with your computer or microcontroller!
Required Materials
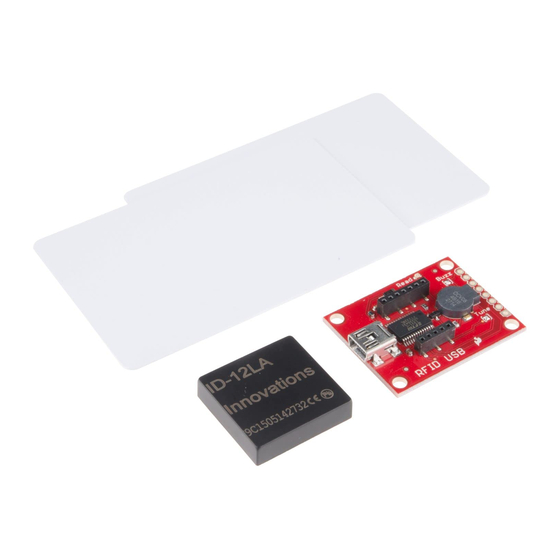
The kit contains:
• 1x RFID USB Reader
• 1x ID-12LA RFID Module
• 2x 125KHz RFID cards
You will also need a USB mini-B cable to connect the USB reader to a
computer.
Recommended Reading
The ID-12LA module has a serial output. If you've never worked with a
serial device or a terminal program before, you might want to take a look at
these tutorials first.
• Serial Communication
• Serial Terminal Basics
• Tim's RFID Comparison video - Let Tim from Tech Support walk you
through our entire line of RFID options, complete with range tests.
• SparkFun Simple Sketches - RFID Starter Kit video - A simple video
demo of the RFID Starter Kit in action.
RFID Overview
But Wait, What is RFID?
Page 1 of 10
Advertisement

Related Manuals for sparkfun RFID Starter Kit


Summary of Contents for sparkfun RFID Starter Kit
- Page 1 SparkFun RFID Starter Kit Hookup Guide Introduction The SparkFun RFID Starter Kit gives you the tools you need to start reading RFID tags with your computer or microcontroller! Required Materials The kit contains: • 1x RFID USB Reader •...
- Page 2 More sophisticated tags may have their own internal power supply for increased range. A Few Common RFID Reader Types Frequency Range Read/write SparkFun product 120-150 "Chips/microchips"(in Up to Read only ID-3LA,...
- Page 3 Buzz jumper. 2. A “card read” LED 3. 2mm-spaced sockets that fit three of SparkFun’s RFID modules (the ID-3LA, the ID-12LA, and the ID-20LA) 4. A USB mini-B connector 5.
- Page 4 Page 4 of 10 Here’s the RFID reader (on COM4) with the FTDI drivers installed. Open a terminal program of your choice. If you’ve never used a terminal program before, here’s a guide to choosing and using them. First, use the Arduino IDE’s built-in serial monitor: •...
- Page 5 * Not suitable for critical applications, e.g. guarding the Hope Diamond. In addition to your RFID Reader Kit, you will want: • A microcontroller like the SparkFun RedBoard or the Arduino Uno • Jumper Wires - M-to-M • Breadboard •...
- Page 6 Page 6 of 10 Connect the VCC, GND, and TX pins on the RFID USB Reader to the Arduino’s 5V, GND, and D2 pins, and connect the servo to 5V, GND, and D9. Upload the below code, open your Serial Monitor by going to Tools > Serial Monitor, and start scanning some cards!
- Page 7 Page 7 of 10 /***************************** RFIDpowered lockbox This sketch will move a servo when a trusted tag is read with the ID12/ID20 RFID module Pinout for SparkFun RFID USB Reader Arduino RFID module 5V VCC GND GND D2 TX Pinout for SparkFun RFID Breakout Board Arduino RFID module 5V VCC GND GND D2 D0 Connect the servo's power, ground, and signal pins to VCC, GND, and Arduino D9 If using the breakout, you can also put an LED & 330 ohm resistor between the RFID module's READ pin and GND for a "card successfully read" indication by acavis, 3/31/2015 Inspired by & partially adapted from http://bildr.org/2011/02/rfidarduino/ ******************************/ #include <SoftwareSerial.h> #include <Servo.h> // Choose two pins for SoftwareSerial SoftwareSerial rSerial(2, 3); // RX, TX // Make a servo object Servo lockServo; // Pick a PWM pin to put the servo on const int servoPin = 9;...
- Page 8 Page 8 of 10 "7A005B0FF8D6" }; // Empty array to hold a freshly scanned tag char newTag[idLen]; void setup() { // Starts the hardware and software serial ports Serial.begin(9600); rSerial.begin(9600); // Attaches the servo to the pin lockServo.attach(servoPin); // Put servo in locked position lockServo.write(0); } void loop() { // Counter for the newTag array int i = 0; // Variable to hold each byte read from the serial buffer int readByte; // Flag so we know when a tag is over boolean tag = false; // This makes sure the whole tag is in the serial buffer bef // reading, the Arduino can read faster than the ID module c an deliver! if (rSerial.available() == tagLen) { tag = true; } ...
- Page 9 1; } Using the RFID Reader Breakout For Arduino projects, you can also use the SparkFun RFID Reader Breakout which gives the module a place to sit and breaks out its odd 2mm- pitch pins to a breadboard-friendly 0.1" spacing.
- Page 10 Shown with the module removed so you can read the silk Resources and Going Further You can use the SparkFun RFID Reader Kit and an Arduino to control access to just about anything! • Instead of moving a servo, how about controlling a relay like the PowerSwitch Tail II.
Need help?
Do you have a question about the RFID Starter Kit and is the answer not in the manual?
Questions and answers