Advertisement
Quick Links
Getting Started with the BrickPi
learn.sparkfun.com tutorial
Available online at:
Contents
Introduction
Programming
Introduction
If you're familiar with
can make and the educational value of such an easy-to-use robotics platform. Enter the BrickPi.
http://sfe.io/t199
Mindstorms
®, then you are probably aware of all the cool
Page 1 of 20
a
projects
that you
Advertisement

Related Manuals for sparkfun BrickPi


Summary of Contents for sparkfun BrickPi
-
Page 1: Table Of Contents
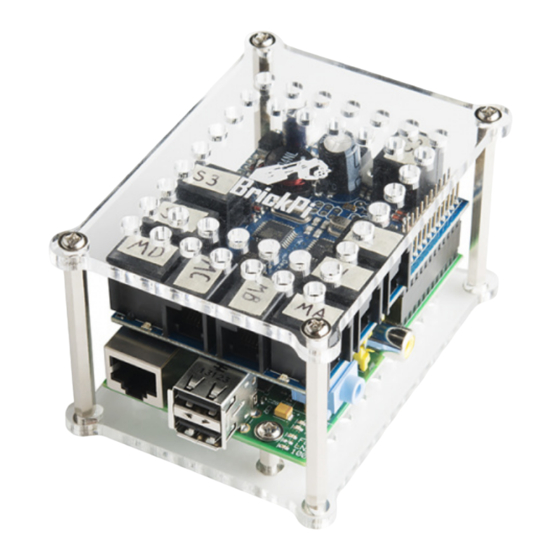
Resources and Going Further Introduction If you're familiar with Mindstorms ®, then you are probably aware of all the cool projects that you can make and the educational value of such an easy-to-use robotics platform. Enter the BrickPi. Page 1 of 20... - Page 2 BrickPi DEV-12732 Retired Favorited Favorite Wish List The BrickPi is a RasbperryPi add-on that lets you control Mindstorm parts. The BrickPi stacks on top of the Raspberry Pi and accepts Mindstorms motors and sensors. Page 2 of 20...
- Page 3 Python, and Scratch. Covered in This Tutorial In this tutorial, we will cover how to get started with the BrickPi. We will show you how to connect the BrickPi to a Raspberry Pi, attach building blocks, connect motors/sensors, and write a simple Python script to control the motors/sensors.
-
Page 4: Configure Sd Card
7. Click "Write" Don't forget to Run as Administrator! BrickPi Assembly You will need to build the hardware around the BrickPi in order to connect it to the Raspberry Pi and your building blocks. Build the Case Page 4 of 20... - Page 5 1) Unpack the BrickPi hardware and remove the protective paper from the case. 2) Screw the two small standoffs into the holes in the bottom piece of acrylic. 3) Screw a Raspberry Pi onto the two bottom standoffs. Page 5 of 20...
- Page 6 4) Screw the four long standoffs into corner slots of the bottom piece of acrylic. 5) Attach the BrickPi to the Raspberry Pi by mating the BrickPi's header to the Raspberry Pi's GPIO header. Page 6 of 20...
- Page 7 6) (Optional) Now is a good time to label the motor and sensor ports on the BrickPi. I recommend S1, S2, and so on for the sensor ports and MA, MB, and so on for the motor ports. 7) Attach the top piece of acrylic to the four posts using the remaining screws.
- Page 8 8) Insert the SD card. Attaching the Building Blocks Beams can be attached to the top and bottom pieces of acrylic in order to secure the BrickPi and Page 8 of 20...
- Page 9 Raspberry Pi to your building block creation. Attach pegs to the holes in the acrylic Attach beams to the pegs Page 9 of 20...
- Page 10 Any of the Mindstorms sensors can be attached to the ports labeled with an "S" followed by a number. You will need to remember the port number that you plugged your sensor into. Sensor port locations (Image courtesy of dexterindustries.com) Motors can be attached to the ports labeled with an "M"...
- Page 11 Motor port locations (Image courtesy of dexterindustries.com) For this example, connect a single touch sensor to S1 and a single servo motor to MA. Page 11 of 20...
-
Page 12: Powering The Brickpi
, we need to connect a keyboard, mouse, and monitor. Plug a keyboard and mouse into the USB ports, and connect a monitor using an HDMI cable. Powering the BrickPi Dexter Industries recommends a few different ways to provide power to your robot. - Page 13 However, we will do things differently. In order to get unlimited run time and the ability to power a couple of motors, we will hack a wall power supply to attach to the BrickPi. 1) Cut the 9V battery connector off of the 9V Snap Connector and strip the ends.
- Page 14 2) Attach the red wire to the positive (+) and the black wire to the negative (-) screw terminals of the DC Barrel Jack Adapter. 3) Plug the connector into the BrickPi. Page 14 of 20...
- Page 15 4) Plug the 9V wall adapter into the other end of the DC Barrel Jack Adapter. 5) IMPORTANT: Make sure your monitor is connected to the Raspberry Pi and turned on! 6) Plug the wall adapter power supply into a wall outlet. WARNING: The large power regulator (TO-220 Package) gets hot! Be careful when plugging or...
-
Page 16: Configure The Raspberry Pi
7) Your Raspberry Pi should come to life! Configure the Raspberry Pi Once the Raspberry Pi has booted, you should be presented with the Dexter Industries desktop. If Page 16 of 20... - Page 17 you are ever asked for a username or password, the defaults are: Username: pi Password: raspberry If you would like to configure the Raspberry Pi, open up a terminal: and enter the following command: sudo raspi-config You will be presented with the Raspberry Pi configuration screen. It is recommended that you expand the filesystem.
- Page 18 Open a terminal (if you do not already have one open) and create a new file for our motor and sensor test. Open that file with Leadpad (Raspbian's default text editor). leafpad motor_sensor.py Enter the following code into the text editor: language:python from BrickPi import * BrickPiSetup() BrickPi.SensorType[PORT_1] = TYPE_SENSOR_TOUCH BrickPi.MotorEnable[PORT_A] = 1 BrickPiSetupSensors()
-
Page 19: Resources And Going Further
Save and exit out of Leafpad. In the console, enter the following: python motor_sensor.py Now, whenever you press the Touch Sensor, the Servo Motor should move! Press ctrl+c to end the program. Resources and Going Further Page 19 of 20... - Page 20 The BrickPi opens up many opportunities to expand on the Mindstorms kits. To learn more about Dexter Industries and the BrickPi, check out their website: http://www.dexterindustries.com/BrickPi/. If you are looking for some ideas, Dexter Industries updates their BrickPi site with interesting projects: http://www.dexterindustries.com/BrickPi/projects/...
Need help?
Do you have a question about the BrickPi and is the answer not in the manual?
Questions and answers