Table of Contents
Advertisement
Page 1 of 36
micro:climate Kit Experiment Guide
Introduction to the Micro:Climate Kit
Introduction
We have seen a huge amount of excitement from hobbyists, students and
scientists around building a DIY weather station to track what is going on
around us on Planet Earth on a daily basis.
We have seen just as much excitement around the BBC's newly released
micro:bit, which made its debut in the United Kingdom and is now available
in the United States through SparkFun.
And then it dawned on us...why not combine the two? So, here it is: a
weather station kit that is built on top of the inexpensive, easy-to-use
micro:bit and Microsoft MakeCode. We have also written seven
experiments that walk you through how to use each and every component
of the kit and how to use them with the micro:bit and Microsoft MakeCode.
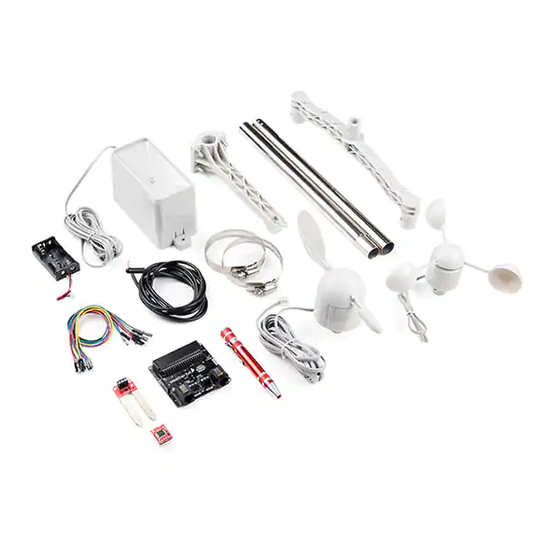
What's Included in the Kit?
Below is all the parts included in the SparkFun micro:climate kit.
SparkFun micro:climate kit
KIT-1421 7
The kit comes with everything you need to build a fully featured weather
station for the micro:bit. All you need to supply is, well, the micro:bit!
Advertisement
Table of Contents

Related Manuals for sparkfun micro climate Kit


Summary of Contents for sparkfun micro climate Kit
- Page 1 Microsoft MakeCode. What’s Included in the Kit? Below is all the parts included in the SparkFun micro:climate kit. SparkFun micro:climate kit KIT-1421 7 The kit comes with everything you need to build a fully featured weather station for the micro:bit.
-
Page 2: How To Use This Guide
• Waterproof Temperature Sensor — Waterproof temperature sensor with a long wire • SparkFun OpenLog — A small widget that logs any data sent to it over a serial connection to a microSD card • 10-Pack of M/M 12" Jumper Wires — Jumper wires for connecting things •... -
Page 3: Open Source
SparkFun weather:bit DEV-1421 4 In this case, the weather:bit takes your normal run-of-the-mill micro:bit and... -
Page 4: Edge Connector
It communicates with the micro:bit via I C, and the data from this sensor is easily accessible using the SparkFun weather:bit package for MakeCode. Weather Meter Sockets There are two RJ11 jacks at the bottom of the weather:bit. These are used... - Page 5 Page 5 of 36 These meters enable you to measure the wind speed and direction, as well as rain fall. Again, these are easily accessible in MakeCode via our SparkFun weather:bit package. Soil Moisture and Temperature Between the two RJ11 jacks are two sets of screw terminals sets.
-
Page 6: Serial Port
Page 6 of 36 The set on the right is the soil temperature sensor. It is set up to use our waterproof temperature sensor. This sensors wire is rather long and is great for monitoring the temperature of the soil in your garden so that you know the exact moment the ground is ready for planting those tomatoes! Serial Port We have populated the serial port pins with a standard FTDI format to... - Page 7 To install or add a new package to your MakeCode toolbox (the list of different block groups), click on “Advanced” and then on “Add Package.” From here you can search for “SparkFun weather-bit,” and it should show up as a public package in the list. Go ahead and click on it.
- Page 8 Conditions”? Well, other than the weatherman on the news, you probably think about temperature — maybe humidity and even barometric pressure if you are a weather nerd like many of us at SparkFun. In this first experiment we will explore measuring those conditions using a micro:bit and the weather:bit carrier board.
-
Page 9: Hardware Hookup
Page 9 of 36 SparkFun weather:bit DE V- 14214 Suggested Reading • Getting Started with the micro:bit — Basic hookup and programming of the micro:bit Introduction to the BME280 The BME280 Atmospheric Sensor is an easy way to measure aspects of the atmosphere around you, including pressure, humidity and air temperature. - Page 10 Page 10 of 36 Note: The edge connector for the micro:bit is not keyed, so there is the potential for the micro:bit to be inserted backward. Be sure to check the orientation of the board and micro:bit before plugging it in! Running Your Script We are going to use Microsoft MakeCode to program the micro:bit.
-
Page 11: What You Should See
Page 11 of 36 Start Weather Monitoring When the script starts, we use this block to start or initiate the BME280 sensor and get it ready to take readings. Anytime you want to use the temperature, humidity, pressure or altitude blocks, you need to have this block in your block. -
Page 12: Troubleshooting
Page 12 of 36 micro:climate kit: Exp1 Troubleshooting • weather:bit blocks not showing up — Make sure you have a network connection and have added the package to your MakeCode environment. • micro:bit not showing up — Try unplugging the USB cable and plugging it back in. - Page 13 Page 13 of 36 micro:bit Board USB Micro-B Cable - 6" DE V- 14208 CAB-13244 Suggested Reading • Using LEDs as Light Sensors — That’s correct! You can use LEDs as light sensors. In fact, that is how the micro:bit does it. Hardware Hookup Again, the hardware hookup here is minimal! Plug your micro:bit into your computer with the USB cable, and you are good to go!
- Page 14 Page 14 of 36 Plot Bar Graph Of This block is fun! It accepts two values: the value of what you want to graph and a maximum value of that variable. In this case we want to graph , and it has a maximum value of .
- Page 15 Page 15 of 36 • 1x SparkFun Soil Moisture Sensor micro:bit Board SparkFun Soil Moisture Sensor DE V- 14208 SEN- 13322 USB Micro-B Cable - 6" SparkFun weather:bit CAB-13244 DEV- 14214 Jumper Wires Premium 12" M/M Pack of 10 ...
- Page 16 Page 16 of 36 The SparkFun Soil Moisture Sensor is a simple breakout board for measuring the moisture in soil and similar materials. The soil moisture sensor is straightforward to use. The two large, exposed pads function as probes for the sensor, together acting as a variable resistor. The more water that is in the soil, the better the conductivity between the pads will be, which will result in a lower resistance and a higher SIG (output voltage).
- Page 17 Page 17 of 36 Start by using the screwdriver to open the three screw terminals on the moisture sensor enough that you can insert the ends of the jumper wires into them. Next, insert three jumper wires into the screw terminals using Red for VCC, Black for GND and Yellow for SIG.
-
Page 18: Soil Moisture
Page 18 of 36 Soil Moisture block returns an analog value range of 0 - 1023 (a 10 Soil Moisture bit number). The lower the number is the less moisture the sensor detects. The “dryness” and “wetness” level depends on your climate, humidity, etc. so we cannot give you a concrete range of what is wet and dry, that is something you will have to fiddle with yourself. - Page 19 Page 19 of 36 You may need to adjust the numbers in your code to match the state of preference for your house plants! micro:climate kit: Exp3 Troubleshooting • Odd readings — Make sure your wiring is correct, if you wire the sensor backwards it will give backwards results.
- Page 20 Temperature Sensor - micro:bit Board Waterproof (DS18B20) DEV- 14208 SEN- 11050 USB Micro-B Cable - 6" SparkFun weather:bit CAB-13244 DEV- 14214 Suggested Reading • Temperature Sensor Datasheet - The nitty gritty details on the water proof temperature sensor •...
-
Page 21: Soil Temperature
Page 21 of 36 Please open a browser window and navigate to https://makecode.microbit.org. This should open the MakeCode environment that you used to install the weather:bit package. Download Code to Note Soil Temperature block returns the soil a value that you need to Soil Temperature divide by 100 to get the temperature in Celcius. - Page 22 Page 22 of 36 micro:climate kit: Exp4 Note: The actual temperature sensor is at the end of the long wire. Make sure that is in place where you want to take temperature readings; otherwise you may get odd values. Troubleshooting •...
- Page 23 Weather Meters micro:bit Board SEN- 08942 DEV- 14208 USB Micro-B Cable - 6" SparkFun weather:bit CAB-13244 DEV- 14214 Suggested Reading • Reed Switch — A tutorial about how a reed switch works. • Weather Meter Datasheet — The nitty-gritty details on the weather meter.
- Page 24 Page 24 of 36 When the wind blows, it catches the vane, which points in the direction that the wind is coming from. As the vane moves around, it closes a series of switches inside, which produce a different resistance at 16 different locations around the hub.
- Page 25 Page 25 of 36 With that you are ready to roll! Running Your Script Please open a browser window and navigate to https://makecode.microbit.org/. This should open the MakeCode environment that you used to install the weather:bit package in. Download Code to Note Start Wind Monitoring block starts all of the necessary processes to...
- Page 26 Page 26 of 36 Once you power up the micro:bit, spin the anemometer with your hand or place it in front of a fan. The speed in miles per hour should start to scroll across the LED array. If you press the A button on your micro:bit, it will change the readout to print the direction the vane is pointing as the direction the wind is coming from.
- Page 27 • 1x Weather Meter Weather Meters micro:bit Board SEN- 08942 DEV- 14208 USB Micro-B Cable - 6" SparkFun weather:bit CAB-13244 DEV- 14214 Suggested Reading • Weather Meter Datasheet — The nitty-gritty details on the weather meter.
- Page 28 Page 28 of 36 Weather Meter Hookup Guide J U L Y 2 0 , 2 017 How to assemble your very own weather meter! Note: Once you have assembled your weather meter we highly recommend labeling the two cables for the wind and rain sensors. This will make your life much easier in the long run! Once you have completed the assembly of the weather meter, find the cable for the rain gauge and plug it into the RJ-11 connector on the...
- Page 29 Page 29 of 36 Code to Note Start Rain Monitoring To use the rain gauge you need to add the block Start Rain Monitoring to your Block for it to be able to function correctly. It sets up the On Start micro:bit hardware correctly to be able to read the rain gauge correctly.
- Page 30 • 1x weather:bit carrier board • 1x micro-B USB cable (Not included) • 1x OpenLog (with headers) • 1x microSD card (NOT INCLUDED WITH THIS KIT) SparkFun OpenLog micro:bit Board DE V- 13712 DEV- 14208 USB Micro-B Cable - 6"...
- Page 31 • OpenLog Hookup Guide — The ups and downs of how to use the OpenLog Introducing the SparkFun OpenLog The OpenLog Data Logger is a simple-to-use open source solution for logging serial data from your projects. The OpenLog provides a simple serial interface to log data from a project to a microSD card.
- Page 32 Page 32 of 36 • STAT1 — This blue indicator LED toggles on/off when a new character is received. This LED blinks when serial communication is functioning. • STAT2 — This green LED is connected to Arduino D13 (SPI Serial Clock Line/ATmega328 PB5).
- Page 33 Serial Redirect To We use the Serial Port on the weather:bit board to write data to the SparkFun OpenLog. To do this we need to do some setup for the micro:bit to use it correctly. We do this through the...
- Page 34 Page 34 of 36 as a single variable called . The blocks standard size is 2 header join slots. To add more slots click on the gear button and drag more slots in place as you have with the if / else if statements in previous experiments. Serial Write Line To send data to the OpenLog we use the block.
- Page 35 Get started with the moto:bit, a information you will need to explore carrier board for the micro:bit that the twelve circuits of the SparkFun allows you to control motors, and Inventors Kit for micro:bit. create your own robot using this experiment guide for the micro:bot kit.
- Page 36 Arduino Weather Shield ESP32 Environment Sensor Hookup Guide V12 Shield Hookup Guide Read humidity, pressure and SparkFun's ESP32 Environment luminosity quickly and easily. Add Sensor Shield provides sensors and wind speed, direction and rain hookups for monitoring gauge for full weather station environmental conditions.
Need help?
Do you have a question about the micro climate Kit and is the answer not in the manual?
Questions and answers