Table of Contents
Advertisement
Quick Links
FiberPlex FPX6000 Series
Audio, Video, and Peripherals over
IP Gateway
Quick Start Guide
CE Class B
Part Number: 50000141, Rev. A
Revised: November 18, 2021
FPX6000 Quick Start Guide
This is a Class B device and is intended for use in a light
industrial (commercial) or residential environment. It is not
intended for use in a heavy industrial environment.
REGULATORY MODEL NUMBER: FPX6000D4
Sales Office: +1 (301) 975-1000
Technical Support: +1 (301) 975-1007
E-mail: support@patton.com
WWW: www.patton.com
Address: Patton Electronics Co.
7622 Rickenbacker Dr.
Gaithersburg, MD 20879, USA
1
Advertisement
Table of Contents

Related Manuals for Patton FiberPlex FPX6000 Series


Summary of Contents for Patton FiberPlex FPX6000 Series
- Page 1 FiberPlex FPX6000 Series Audio, Video, and Peripherals over IP Gateway Quick Start Guide This is a Class B device and is intended for use in a light industrial (commercial) or residential environment. It is not CE Class B intended for use in a heavy industrial environment.
-
Page 2: Safety Information
• remove the device’s outer cover. There are no user-service- able parts inside. This device shall be returned to Patton Elec- tronics for repairs or repaired by qualified service personnel. For units with an external power adapter, the adapter shall •... -
Page 3: Optional Accessories
• 10-2500 Ethernet Cable (length 10 ft/1.5 m, Cat. 5 EIA 568B, color: black, RJ-45 con- • nectors) 50000141 FiberPlex FPX6000 Series Quick Start Guide • Optional Accessories CL141E/BT60/24 Power Supply, Industrial Gigabit 60 W (802.3BT) PoE (Power over •... -
Page 4: Installation Steps
15 to use the Dante Con- troller to connect an FPX6000 transmitter and receiver Refer to the FiberPlex FPX6000 Series User Manual (document #50000137) if you need more information to install, configure, operate, or troubleshoot the FPX6000. It can be downloaded here: https://www.patton.com/manuals/50000137_fpx6000-um.pdf. - Page 5 Figure 1. VESA mounting bracket holes Figure 2. VESA mounting holes example 1. Locate the VESA mounting holes on the rear panel of the TV or monitor (see figure FPX6000 Quick Start Guide...
- Page 6 2. Install the mounting bracket using the screws recommended in the manual that came with the TV or monitor. 3. Place the FPX6000 in the bracket (see figure Figure 3. Placing the device on the VESA mounting bracket 4. Use 4 mounting screws included with the bracket to secure the FPX6000 in the bracket (see figure Figure 4.
- Page 7 The FPX6000 is installed in the VESA mounting bracket. Refer to section 8.0, “Install- ing Cables” on page 9. 5.0 Installing into a 19-inch Rack Do the following to install up to two devices in a 19-inch rack using the rack-mounting bracket (see figure Figure 5.
- Page 8 Figure 7. Installing the FPX6000 and Cover Plate 3. Install the 4 screws that were removed in step 1 (see figure Figure 8. Installing 4 screws to the underside of the rack mount 4. If there is another FPX6000 to install in the bracket, go to step 5. Otherwise, use 4 mounting screws included with the bracket to install the cover plate (see figure then go to step 6.
-
Page 9: Wall Mounting
5. Repeat steps 1 through 3 to secure the second FPX6000 to the bracket. 6. Place the rack mounting bracket at the desired location in the rack (verify that the bracket is level), then secure it by using 4 rack fasteners. 7. - Page 10 8.1 Installing cables on the FPX6000T Transmitter Do the following: 1. Install cables on the front panel of the FPX6000T (see figure 9) as follows: – If you are connecting a PTZ control input (RS422/VISCA) from a camera or con- troller, attach the cable to the Serial port.
- Page 11 ETH2 will not provide PoE power to a daisy-chained device. Figure 10. Transmitter rear panel ports Go to section 8.2 “Installing cables on the FPX6000R Receiver”. 8.2 Installing cables on the FPX6000R Receiver Do the following: 1. Install cables on the front panel of the FPX6000R (see figure 9 on page 10) as fol- lows:...
-
Page 12: Connecting Power
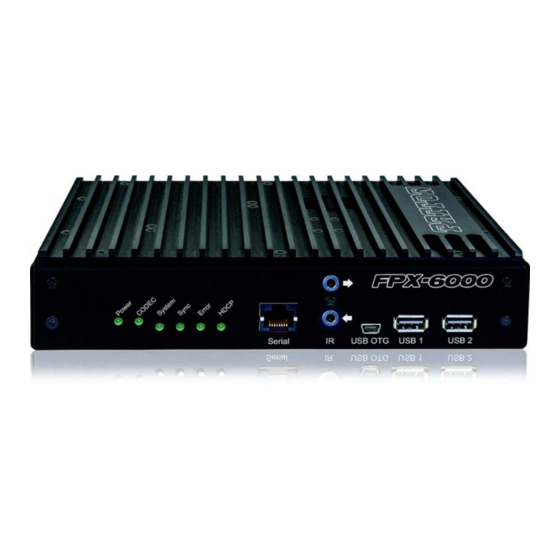
For best results, Patton recommends you use only professional 1G (or better) switches with IGMP Packet Snooping and a non-blocking backplane. Patton’s CL141E will power the device via PoE if the customer does not already have • a suitable supply. - Page 13 Table 1. Front panel ports and LED descriptions LEDs/Ports Description Green: Power is detected Power Off: Power is not detected Green: Indicates the CODEC is active CODEC Off: CODEC is not active Solid Green: All OK Amber: Booting up, awaiting sync System Red: System failed to boot correctly Off: No power...
- Page 14 Hardware Requirements: At least a 1-GHz CPU. • At least 512 MB of storage. • A 1-Gbps Ethernet connectivity port. • A display resolution of at least 1024 x 768, with a screen size of at least 19 inches is •...
- Page 15 10.3 Installing Dante Controller on Mac OS To install Dante Controller you will need to be logged on with administrator privileges. You do not have to uninstall the previous version before installing this update. Do the following to install the Dante Controller: 1.
- Page 16 Transmit channels are advertised on the network. A receiver uses this advertisement to establish a subscription to the channel. A transmit channel can be sent to multiple receivers using unicast or multicast. Receive channels are connected to transmit channels via a subscription. Each receive channel will receive audio over the network from at most one transmit channel.
- Page 17 If you do not already have a designated Dante Network Clock, Dante Controller will choose one from the available Dante devices. This process is automatic. 4. Locate the desired FPX6000T Unit Name in the transmit channel at the top of Dante Controller grid, then click the “+”...
- Page 18 PC host connected to the FPX6000T Transmitter. A.0 Customer and Technical Support Patton Electronics offers a wide array of free technical services. If you have technical questions about the FPX6000, begin your search for answers by using our Knowledge- base at https://www.patton.com/support/kb.asp.
-
Page 19: Compliance Information
2014/35/EU on the approximation of the laws of the member states relating to electrical equipment designed for use within certain voltage limits. The Declaration of Conformity may be obtained from Patton Electronics, Inc at www.patton.com/certifications. The safety advice in the documentation accompanying this device shall be obeyed. The conformity to the above directive is indicated by CE mark on the device. -
Page 20: Authorized European Representative
Republic of Ireland Copyright statement Copyright © 2021, Patton Electronics Company. All rights reserved. The information in this document is subject to change without notice. Patton Electron- ics assumes no liability for errors that may appear in this document. Trademarks statement Patton is a registered trademark of Patton Electronics Company in the United States and other countries.
Need help?
Do you have a question about the FiberPlex FPX6000 Series and is the answer not in the manual?
Questions and answers