Table of Contents
Advertisement
Quick Links
Advertisement
Table of Contents

Related Manuals for Keenon Robotics PEANUT M2


Summary of Contents for Keenon Robotics PEANUT M2
- Page 1 PEANUT M2 Disinfection Robot User Manual...
-
Page 2: Peanut M2 Disinfection Robot
Copyright © 2020 Keenon Robotics Co., Ltd. All rights reserved. Without the written permission from Keenon Robotics Co., Ltd. Any companies or individuals are not allowed to copy, replicate, transcribe or translate the contents of the manual, whether in part or in whole, nor spread it in any ways (electronic, photocopying, and recording, etc.) for profit. -
Page 3: Outline
Outline This manual mainly demonstrates the functions and features of the robot, methods of installation and usage of the robot, and some precautions when using. The manual mainly includes the following contents: Introduction: a brief description on the basic function and characteristics of the robot. Main Structure: a detailed introduction of the structure of the robot. -
Page 4: Table Of Contents
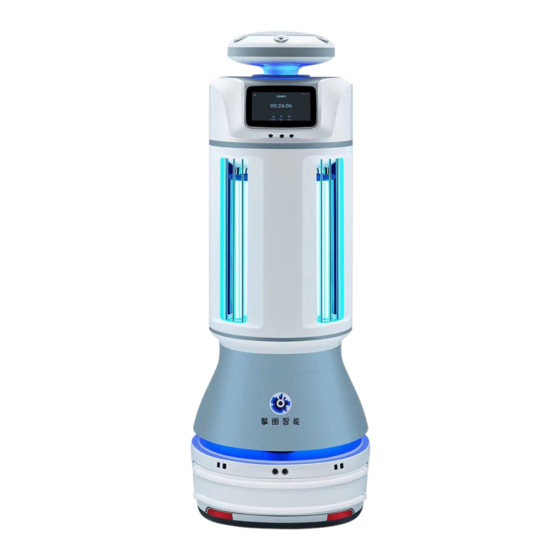
Content PEANUT M2 Disinfection Robot......................1 Statement.............................. 1 Preface..............................1 Outline..............................2 1. Introduction............................5 2. Main Structure..........................5 3. Operating Procedures........................6 3.1 Installation..........................6 3.1.1 Robot Mapping......................6 3.2 Power On..........................6 3.2.1 Power Button.......................6 3.2.2 App Instructions......................7 3.3 Charging..........................9 3.3.1 Autonomous Intelligent Recharge................ - Page 5 Front view Side view Back view Fig. 1 Structure diagram of PEANUT Disinfection Robot Note: The above figure is for reference only. Product appearance and color are subject to the actual product.
-
Page 6: Introduction
1. Introduction PEANUT Disinfection Robot is applied in public indoor occasions such as hospitals, quarantine areas, hotels, business offices, etc. PEANUT Disinfection Robot realizes fully autonomous positioning and navigation and intelligent obstacle avoidance through machine vision technology and radar, so it can move autonomously indoors. -
Page 7: Operating Procedures
Main bactericidal factor: Ultraviolet Sterilization factor intensity: Radiation intensity at 1m away from the ultraviolet lamp>200µW/cm Sterilization principle: Ultraviolet rays destroy the molecular structure of DNA or RNA in the cells of microbes and cause the cells to die, thereby achieving the effect of sterilization and disinfection. Types of microorganisms to be killed: Staphylococcus albus, pores of Bacillus subtilis var. -
Page 8: App Instructions
robot. When you turn on the robot, it will take about 40s to start the system before operation. After you turn off the robot, the machine will be powered off immediately. Fig. 3 Schematic diagram of power switch position 3.2.2 App Instructions 3.2.2.1 Introduction The basic disinfection progress: Firstly, the user selects the disinfection mode in the APP. - Page 9 starts spraying for disinfection and continues this operation along the way back and forth. Meanwhile, the robot will send a voice prompt every 2 minutes until the disinfection process for pre-set number of cycles is completed. After that, the robot continues to spray on the next route or returns to the original point.
-
Page 10: Charging
1. When using disinfectant, please follow relevant regulations and pay attention to safety;; 2. Ultraviolet radiation should be used in unmanned state to prevent harm to people; 3.2.2.3 Settings Press the ‘Settings’ button at the top left of the main page and enter the 4-digit password to enter the setting page. -
Page 11: Autonomous Intelligent Recharge
3.3.1 Autonomous Intelligent Recharge The robot has the function of intelligent autonomous recharge. The robot will return to the charging pile to recharge if below two conditions are met. Besides, please ensure that the charging pile is secured in position and plugged. ... -
Page 12: Disinfectant Discharging
Fig. 4 Disinfectant filling port 3.5 Disinfectant Discharging When you have to discharge the disinfectant in the robot, firstly, please pull out the gray silicone plug on the top of the robot(DO NOT destroy the plug), as shown in Figure 5; then insert the end of the hose of the pump into the head of the robot, and put the other end of the pump in the container to catch the disinfectant;... -
Page 13: Indicator Light
Fig .5 Top Silicone plug for discharging the disinfectant 3.6 Indicator Light Indicator light status Meaning Blue breathing light (slow blinking) The robot is in standby status, and neither the spray device nor the ultraviolet lamps are turned on. Blue run light (rotating) The robot is in operation, with spraying device or ultraviolet lamp on. -
Page 14: Moving Robot Manually
Fig. 6 The emergency stop button The emergency stop button of the robot is on the back of the robot, which is the position shown by the number 16 in the figure. To activate the emergency stop switch, firstly you need to open the outer cover of the emergency stop switch, and then destroy the acrylic protection plate in the middle layer, and finally press the red emergency stop switch to stop the robot in an emergency. -
Page 15: Troubleshooting And Parameters Of The Robot
Fig. 7 Schematic diagram for moving the robot * Note: The gap of the laser layer is the only force-bearing part of the robot to be handled. When moving robots, you should strictly follow the instructions. It is strictly prohibited to directly pull and lift the bottom of the robot, turn over the robots, or directly lift the robot's face and head. - Page 16 The robot cannot move 1. The robot is in the blind area of the map, please turn off and navigate. the robot and push it to the vicinity of the starting point to start navigation again. 2. The top camera, stereo vision or the gap of the laser layer is covered;...
-
Page 17: Performance And Parameters Of The Robot
4.2 Performance and Parameters of the Robot Model Disinfection Robot No. M2 Dimension 500*500*1350 mm Disinfectant volume Spraying Parameter Spraying output: 0.5-1.5L/h; Spray particle size < 10µm. Number ultrasonic 6 sets of ultra-dry atomizing nozzles atomization devices Applicable disinfectant Hydrogen peroxide, hypochlorous acid,... - Page 18 Moving speed 0-0.8m/s Maximum climbing angle Slope ≤ 3° Network interface WIFI Battery capacity DC 48V 15Ah Rated power 150W Standby current Standby current is less than 0.5A Endurance time about 4 hours Standby time Standby time is greater than 24 hours Life span 20,000 h Temperature and humidity...
-
Page 19: Safety Instructions
4.3 Safety Instructions 4.3.1 Use Restrictions (1) As a wheeled robot, the product shall only operate in indoor environment with flat ground (smooth ground; slope: < 3°; protrusion height: ≤ 0.5cm). Do not operate the robot in outdoor environment (such as open balcony) or rugged ground (such as stairs). (2) Do not operate the robot in a suspended environment (e.g. -
Page 20: Battery And Charging
(14) As the disinfectant is a chemical medicine, please strictly abide by the disinfectant usage specification when using the disinfectant atomization method for disinfection. In case of damage caused by improper use of disinfectant, all responsibilities shall be borne by the users themselves and have nothing to do with our company. -
Page 21: Non-Warranty Clause
If the product fails in the warranty period due to quality or manufacturing issues of original components, maintenance will be provided free of charge. The warranty period is 1 (one) year from the date of purchase of the equipment. 5.2 Non-Warranty Clause The warranty is only applicable to the products under normal use. -
Page 22: After-Sales Service
Our customer service response time is maximum of 48 hours Appendix Thank you for choosing the PEANUT M2 Disinfection Robot.We will provide you with quality and efficient services. This manual is a detailed document to guide the installation, operation and maintenance of this product. - Page 23 Please only use the emergency charging cable for an emergency charge. Do not attempt to open the equipment housing by unauthorized personnel. This manual provides information related to the product. All contents in the manual are subject to change without notice, including printing errors, inaccurate information, or improvements to software and equipment.
Need help?
Do you have a question about the PEANUT M2 and is the answer not in the manual?
Questions and answers