Table of Contents
Advertisement
Available languages
Available languages
Advertisement
Chapters
Table of Contents

Related Manuals for Keenon Robotics W3


Summary of Contents for Keenon Robotics W3
- Page 1 Smart Delivery Robot W3 User Manual...
-
Page 2: Notice
(electronic, photocopy, recording, etc.) for any commercial purposes without the prior written permission of Keenon Robotics Co., Ltd. This manual is for reference only and may not be exhaustive. Please contact our Technical Support if you have any questions. -
Page 3: Safety Instructions
Safety Instructions Warnings: This wheeled robot is intended for indoor use on flat surfaces (smooth surface with a slope less than 5 degrees and a stair height no more than 15 mm). Do not use it outdoors (e.g., on an open balcony) or on any rugged ground (e.g., on stairs). - Page 4 Staring into the source for not very long times, greater not than 100 s. Do not use the robot in suspended environments (such as in a duplex apartment, on an open balcony, on top of furniture, or on stairs) or in environments without guardrails.
- Page 5 recommended. Use the product in accordance with the User Manual or Quick Start Guide. Any loss or damage caused by improper use shall be borne by the user. WARNING! This product contains a button/coin cell battery. If the button/coin cell battery is swallowed, it can cause internal chemical burns in as little as two hours and lead to death.
- Page 6 Do not wipe or clean the charging contacts with a piece of wet cloth or wet hands. Do not discard waste batteries. Leave them to a professional recycling organization. If the product will be left unused for a long period, store it in a cool and dry place after having it fully charged and switched off.
- Page 7 Changes or modifications not expressly approved by the party responsible for compliance could void the user's authority to operate the equipment. This equipment has been tested and found to comply with the limits for a Class B digital device, pursuant to part 15 of the FCC Rules. These limits are designed to provide reasonable protection against harmful interference in a residential installation.
- Page 8 L'antenne installée doit être située de facon à ce que la population ne puissey être exposée à une distance de moin de 20 cm. Installer l'antenne de facon à ce que le personnel ne puisse approcher à 20 cm ou moins de la position centrale de l’...
- Page 9 Introduction This manual describes the functions, features, installation, and use of Keenon smart delivery robot W3 as well as the precautions during the operation. It covers: Robot introduction: A brief description of the robot's basic functions and features and a detailed presentation of its structure.
-
Page 10: Table Of Contents
Contents Notice ........................2 Safety Instructions ................... 3 Robot Introduction (Getting to Know the Robot) ..........11 Robot Structure ..................... 11 Operations (Using the Robot) ................14 Installation ..................... 14 Powering On ....................15 Settings ......................16 Delivery ......................20 Charging ...................... -
Page 11: Robot Introduction (Getting To Know The Robot)
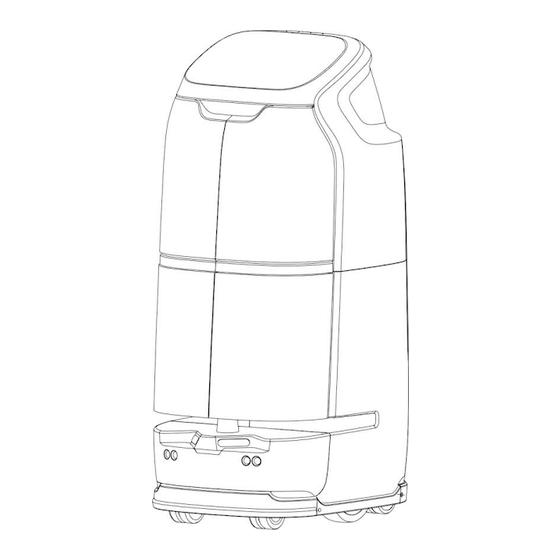
The product described in this manual is the smart delivery robot W3. Robot Structure Figure 1 shows the main structure of W3. The robot chassis features two drive wheels and four driven wheels. The machine vision and LiDAR allow for autonomous positioning. - Page 12 9. Decorative hole 10. Turn signal 11. Anti-collision strip 12. Omni-directional wheels 13. Drive wheel 14. Power switch 15. Manual charging port 16. Emergency stop switch 17. Auto charging port 18. Image Module (Side View) Figure 1. Structure of W3...
- Page 13 Figure 2 shows the structure of the charging pile of W3. The robot has the function of intelligent and autonomous recharging. It will automatically locate, match, and connect with the charging pile for auto-charging when its battery level drops to 5% or it is sent for charging manually.
-
Page 14: Operations (Using The Robot)
Operations (Using the Robot) Please follow the steps below to get started. Installation 1. Mapping Mapping is the process where the robot explores its operating environment and recognizes and stores the information in the form of maps. This is required for the robot to run autonomously. (Mapping will be performed by a professional technician. -
Page 15: Powering On
Powering On 1. Power Switch The power switch is located between the robot chassis and the main body. It is on the left side when you are facing the robot. Find the power switch as shown in Figure 3 and press it to power on the robot. The blue light strip in the gap of the laser layer will be lit up. -
Page 16: Settings
2. Launching PEANUT APP ① Once the robot is powered on, the boot logo, PEANUT animation, and Android desktop will be displayed in turn. The startup takes about 40 seconds. ② The PEANUT APP will be launched automatically upon startup by default. If the PEANUT APP is not launched, tap the icon of the PEANUT APP (see Figure 4) on the system desktop to launch it. - Page 17 1. Functions & Operations Functions such as compartment door opening/closing, task modification, and task cancellation are supported. ① Compartment door opening/closing: Tap Open/Close Door to open or close the compartment door. ② Task modification: If the task information is found to be wrong after the robot starts off, tap Modify Task to return to the home page and re-enter the task information.
- Page 18 4. Additional Functions ① Hiding room number: This function allows the room number to be hidden on the display while the robot is performing the delivery. ② Background music: This function allows the robot to play background music while performing the delivery. 5.
- Page 19 7. Delivery Notification Voice notification, internal call notification, mobile phone notification, etc. can be provided when the robot arrives at the destination. Please select the notification based as needed. ① Voice notification: The robot broadcasts the name of the destination to inform the user to pick up the items in time.
-
Page 20: Delivery
Delivery After mapping and configurations, the robot is ready to work. The operation steps are as follows: ① Tap the Delivery icon; ② Enter the correct password and go to the page for selecting the destination; ③ Select the compartment you want to use and tap its icon to open its door;... -
Page 21: Charging
Charging 1. Auto-Charging The robot features intelligent auto-charging, which allows it to automatically return to the charging pile for charging in the following cases. Make sure the charging pile is secured in place and has good conductivity. ⚫ The battery level is below the preset auto-charging battery level; ⚫... -
Page 22: Emergency Handling
3. Charging with Power Adapter (not recommended, and operation of the robot is prohibited during charging) In case the robot is out of power and unable to be powered on, follow the steps below to charge the robot with a power adapter: ①... -
Page 23: Moving The Robot
Note: If the emergency stop button is pressed on a slope, the robot will release the kinetic energy and continue to move due to inertia, which may cause injury. The position of the emergency stop switch is shown in Figure 5. Emergency stop switch Figure 5. - Page 24 Force-bearing area Figure 6. Moving the Robot *Note: The middle position on both sides of the robot is the force-bearing area that you can hold when moving the robot. Please strictly follow the instructions. During the movement, it is strictly prohibited to lift the robot from the bottom, the tray, the gap of the laser layer, or the face and head directly, or dump the robot.
-
Page 25: Appendices
Appendices Faults & Troubleshooting Faults Possible Causes & Solutions Robot cannot be 1. Low battery. Charge the robot with the power adapter. powered on 2. If the problem persists, please contact the seller staff for treatment Robot cannot be 1. The location of the charging pile has changed. Place charged the charging pile back to its original location. - Page 26 5. If the problem persists, please contact the seller staff for treatment Robot cannot 1. The voice is turned off or the volume is too low. Reset provide voice the voice. prompts 2. If the problem persists, please contact the seller staff for treatment Robot cannot Power off the robot immediately and...
-
Page 27: Specifications
Specifications Model Dimensions 450*550*1080 mm Upper compartment: 39*38.5*30 cm Lower compartment: 39*38.5*30 cm Compartment The two compartments on each floor can be merged Capacity (L*W*H) into one. Auto door opening & closing Compartment 20 kg in total, with 10 kg for each floor Load Net Weight 48 kg... - Page 28 Rated Power 120W Maximum 0.8 m/s Moving Speed Maximum Slope ≤ 5° Climbing Angle Maximum 15 mm Surmountable Height Minimum Travel 70 cm Width Wi-Fi Supporting 802.11b/g/n transmission protocol Battery Life 9-12 hours (assuming 3 deliveries per hour and 5 minutes for each delivery) Network Port Wi-Fi/2G/3G/4G Standby Current...
-
Page 29: Warranty Policy
Environment Charging Mode Auto/manual charging; input: 100-240V, 50/60Hz; output: 54.6V, 3.0A Charging Pile 230*220*290 mm Dimensions Charging Pile 2.5 kg Weight Sensors LiDAR, depth vision sensor, and touch sensor WIFI Frequency 2.4-2.484GHZ LoRa Frequency 850.125MHz~930.125MHz LTE Frequency LTE FDD: B1/B2/B3/B4/B5/B7/B8/B12/B13/B18/ B19/B20/B25/B26/B28 LTE TDD: B38/B39/B40/B41 WCDMA: B1/B2/B4/B5/B6/B8/B19... - Page 30 Robot (excluding consumable parts) 1 year Consumable part: Omni-directional wheel 6 months Consumable part: Power adapter 6 months 2.Warranty Conditions: a) During the warranty period, product quality failures that occur under normal use conditions. b) The original factory label on the robot must be kept intact. c) Provide a valid proof of purchase.
- Page 31 j) Damage caused by exceeding the load limit. k) The product fails after the warranty period.
- Page 32 Keenon Robotics Co., Ltd. Official website: http://www.keenon.com 11F, Building 56, No. 1000 Jinhai Road, Pudong District, Shanghai WeChat Official Account: KeenonRobot After-sales WeChat Official Account: Keenon Robotics Technical Support Website: http://www.keenon.com...
- Page 33 スマートデリバリーロボット W3取扱説明書...
- Page 34 注意 Copyright © 2019 Keenon Robotics Co., Ltd. All rights reserved. この文書は、Keenon Robotics Co., Ltd.の書面による事前の許可なしに、商業 目的で個人または組織が一部または全部をコピー、複製、転写、翻訳した り、あらゆる形式や手段(電子形式、写真、録画など)で送信することが 禁止されています。 この取扱説明書は参照用であり、網羅的でない場合があります。ご不明な 点がございましたら、テクニカルサポートまでご連絡ください。 この取扱説明書は事前の予告なく内容や画像を変更することがあります。 この取扱説明書は参照用であり、実際の製品とは異なっている場合があり ます。すべての記載は、いかなる保証も提供されません。...
-
Page 35: 安全に関する注意事項
安全に関する注意事項 警告: この車輪付きロボットは屋内の平らな床(傾斜5°未満、段差15mm未満の平 らな面) の上での使用を想定しています。 屋外 (オープンバルコニーなど) や凸凹のある地面(階段など)では使用しないでください。 本装置は、8歳以上のお子様、および身体的、感覚的、精神的能力の低下し た人や経験や知識のない人でも、安全な方法での使用に関する監督や指導 を受け、その危険性を理解していれば使用することが可能です。 - 子供を本装置で遊ばせないでください。 - 清掃およびユーザーメンテナンス作業は監督なしに子供が実施しないで ください。 - 本装置は提供されたユニットのみ使用できます。 - 本装置には交換できないバッテリーが内蔵されています。 バッテリーの充電には、本製品に付属の取り外し可能な電源ユニットのみ を使用してください。 本装置は、8歳以上のお子様、および身体的、感覚的、精神的能力の低下し た人や経験や知識のない人でも、安全な方法での使用に関する監督や指導 を受け、その危険性を理解していれば使用することが可能です。 子供を本装置で遊ばせないでください。清掃およびユーザーメンテナンス 作業は監督なしに子供が実施しないでください。 光 源 を 非 常 に 長 い 時 間 ( 100 秒 以 上 ) 見 つ め な い で く だ さ い 。... - Page 36 ロボットは階層のある環境(メゾネットタイプ、オープンバルコニー、家 具の上、階段など)や柵のない環境で使用しないでください。 ロボットを45°C以上または0°C未満の温度、または液体や粘着性物質のある 床の上で使用しないでください。 ロボットを使用する前には、床の上のケーブルを整理し、ロボットに絡ま ないようにしてください。 ロボットを使用する前には、ロボットの筐体を傷つけないように、床の上 のすべての鋭利な物体(装飾、ガラス、釘など)を片付けてください。 ロボットの静止/動作中にかかわらず、ロボットの上に運べない物体(子供 や動物など)を置かないでください。 動作中はロボットを押したり、動かしたりしないでください。 ロボットを動かす際は、取扱説明書の指示に従ってください。 ロボットおよび充電パイルの清掃やメンテナンスを行う際は、電源を切っ てから行ってください。 硬いもの、鋭利な物体との接触を避けてください。 ロボットに液体をこぼさないでください。 ロボットを押したり、倒立させないでください。 このロボットは電子製品です。火気に近づけないでください。 輸送時には電源が切れていることを確認し、元の梱包を使用することを推 奨します。 製品の使用は、取扱説明書またはクイックスタートガイドに従ってくださ い。誤使用により生じた損失または損害は、ユーザーの責任となります。...
- Page 37 警告!本製品にはボタン電池/コイン電池が内蔵されています。ボタン型電 池/コイン電池を飲み込んだ場合、体内で早ければ2時間以内に化学火傷を 生じ、 死亡することもあります。 使用済み電池は直ちに廃棄してください。 新品/使用済み電池は子供の手の届かない場所に保管してください。 バッテ リー収納部がしっかりと閉まらない場合は、製品の使用を中止してくださ い。バッテリーを飲み込んだ/体内に取り込んだと思われる場合には、直ち に医師の診察を受けてください。 バッテリーと充電: 他社製のバッテリー、電源アダプター、充電パイルを使用しないでくださ い。許可なくバッテリーや充電パイルを分解、修理、改造しないでくださ い。BC254480030電源ユニットのみを使用してください。 充電パイルを熱源(ストーブなど)に近づけないでください。...
- Page 38 濡れた布や濡れた手で、充電接点を拭いたり、清掃しないでください。 使用済みバッテリーはゴミとして廃棄せず、専門のリサイクル業者に委託 してください。 製品を長期間使用しない場合には、満充電し、電源を切ってから、涼しく 乾燥した場所で保管してください。バッテリーの損傷を防ぐため、最低月 に一回は充電してください。 - プラグ接続可能な装置の場合:装置の近くで、簡単に手の届く場所にコン セントを配置してください。 注:正しくない種類のバッテリーを使用すると、爆発の危険があります。 使用済みバッテリーは指示に従って廃棄してください。 注意: 本装置はFCC規則パート15/イノベーション・科学経済開発省(カナダ)の ライセンス免除RSSに準拠しています。 操作は次の2つの条件を満たします。 (1) 本装置は有害な干渉を生じる恐れがない。(2) 意図しない操作の原因と なる可能性のある干渉を含む、 あらゆる干渉を許容できなければならない。...
- Page 39 L’émetteur/récepteur exempt de licence contenu dans le présent appareil est conforme aux CNR d’Innovation, Sciences et Développement économique Canada applicables aux appareils radio exempts de licence. L’exploitation est autorisée aux deux conditions suivantes : 1. L’appareil ne doit pas produire de brouillage; 2.
- Page 40 準拠の責任を負う当事者によって明示的に承認されていない変更または改 造を行うと、 装置を操作するユーザーの権限が無効になることがあります。 本装置はFCC規則のパート15に準拠したクラスBのデジタル装置の制限に準 拠していることが試験および確認されています。これらの制限は、住宅に 設置する際の有害な干渉に対する合理的な保護を提供するように設計され ています。本装置は電波エネルギーを発生、使用、放射し、取扱説明書に従 って設置および使用しない場合には、無線装置に有害な干渉が生じることが あります。しかし、特定の設置によって干渉が発生しなくなるという保証は ありません。本装置がラジオやテレビの受信に有害な干渉を引き起こす場 合は、装置の電源をオン/オフにすることで判定できます。ユーザーは以下 の1つ以上の方法で干渉を修正することが推奨されます。 —受信アンテナの向き/位置を変える。 —装置と受信機の間の距離を伸ばす。 —受信機が接続されている回路とは別のコンセントに装置を接続する。 —販売店または熟練のラジオ/TV技術者に相談する。 MPE(最大許容曝露)のお知らせ FCC/IC RFの曝露要件に準拠するために、装置の動作中は本装置のアンテナ と人との間の距離を20cm以上取ることが必要です。 準拠するためには、この距離よりも近い距離での操作は推奨されません。...
- Page 41 L'antenne installée doit être située de facon à ce que la population ne puissey être exposée à une distance de moin de 20 cm. Installer l'antenne de facon à ce que le personnel ne puisse approcher à 20 cm ou moins de la position centrale de l’ antenne.
- Page 42 はじめに 本取扱説明書では、KeenonスマートデリバリーロボットW3の機能、特徴、 設置、使用方法、操作時の注意事項について説明します。 内容: ロボットの紹介:ロボットの基本機能と特徴の簡潔な説明と、構造の 詳細な説明。 操作:ロボットの設置と使用中の準備と注意事項。 付録:ロボットの一般的な障害、詳細な仕様、安全上の注意。 保証規定。...
- Page 43 目次 注意 ........................34 安全に関する注意事項 ................35 ロボットの紹介(ロボットを知る) ............... 44 ロボットの構造 ....................44 操作(ロボットを使う) ................... 47 設置 ....................... 47 電源オン ....................... 48 設定 ....................... 49 配達 ....................... 53 充電 ....................... 54 緊急時の取り扱い ..................55 ロボットの移動 ................... 56 付録 ........................58 故障とトラブルシューティング...
-
Page 44: ロボットの紹介(ロボットを知る
ロボットの紹介(ロボットを知る) ⚫ W3はホテル、オフィスビル、レストラン、スーパーマーケット、映画 館、カラオケボックスなど、公共屋内環境向けに設計されたスマート デリバリーロボットです。 ⚫ W3はマシンビジョンとLiDARを用いた完全自律型の位置決めとナビゲ ーション、インテリジェントな障害物回避の基本機能を備えており、 屋内を自律的に移動し、ターミナルから目的地への配達、オフィス文 書の配達、商品や持ち帰り品の速配サービスを提供します。 ⚫ この取扱説明書に記載の製品は、 スマートデリバリーロボットW3です。 ロボットの構造 図1にW3の主な構造を示しています。ロボットの筐体には、2つの駆動輪と 4つの被駆動輪が付いています。搭載されているマシンビジョンとLiDARに より、自律位置決めが可能です。衝突センサーなどのセンサーとの組み合 わせにより、インテリジェントな障害物回避を実現しています。ロボット システムはタッチスクリーンから操作できます。... - Page 45 (正面図) (背面図) 1.タッチスクリーン 2.装飾ライトストリップ 3.コンパートメント 4.装飾テープ 5.空気出口 6.スピーカー 7.LiDAR 8.デュアルステレオビ ジョンモジュール 9.装飾穴 10.方向指示灯 11.衝突防止ストリップ 12.全方向ホイール 13.駆動輪 14.電源スイッチ 15.手動充電ポート 16.緊急停止スイッチ 17.自動充電ポート 18.画像モジュール (側面図) 図 1. W3 の構造...
- Page 46 図2にはW3の充電パイルの構造を示します。ロボットにはインテリジェン ト自律充電機能が備わっています。バッテリーレベルが5%に低下した場合、 または手動で充電する場合、自動充電用の充電パイルを自動的に探し、見 つけて接続します。 (上面図) 20.インジケーター 21.熱放散穴 22.充電接点 (背面図) (正面図) 図 2.充電パイルの構造...
-
Page 47: 操作(ロボットを使う
操作(ロボットを使う) 以下の手順に従い、開始してください。 設置 3. マッピング マッピングはロボットが動作環境を探索し、地図の形式で情報を認識 して、保存するためのプロセスです。これはロボットが自律走行する ために必要です。(マッピングは専門の技術者が実行します。ユーザー の操作は不要です)。 屋内環境に大きな変化があった場合(例えば改装、室内のアイテムの 置き換え、新しい環境へのロボットの配置など)には、販売業者に連 絡して再度のマッピングを依頼してください。 4. 充電パイルの設置 インテリジェント自動充電機能が正しく機能するためには、簡単にア クセスできる動作環境に充電パイルを設置する必要があります。設置 は販売業者の技術者が行います。設置した後は、無断で移動しないで ください。充電パイルの場所を変更するには、販売業者に連絡してく ださい。... -
Page 48: 電源オン
電源オン 3. 電源スイッチ 電源スイッチはロボット筐体と本体の間にあります。 ロボットに向かっ て左側にあります。図3に示す電源スイッチを探し、それを押してロボッ トの電源を入れます。レーザー層の隙間にある青色ライトストリップ が点灯します。システムが起動してから、動作準備が完了するまで約 40秒間お待ちください。 1.ロボットの電源を切る際も同様です。ロボットの電源スイッチをオ フにすると、ロボットの電源がすぐに切れます。 2.ユーザーがロボットを動かす必要がある場合には、最初に電源をオ フにしてください。 電源スイッチ 図3.電源スイッチの位置... - Page 49 4. PEANUTアプリの起動 ③ ロボットの電源を入れると、起動ロゴ、PEANUTアニメーション、 Androidデスクトップが順番に表示されます。起動には約40秒かか ります。 ④ PEANUTアプリはデフォルトで起動時に自動で立ち上がります。 PEANUTアプリが起動されない場合には、システムデスクトップの PEANUTアプリのアイコン (図4参照) をタップして起動してください。 図4. PEANUTアプリのアイコン PEANUTアプリが起動すると、ロボットの動作準備が完了です。 設定 次の手順でPEANUTアプリのロボット設定を変更できます。 ③ ホームページの左上にある3本の横線アイコンをタップして、PIN パスワードページにアクセスします。 ④ デフォルトのPINは「0000」です。 正しいPINを入力して、設定ページに進みます。...
- Page 50 9. 機能と操作 コンパートメントドアの開閉、タスク変更、タスク取り消しなどの機能を サポートしています。 ④ コンパートメントドアの開閉:[ドアを開ける/閉じる]をタップし て、コンパートメントドアを開けたり閉じたりします。 ⑤ タスク変更:ロボットの起動後にタスク情報が間違っていること に気づいた場合は、[タスク変更]をタップしてホームページに 戻り、タスク情報を再入力します。 ⑥ タスク取り消し:現在のタスクを取り消す場合、またはタスクが ない場合には、[タスク取り消し]をタップしてタスクを取り消 します。ロボットは開始位置に戻り、待機します。 10. 音量調節 音量ボタンをタップして、音量を調節します。 11. パスワード変更 ロボットのデフォルトパスワードは 「0000」 です。 以下の手順に従い、 パスワードを変更します。 ⑤ [パスワード変更]をタップすると、現在のパスワードを入力す るウィンドウがポップアップ表示されます。 ⑥ 現在のパスワードを正しく入力後、新しいパスワードを入力する ウィンドウがポップアップ表示されます。 ⑦ 新しいパスワードを入力後、新しいパスワードを再入力するウィ ンドウがポップアップ表示されます。 ⑧ 2つの新しいパスワードが一致すると、パスワードはリセットされ ます。...
- Page 51 12. その他の機能 ③ 部屋番号の非表示: この機能は、 ロボットが配達を行っている間、 部屋番号をディスプレイで非表示にすることができます。 ④ バックグラウンドミュージック:この機能は、ロボットが配達を 行っている間に音楽を再生できます。 13. 手動充電 手動充電は2つの方法でトリガーできます。 オプション1:[今すぐ充電]をタップすると、ロボットは自動で充電 パイルを探して充電します。オプション2:ロボットを手動で充電パイ ルに移動させ、充電します。以下の手順を参照してください。 ⑥ 左側のナビゲーションバーで[電源管理]をタップすると、[電 源管理設定]ページがポップアップ表示されます。 ⑦ [手動充電]をタップすると、[手動充電]ページが表示されます。 ⑧ ロボットを手動で充電パイルに移動すると、プロンプトページが 表示されます。 ⑨ ロボットの背面を充電パイルに合わせてから、ロボットを押し、 ロボットの底部にある充電ポートと充電パイルの充電接点が正し く接触するようにします。 ⑩ 正常に接続されると、充電パイルのインジケーターが赤色に変わ ります。 14. コンパートメントの選択 1コンパートメントおよび4コンパートメントオプションなど、複数の 選択が可能です。ロボットに合わせたコンパートメントを選択してく ださい。...
- Page 52 15. 配達通知 ロボットが目的地に到着した際に、音声通知、内線通知、携帯電話通 知などを提供できます。必要に応じて、通知を選択してください。 ④ 音声通知:ロボットは目的地の名称を放送して、ユーザーに時間 内に品物を受け取るように知らせます。これは企業内またはその 他の公共シナリオでの配達に適しています。 ⑤ 内線通知:Keenon電話モジュールを購入し、内線通話システムに 接続した場合には、内線通知が選択できます。到着すると、ロボッ トは目的地の内線番号にダイヤルし、品物が届けられたことを通 知します。これはホテルなどのアプリケーションに適しています。 ⑥ 携帯電話通知:到着すると、ロボットはSMSを送信し、電話を掛け て目的地で品物を受け取るようにユーザーに知らせます。 (現在、 ロボットは最大5分間待つことができます)。 16. 音声放送 ロボットが途中で障害物に遭遇した場合、知らせるために自動で音声を放 送します。 エレベーターに乗っているときには、ロボットは乗客にディスプレイまた は音声で作業や状況を知らせます。...
- Page 53 配達 マッピングと設定が終わると、ロボットの動作が可能です。操作手順は以 下のとおりです。 ⑧ [配達]アイコンをタップします。 ⑨ 正しいパスワードを入力し、目的地を選択するためのページに進 みます。 ⑩ 使用するコンパートメントを選択し、アイコンをタップしてドア を開きます。 ⑪ 携帯電話番号または目的地のフロア番号/エリア番号を入力し、配 達する品物をコンパートメントに入れます。 ⑫ [ドアを閉じる] ボタンをタップすると、 ロボットが出発します。 回転式改札口とエレベーターがIoTに接続されている場合、ロボッ トは回転式改札口を通過し、エレベーターに乗って、指定された 階の目的地に向かうことができます。 ⑬ 到着すると、ロボットは事前に設定された方法で、受け取りにつ いてユーザーに通知します。 ⑭ ユーザーが品物を受け取り、[ドアを閉じる]ボタンをタップす ると、 ロボットは充電パイル/待機場所に戻ります。 ユーザーが [ド アを閉じる]ボタンをタップしない場合、ロボットはタイムアウ ト時に自動でドアを閉じます。...
- Page 54 充電 4. 自動充電 このロボットにはインテリジェント自動充電機能が備わっており、次 の場合には自動的に充電パイルに戻り、充電できます。充電パイルが 決められた場所に固定され、適切に通電していることを確認します。 ⚫ バッテリーレベルが事前設定した自動充電レベルを下回っている。 ⚫ 非動作時のバッテリーレベルが100%未満である。 自動充電条件を設定するには、この取扱説明書の「設定」の章にある 「充電設定」を参照してください。 5. 手動充電 PEANUTアプリの[設定]ページで、ロボットの手動充電を有効化し、 制御できます。詳細については、「設定」の章を参照してください。 *注: どちらの場合も、ロボットは充電パイルで充電されます。充電パイルが適 切に通電されており、ロボットと正しく接続されていることを確認してく ださい。安全上のリスクにつながる可能性のある不適切な操作を避けるよ うに注意してください。...
-
Page 55: 緊急時の取り扱い
6. 電源アダプターを使用した充電(推奨されない。充電中のロボット操 作は禁止) ロボットの電源が切れて、電源が入らない場合には、以下の手順に従っ て、電源アダプターを使用してロボットを充電してください。 ⑤ ロボットの電源スイッチをオフにします。 ⑥ ロボットの背面にある手動充電ポートのカバーを開き、充電ケー ブルでアダプターをロボットに接続します。 ⑦ 接続に成功すると、アダプターのインジケーターが赤色に変わり、 充電ページが表示され、ロボットが充電中であることが分かります。 ⑧ 充電が完了すると、インジケーターが緑色に変わります。ロボット から電源アダプターを外し、手動充電ポートのカバーを閉じます。 緊急時の取り扱い 次の場合には、ロボットの後ろにある緊急停止スイッチを押すと、ロボッ トを停止させることができます。 1) ロボットが正常に動作しておらず、 周囲環境に損害を与える可能性がある。... -
Page 56: ロボットの移動
緊急停止 スイッチ 注: 斜面で緊急停止ボタンを押すと、 ロボットは運動エネルギーを放出し、 慣性により移動を続け、 ケガの原因となることがあります。 図5に非常停止 スイッチの位置を示します。 図5.カバーを外した状態の非常停止スイッチの拡大図 ロボットの移動 ロボットは貴重な装置です。手動で移動する際には、必ず以下の指示に従っ てください。 図6に示すように、 ロボットの両側にある支持力エリアを手で持って、 ロボ ットを持ち上げることができます。移動中は常にロボットを直立させた状 態で維持してください。... - Page 57 支持力エリア 図6.ロボットの移動 *注: ロボットの両側にある中央の位置は、ロボット移動時に持つことができる 支持力エリアです。 必ず指示に従ってください。 移動中はロボットの底部、 トレイ、レーザー層の隙間、顔や頭を直接持ち上げたり、乱暴に落下させ ることは絶対にしないでください。不適切な操作により生じたロボットの 損傷は、ユーザーの責任となります。...
-
Page 58: 故障とトラブルシューティング
付録 故障とトラブルシューティング 故障 考えられる原因と解決策 ロボットの電源 3. バッテリー残量低下。電源アダプターでロボット が入らない を充電します。 4. それでも問題が続く場合には、 販売業者の担当者に 連絡して、対処してもらってください。 ロボットが充電 5. 充電パイルの場所が変更されました。充電パイル できない を元の場所に戻します。 6. 充電パイルに給電されていません。充電パイルを 電源に接続します。 7. 充電パイルが塞がっています。充電パイルの前に 置かれた障害物を除去します。 8. それでも問題が続く場合には、 販売業者の担当者に 連絡して、対処してもらってください。 移動時の 6. 位置決めエラーです。 ロボットを充電パイルに移動 ナビゲー して充電すると、自動的に位置決めが回復します。 ションエラー 7. 位置決めに使われるビジョンモジュールが塞がれ ています。ビジョンモジュールを塞いでいる物体 をすべて除去します。 8. LiDARエラーです。LiDARに汚れがないか確認します。 9. - Page 59 ていることを確認します。 10. それでも問題が続く場合には、 販売業者の担当者に 連絡して、対処してもらってください。 ロボットが音声 3. 音声がオフになっている、または音量が小さすぎ プロンプトを提 ます。音声をリセットします。 供できない 4. それでも問題が続く場合には、 販売業者の担当者に 連絡して、対処してもらってください。 ロボットが正し 直ちにロボットの電源を切り、 販売業者の担当者に連 く動かない 絡して、対処してもらってください。 ロボットが転倒 直ちにロボットの電源を切り、 販売業者の担当者に連 する 絡して、対処してもらってください。...
- Page 60 仕様 モデル 寸法 450*550*1080 mm 上部コンパートメント:39*38.5*30 cm コンパートメント 下部コンパートメント:39*38.5*30 cm 容量(長さ x 幅 x 各段の2つのコンパートメントは1つに統合でき 高さ) ます。 自動ドア開閉 コンパートメン 合計20 kg、各段10 kgずつ ト搭載可能重量 総重量 48 kg 主な材料 ABS樹脂(本体) ディスプレイ 11.6インチHDタッチスクリーン(解像度 1920*1080) 位置決めとナビ レーザー、IMU、エンコーダーマルチセンサーに ゲーション よる位置決めとナビゲーション 障害物回避 デュアルステレオビジョン、衝突防止ストリッ プ、画像モジュールを含むマルチセンサーによる 障害物回避 スピーカー 2サウンドトラック...
- Page 61 定格電流 2.5A 定格出力 120W 最大移動速度 0.8 m/秒 最大登坂角度 斜度5°以下 最大乗り越え 15 mm 高さ 最小移動幅 70 cm Wi-Fi 802.11b/g/n伝送プロトコル対応 バッテリー稼 9~12時間(1時間あたり3回の配達、各配達にか 働時間 かる時間を5分と想定した場合) ネットワーク Wi-Fi/2G/3G/4G ポート 待機電流 0.5A未満 待機時間 約15時間 充電時間 約6.5時間 使用可能寿命 20,000時間 動作温度と湿度 0~45°C、相対湿度:5%~85%、埃なし 保管温度 0~60°C 動作環境 屋内の平らで滑らかな床 充電モード 自動/手動充電。入力:100-240V、50/60Hz。出力:...
-
Page 62: 保証規定
WIFI周波数 2.4~2.484GHZ LoRa周波数 850.125MHz~930.125MHz LTE FDD: B1/B2/B3/B4/B5/B7/B8/B12/B13/B18/ LTE周波数 B19/B20/B25/B26/B28 LTE TDD: B38/B39/B40/B41 WCDMA: B1/B2/B4/B5/B6/B8/B19 GSM: B2/B3/B5/B8 最大出力 保証規定 1. 製品の保証期間: Keenonは消耗部品を除く主要部品に12か月間の保証サービスを提供し、消 耗部品には6か月間の保証サービスを提供します。 主要部品の保証期間 名前 保証期間 ロボット(消耗部品を除く) 1年間 消耗部品:全方向ホイール 6か月 消耗部品:電源アダプター 6か月 2. 保証条件: 保証期間中に通常の使用条件で発生した製品品質の不具合につい て保証を提供します。 ロボットの工場出荷時ラベルは元のままであること。 有効な購入の証明書を提供すること。 次の条件は保証条件を満たしていません。 Keenonの案内なしに行われた許可のない分解や改造。 製品自身の問題によるものではない損傷。... - Page 63 落雷や火災などの不可抗力により生じた問題。 正式な指示や案内なしに行われた修理によって生じた損傷。 経年劣化または損傷した部品で強制的に動作させたことによって 生じた損傷。 Keenonの純正部品以外を用いて修理したことによって生じた故障 または損傷。 部品のラベルを改変または剥がした場合。 電力不足または品質に問題のあるバッテリーを使用したことによっ て生じた損傷。 製品の取扱説明書に従わないユーザー操作によって生じた損傷 (以 下の状況が含まれるがこれに限定されない): 不適切な充電によって生じたバッテリーの損傷。 対応する状況に合わせた設定ができていないことで生じたロボッ トの損傷。 輸送中の不適切な操作によって生じたロボットの損傷。 金属や鋭利な物体(装飾品、ガラス、鉄の釘など)がロボットに ぶつかって生じた損傷。 ロボットに液体をこぼしたことで生じた損傷。 45°C以上または0°C未満の環境でロボットが損傷した場合。 床の上に液体または粘着物がある環境で使用したことで生じたロ ボットの損傷。 配達できない物体(子供や動物)をロボットに置いたことで生じ た損傷。 濡れた布や濡れた手で充電パイルの接点を拭いた場合。 搭載可能重量制限を超えたことによる損傷。 保証期間後の製品の故障。...
- Page 64 Keenon Robotics Co., Ltd. 公式Webサイト:http://www.keenon.com 11F, Building 56, No. 1000 Jinhai Road, Pudong District, Shanghai WeChat 公式アカウント:KeenonRobot アフターサービス用 WeChat 公式アカウント:Keenon Robotics テクニ カルサポート Web サイト:http://www.keenon.com...
- Page 65 스마트 배달 로봇 W3 사용 설명서...
- Page 66 Copyright © 2019 Keenon Robotics Co., Ltd. All rights reserved. 본 문서는 Keenon Robotics Co., Ltd.의 사전 서면 허가 없이 개인 또는 조직에서 문서의 일부 또는 전체를 복사, 복제, 전사 또는 번역할 수 없 으며, 형태와 수단(전자, 복사, 녹음 등)을 불문하고 상업적 목적으로 전...
-
Page 67: 안전 지침
안전 지침 경고: 본 로봇에는 바퀴가 달려 있으며 실내의 평평한 표면(경사가 5도 미만 이며 계단 높이가 15mm 이하인 매끄러운 표면)에서 사용하기 위해 제 작되었습니다. 야외(예: 열린 발코니)에서 사용하거나 울퉁불퉁한 바닥 (예: 계단)에서 사용하지 마십시오. 8세 이상의 어린이, 신체적, 지각적, 정신적 능력이 저하된 사람, 또는 경험... - Page 68 떨어질 위험이 있는 환경(예: 복층 아파트, 열린 발코니, 가구 또는 계단 위)이나 가드레일이 없는 환경에서 로봇을 사용하지 마십시오. 온도가 45°C 이상 또는 0°C 미만인 환경이나 액체 또는 끈적한 물질이 있는 표면에서 로봇을 사용하지 마십시오. 사용 전 바닥의 모든 케이블을 정리해 로봇에 감기지 않도록 하십시오. 사용...
- Page 69 경고! 이 제품에는 버튼/코인 셀 배터리가 포함되어 있습니다. 버튼/코인 셀 베터리를 삼킨 경우 2시간 내에 체내에서 화학적 화상이 발생해 사망할 수 있습니다. 사용한 배터리는 즉시 폐기하십시오. 새 배터리와 사용한 배 터리는 어린이의 손이 닿지 않는 곳에 보관하십시오. 배터리함이 단단히 닫히지 않을 경우 제품 사용을 중단하십시오. 배터리를 삼켰거나 체내에 배터리가...
- Page 70 젖은 천이나 젖은 손으로 충전 접촉부를 닦거나 청소하지 마십시오. 폐기용 배터리를 버리지 마십시오. 전문 재활용 기관에 맡기십시오. 장기간 제품을 사용하지 않을 경우 완전히 충전하고 전원을 끈 상태로 건조하고 시원한 곳에 보관하십시오. 배터리 손상을 방지하기 위해 한 달에 한 번 이상 충전하십시오. -플러그형...
- Page 71 L’émetteur/récepteur exempt de licence contenu dans le présent appareil est conforme aux CNR d’Innovation, Sciences et Développement économiq ue Canada applicables aux appareils radio exempts de licence. L’exploitatio n est autorisée aux deux conditions suivantes : 1. L’appareil ne doit pas produire de brouillage; 2.
- Page 72 규정 준수 책임이 있는 당사자가 명시적으로 승인하지 않은 변경 또는 수정은 장비 작동에 대한 사용자의 권한을 무효화할 수 있습니다. 본 장비는 테스트를 완료했으며, FCC 규정 파트 15에 따라 클래스 B 디 지털 장치에 대한 제한 사항을 준수하는 것으로 확인되었습니다. 이러 한...
- Page 73 é ê é à L'antenne install e doit tre situ e de facon ce que la population ne p ê é à uissey tre expos une distance de moin de 20 cm. Installer l'antenne à à de facon ce que le personnel ne puisse approcher 20 cm ou moins d e la position centrale de l’antenne.
- Page 74 서문 본 설명서는 Keenon 스마트 배달 로봇 W3의 기능, 특징, 설치, 사용 및 작동 중 주의사항을 기술합니다. 다루는 내용은 다음과 같습니다. 로봇 소개: 로봇의 기본적 기능과 특징에 대한 간략한 설명 및 상 세한 구조 제시. 10. 작동: 로봇 설치 및 사용 중 준비 작업과 주의사항.
- Page 75 목차 공지 ........................66 안전 지침 ..................... 67 로봇 소개(로봇 알아보기) ................. 76 로봇 구조 ......................76 작동(로봇 사용) ....................79 설치 ....................... 79 전원 켜기 ..................... 80 설정 ....................... 81 배달 ....................... 85 충전 ....................... 86 비상 조치 ..................... 87 로봇...
-
Page 76: 로봇 소개(로봇 알아보기)
⚫ 본 설명서에서 설명하는 제품은 스마트 배달 로봇 W3입니다. 로봇 구조 그림 1은 W3의 주요 구조를 나타냅니다. 로봇 프레임에는 구동 바퀴 2 개와 피동 바퀴 4개가 장착되어 있습니다. 머신 비전 및 LiDAR를 통해 자동 위치 제어가 가능합니다. 센서와 같은 센서와 결합하여 지능... - Page 77 8. 듀얼 스테레오 비전 모듈 9. 장식용 구멍 10. 방향 표시등 11. 충돌 방지 스트립 12. 전방향 바퀴 13. 구동 바퀴 14. 전원 스위치 15. 수동 충전 포트 16. 비상 정지 스위치 17. 자동 충전 포트 18. 이미지 모듈 (측면도) 그림 1. W3 구조...
- Page 78 그림 2는 W3의 충전 파일 구조를 나타냅니다. 로봇은 지능형 자율 재충전 기능을 갖추고 있습니다. 배터리 수준이 5% 미만으로 떨어지거나 충전을 위해 로봇을 수동으로 보내면 로봇이 자동으로 충전 파일을 찾아 매칭하고 연결하여 충전합니다. (상부도) 20. 표시등 21. 열 배출구 22. 충전 접촉부...
-
Page 79: 작동(로봇 사용)
작동(로봇 사용) 다음 단계를 따라 시작합니다. 설치 5. 매핑 매핑은 로봇이 작동 환경을 탐색하고 정보를 인식하여 지도 형태로 저장 하는 프로세스입니다. 로봇의 자율 실행을 위해 필요한 단계입니다. (매 핑은 전문 기술자가 수행합니다. 사용자의 조작이 필요하지 않습니다.) 실내 환경에 중대한 변화가 발생할 경우(예: 실내 장식 변경, 실내 물품 의... -
Page 80: 전원 켜기
전원 켜기 5. 전원 스위치 전원 스위치는 로봇 프레임과 본체 사이에 있습니다. 로봇을 마주볼 때 왼쪽에 위치합니다. 그림 3에 표시된 전원 스위치를 찾고 눌러 로봇 전 원을 켭니다. 레이저 레이어 사이에 있는 청색 라이트 스트립에 조명이 들어옵니다. 약 40초 후에 시스템이 시작되고 작동 준비가 완료됩니다. 1. - Page 81 6. PEANUT 앱 실행 ⑤ 로봇 전원이 켜지면 부팅 로고와 PEANUT 애니메이션, Android 바탕 화면이 차례로 표시됩니다. 시작하기까지 약 40초 정도 걸립니다. ⑥ PEANUT 앱은 기본값 설정에 따라 시작 시 자동으로 실행됩니다. PE ANUT 앱이 실행되지 않을 경우 시스템 바탕 화면에서 PEANUT 앱 아이콘(그림...
- Page 82 17. 기능 및 작동 보관함 도어 열림/닫힘, 작업 변경, 작업 취소와 같은 기능이 지원됩 니다. ⑦ 보관함 도어 열림/닫힘: Open/Close Door(도어 열기/닫기)를 눌 러 보관함 도어를 열거나 닫습니다. ⑧ 작업 변경: 로봇이 작동을 시작한 후 작업 정보가 잘못되었음을 확인할 경우 Modify Task(작업 수정)를 눌러 홈 페이지로 돌아 가서...
- Page 83 20. 추가 기능 ⑤ 객실 번호 숨기기: 이 기능을 사용하면 로봇이 배달하는 동안 객실 번호를 숨길 수 있습니다. ⑥ 배경 음악: 이 기능을 사용하면 로봇이 배달하는 동안 배경 음 악을 재생할 수 있습니다. 21. 수동 충전 두 가지 방식으로 수동 충전을 시작할 수 있습니다. 옵션...
- Page 84 23. 배달 알림 로봇이 목적지에 도착하면 음성 알림, 내선 통화 알림, 휴대폰 알림 등을 제공할 수 있습니다. 필요에 따라 알림을 선택해 주십시오. ⑦ 음성 알림: 사용자가 늦지 않게 물품을 가져갈 수 있도록 로봇이 목적지의 이름을 방송합니다. 회사 내부 또는 기타 공공 구역에서 배달하는...
- Page 85 배달 매핑과 구성을 마치고 나면 로봇의 작동 준비가 완료됩니다. 작동 단계 는 다음과 같습니다. ⑮ Delivery(배달) 아이콘을 누릅니다. ⑯ 정확한 암호를 입력하고 목적지 선택 페이지로 이동합니다. ⑰ 사용할 보관함을 선택하고 해당하는 아이콘을 눌러 도어를 엽 니다. ⑱ 휴대폰 번호나 목적지의 층 번호/구역 번호를 입력하고 배달할 물품을...
- Page 86 충전 7. 자동 충전 로봇에는 지능형 자동 충전 기능이 있어 다음 경우에 자동으로 충 전 파일로 돌아가 충전할 수 있습니다. 충전 파일이 단단하게 고정 되어 있으며 전도율이 우수한지 확인하십시오. ⚫ 배터리 수준이 사전 설정된 자동 충전 배터리 수준 미만일 경우 ⚫...
-
Page 87: 비상 조치
9. 전원 어댑터를 통한 충전(권장되지 않음, 충전 중 로봇 작동 금지) 로봇 전원이 꺼져 있고 전원이 켜지지 않는 경우 다음 단계를 통해 전 원 어댑터로 로봇을 충전하십시오. ⑨ 로봇 전원 스위치를 끕니다. ⑩ 로봇 후면의 수동 충전 포트 커버를 열고 충전 케이블을 사용하여 로봇에... -
Page 88: 로봇 이동
비상 정지 스위치 그림 5. 커버를 제거한 상태인 비상 정지 스위치를 확대한 부분도 로봇 이동 로봇은 귀중한 장치이므로 수동으로 로봇을 옮길 경우 반드시 아래 지침을 따라 주십시오. 그림 6과 같이 손으로 로봇 양쪽의 내력 부분을 잡고 로봇을 들어올릴 수 있습니다. 이동 중에는 언제나 로봇을 똑바로 세웁니다. - Page 89 내력 부부 그림 6. 로봇 이동 *참고: 로봇 양측의 중간 부분은 내력 부분으로, 이 부분을 잡고 로봇을 옮길 수 있 습니다. 반드시 지침을 준수하십시오. 이동 중 로봇의 하단이나 트레이, 레이 저 레이어 사이의 틈, 얼굴이나 머리 부분을 직접 들어올리거나 로봇을 거칠 게...
-
Page 90: 결함 및 문제 해결
부록 결함 및 문제 해결 결함 잠재적 원인 및 해결 방법 로봇 전원이 켜 5. 배터리 수준이 낮음 전원 어댑터로 로봇을 충전 지지 않음 합니다. 6. 문제가 지속될 경우 판매처 직원에게 문의하십시오 로봇을 충전할 9. 충전 파일의 위치가 변경되었습니다. 충전 파일 수... - Page 91 15. 문제가 지속될 경우 판매처 직원에게 문의하십시오 로봇이 음성 프 5. 음성이 꺼져 있거나 볼륨이 너무 낮습니다. 음 롬프트를 재생 성을 재설정하십시오. 할 수 없음 6. 문제가 지속될 경우 판매처 직원에게 문의하십시오 로봇이 제대로 즉시 로봇 전원을 끄고 판매처 직원에게 문의하십시오 이동할...
- Page 92 사양 모델 치수 450*550*1080mm 상단 보관함: 39*38.5*30cm 하단 보관함: 39*38.5*30cm 보관함 용량(L*W*H) 각 층의 보관함 2개는 하나로 통합할 수 있습 니다. 자동 도어 열림/닫힘 보관함 하중 총 20kg, 각 층마다 10kg 총 중량 48kg 주요 재질 ABS 플라스틱 본체 디스플레이 11.6인치...
- Page 93 최대 이동 각도 5° 미만 경사 최대 이동 높이 15mm 최소 이동 너비 70cm 802.11b/g/n 전송 프로토콜 지원 Wi-Fi 배터리 수명 9~12시간(시간당 배달 3건, 배달 1건당 소요 시 간 5분 가정 시) 네트워크 포트 Wi-Fi/2G/3G/4G 대기 전류 < 0.5A 대기 시간 약...
-
Page 94: 품질보증 정책
LTE TDD: B38/B39/B40/B41 WCDMA: B1/B2/B4/B5/B6/B8/B19 GSM: B2/B3/B5/B8 최대 출력 품질보증 정책 1. 제품 품질보증 기간: Keenon은 전체 기계에서 소모품을 제외한 주요 부품에 대해 12개월, 소 모품에 대해 6개월 동안 품질보증 서비스를 제공합니다. 주요 부품 품질보증 기간 명칭 품질보증 기간 로봇(소모품 제외) 1년... - Page 95 h) 전력 부족 또는 품질 문제가 있는 배터리를 사용하여 발생한 손상 i) 고객이 제품 설명서를 준수하지 않고 작동하여 발생한 손상(다음 상 황 포함): 1) 부적절하게 충전하여 발생한 배터리 손상 2) 해당하는 상황에 맞게 설정하지 않아 발생한 로봇 고장 3) 운반 중 부적절하게 작동하여 발생한 로봇의 손상 4) 금속...
- Page 96 Keenon Robotics Co., Ltd. 공식 웹사이트: http://www.keenon.com 11F, Building 56, No. 1000 Jinhai Road, Pudong District, Shanghai WeChat 공식 계정: KeenonRobot WeChat 공식 A/S 계정: Keenon Robotics 기술 지원 웹사이트: http://www.keenon.com...
Need help?
Do you have a question about the W3 and is the answer not in the manual?
Questions and answers