Table of Contents
Advertisement
Advertisement
Table of Contents

Related Manuals for Keenon Robotics T5


Summary of Contents for Keenon Robotics T5
- Page 1 Delivery Robot User Manual...
-
Page 2: Declaration
Copyright © 2019 Keenon Robotics Co., Ltd. Copyright reserved, all rights reserved Without the express written permission of Keenon Robotics Co., Ltd., any unit or individual shall not copy, duplicate, transcribe or translate partial or all contents in this Manual arbitrarily, nor propagate in any way (electronic, photocopying, recording, etc.) for profits. -
Page 3: Foreword
Foreword Honorable user, welcome to select the Delivery Robot . Before using your robot, please read this Manual carefully, get familiar with and use your robot gradually according to the instructions in the Manual. @Keenon Robotics... -
Page 4: Brief Introduction To The Manual
Brief Introduction to the Manual This Manual mainly introduces the functional characteristics, methods for installation and usage and precautions in usage of the Delivery Robot . This Manual includes the following contents: Introduction to the robot: This part briefly introduces the basic functional characteristics of the robot, and displays the structural information of the robot in detail. -
Page 5: Table Of Contents
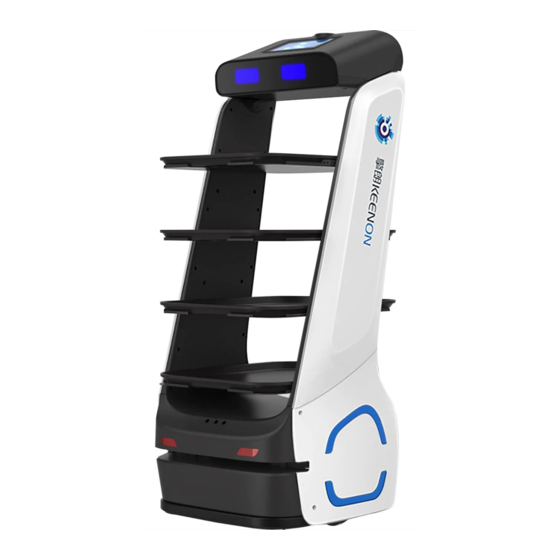
Contents Declaration ......................2 Foreword ......................... 3 Brief Introduction to the Manual ................4 Introduction to the Robot ..................7 Main Structure of the Robot ..................8 Operation Steps ....................... 9 Installation ....................... 9 Startup ......................10 Setup ......................12 Delivery ...................... - Page 6 (Front View) ( Side View ) 1. Touch area 2. Expression board 3. Stereo vision 4. Laser radar 5. Image module 6. Collision proof edge 7. Driven wheel 8. Driving wheel 9. Touch screen 10. Horn 11. Power switch 12. Manual charging port 13.
-
Page 7: Introduction To The Robot
It can move with full autonomy indoors, carry out intelligent voice interactions with people, and provide people with services such as meal delivery in restaurants, transfer of office files and express distribution. ⚫ The product described in this Manual is the Delivery Robot of model T5. -
Page 8: Main Structure Of The Robot
Main Structure of the Robot Figure 1 is the main structure drawing of the Delivery Robot . The chassis of the robot has the two-wheel driving and four-wheel driven structure. It realizes the autonomous positioning through machine vision and laser radar, and achieves intelligent obstacle avoidance by integrating touch switch and other sensors. -
Page 9: Operation Steps
Operation Steps Please start to use your robot by observing the following operation steps. Installation 1. Mapping by the Robot Before autonomous movement, the robot needs to get familiar with the mobile environment, stores and identifies the operation environment in the mode of map. -
Page 10: Startup
Startup 1. Power-on/Power-off Button The power switch is located on the chassis behind the robot. Open the silica gel cover below the chassis, and a button on the left will be seen, namely the power switch. Find the position of the power switch as shown in Figure 3,press the power switch with a finger, and the robot will be booted. - Page 11 Figure 4 Icon of the PEANUT APP After the PEANUT APP is booted, you can use the Peanut Robot normally.
-
Page 12: Setup
Setup Users can carry out relevant setups of the robot through the PEANUT APP, and the steps for entering the setup page of the robot are as follows: (taking meal delivery App as an example) (1) Enter the user setup page: ①... - Page 13 2. Charging Setup *The operation steps for the setup of [Minimum Electricity Consumption] of the robot are as follows: ① Enter the super setup page. ② Click the [Power Management] menu and the power management setup page will be displayed. ③...
- Page 14 operating and trigger the automatic recharging. The operation steps for the automatic recharging working time setup of the robot are as follows: The robot has the intelligent automatic recharging function, and users can set the working time of the robot in the PEANUT APP: ①...
- Page 15 volume button to adjust the volume. If the system menu bar isn’t displayed, operate as follows: ① Enter the user setup page. ② Find the [Volume Adjustment] menu, in which the music volume and voice volume can be adjusted respectively. ③...
- Page 16 the function of daemon mode will be closed, the PEANUT APP won’t start automatically after it is closed, and it is necessary to click the APP icon manually before operating the PEANUT APP. The operation steps for the startup self-booting setup: By default, the system will boot the PEANUT APP automatically.
-
Page 17: Delivery
Delivery The deployment personnel will create the map and corresponding resource allocation; Then start the PEANUT APP. And the robot will work for you. The operation steps are as follows: ① The pantry helper will place the items to be delivered on the trays of the robot;... -
Page 18: Charging
Charging 1. Charging by Adapter (It’s not allowed to operate the robot during the charging process by adapter) ① Open the silica gel casing outside the [Manual Charging Port] at the back of the robot, and use the charging plug of adapter to connect the robot. ②After the successful connection, the indicator light of the adapter turns red, and the screen interface skips to the charging page, indicating that the charging is in progress. - Page 19 3. The user triggers the charging of robot manually The user can trigger and control the automatic recharging of the robot by operating the PEANUT APP. The specific operation steps are as follows: ① Enter the user setup page and find [Charging Setup], or enter the super setup page and find [Power Management].
-
Page 20: Emergency
Emergency When the robot presents the following situations, the user can shut down the robot by pressing the emergency stop switch at the back of the robot: ① The user needs to move the robot when it is operating ② The robot is in a state of abnormal operation, which may cause damage and other situations to the surrounding environment The position of the emergency stop switch and the operation steps are shown in Figure 5:... -
Page 21: Carrying The Robot
Carrying the robot The robot is valuable equipment, when it needs to be handled artificially, please operate by strictly observing the following instructions. As shown in Figure 6, the locations of stand columns on both sides of the robot body are stress-bearing region. You can lift the robot by holding the regions with both hands. - Page 22 *Note: The middle locations on both sides of the robot body mentioned above are the only stress-bearing part for handling of the robot. Please handle the robot in strict accordance with the instructions. In the handling process, it is strictly prohibited to directly pull and lift the bottom of the robot, dump the robot, directly pull and lift the tray, directly pull and lift the clearance of laser layer, or directly pull and lift the face and head of the robot.
-
Page 23: Appendices
Appendices List of Abnormities and Fault Clearance Fault Phenomena Possible Reasons and Solutions 1. The electric quantity is insufficient, please connect the The robot fails to robot for charging via the adapter be booted 2. For other reasons, please contact the customer service normally staff to deal with 1. - Page 24 3. The robot has a radar fault, please check whether the laser radar rotates normally 4. The robot has a fault of impact switch, please check whether the impact switch is squeezed 5. For other reasons, please contact the customer service staff to deal with 1.
-
Page 25: Parameters Of Robot
Parameters of Robot Model Product Dimension 506*502*1205mm 490*404*188mm (Top Layer) Tray Dimension 490*404*176mm(Other Layer) Product Net Weight 55Kg Maximum Travel Speed 1.2m/s Loads 15Kg for the each layer ≤ 5° Maximum Climbing angle 2.4G WIFI(2412-2462MHz) Network Interface Battery Capacity DC 48V 15Ah Rated Power Endurance Continuous operation for more than 15h... -
Page 26: Safety Precautions
Storage Temperature -30℃-60℃ Working Air Pressure and One standard atmospheric pressure, the elevation doesn’t exceed 1,000m Elevation Safety Precautions Restrictions: This product is a wheeled robot, which is restricted to be only used in indoor flat environment (with smooth ground, slope gradient of less than 5 degrees, and protrusions not higher than 1cm). - Page 27 Please clean and maintain the robot and charging pile in the state of shutdown or outage. Please don’t use hardware or sharp objects to collide with the robot. Please don’t sprinkle any liquid into the robot. Please don’t push over the robot or place it upside down. The robot is an electronic product, please don’t make the robot get close to the fire.
- Page 28 once every month to avoid battery damage.
- Page 29 Material Testing: The main components of the robot have passed the testing by the EU ROHS (Restriction of Hazardous Substances), and conform to the requirements of relevant national laws and regulations. Caution: This device complies with Part 15 of the FCC Rules / Innovation, Science and Economic Development Canada’s licence-exempt RSS(s).Operation is subject to the following two conditions: (1) this device may not cause harmful interference.
- Page 30 L'antenne installée doit ê tre située de facon à ce que la population ne puissey être exposée à une distance de moin de 20 cm. Installer l'antenne de facon à ce que le personnel ne puisse approcher à 20 cm ou moins de la position centrale de l’ antenne.
- Page 31 11F, Building 56, City of Elite, No. 1000 Jinhai Road, Pudong New Area, Shanghai WeChat Subscription Account: Keenon Robotics After-sales WeChat Official Account: Keenon Robot Technical Support Center Official Website: http://www.keenon.com...
Need help?
Do you have a question about the T5 and is the answer not in the manual?
Questions and answers