Table of Contents
Advertisement
Quick Links
Advertisement
Table of Contents

Subscribe to Our Youtube Channel
Related Manuals for UTC Fire and Security Interlogix NX-535N


Summary of Contents for UTC Fire and Security Interlogix NX-535N
- Page 1 NX-535N Voice Module Installation Manual P/N 1077953 • REV 1.01 • ISS 24FEB12...
- Page 2 Copyright © 2011 UTC Fire & Security. All rights reserved. Trademarks and Interlogix, NX-535N and logo are trademarks of UTC Fire & Security. patents Other trade names used in this document may be trademarks or registered trademarks of the manufacturers or vendors of the respective products. Manufacturer UTC Fire &...
-
Page 3: Table Of Contents
Content General information 3 Programming the NX-535N voice module 4 Programming the NX-535N via the LED keypad 4 Programming the NX-535N via the LCD keypad 5 Programming the locations 7 Recording / Playing back messages 7 Configuring Handshake and Kiss-off 8 Examples 9 Message table and lenghts 10 Programming the control panel 11... -
Page 5: General Information
General information The NX-535N is a microprocessor-controlled voice module that allows you to report a recorded voice message to a specific phone number in case of an event. A maximum of 15 different alarm messages can be recorded. The voice messages can be recorded using a standard DTMF telephone set. -
Page 6: Programming The Nx-535N Voice Module
Programming the NX-535N voice module Programming the NX-535N via the LED keypad Entering the program mode To enter the program mode, press [*]-[8]. At this time, the five functions LED’s (Stay, Chime, Exit, Bypass and Cancel) will begin to flash. Next, enter the “Go To Program Code”... -
Page 7: Programming The Nx-535N Via The Lcd Keypad
Exiting a location After the last segment of a location is programmed, pressing the [*] key will exit that location, turn the “Ready” LED off and the “Armed” LED on. As before, you are now ready to enter another programming location. If an attempt is made to program an invalid entry for a particular segment, the keypad sounder will emit a triple error beep (beep, beep, beep) and remain in that segment awaiting a valid entry. - Page 8 Zone 1 LED = 1 Zone 2 LED = 2 Zone 3 LED = 4 Zone 4 LED = 8 Zone 5 LED = 16 Zone 6 LED = 32 Zone 7 LED = 64 Zone 8 LED = 128 Example: If the numerical data to be programmed in a location is “66”, press [6] - [6] on the keypad.
-
Page 9: Programming The Locations
Programming the locations Recording / Playing back messages LOCATION 0 – Recording / playback selector (3 segments, numerical data) Segment 1 – Recording / Playback selector Segment 1 contains the selector whether you want to record, playback or cancel the operation. Programming any value other than 0, 1 or 2 will be ignored. Selectors: Cancel the operation Recording mode... -
Page 10: Configuring Handshake And Kiss-Off
Configuring Handshake and Kiss-off LOCATION 1 – Configuring handshake and Kiss-off (2 segments, numerical data) When the NX-535N module reports an event and the call is answered, the system plays the leader message until the call taker acknowledges the call by means of pressing a specific phone key. -
Page 11: Examples
Examples Recording leader message 1. Go to program mode of Voice module (Module 77). 2. Select Location 0. • Segment 1 = 1 (= record mode) • Segment 2 = 0 (= leader message) 3. Connect a telephone handset into the RJ11 phone jack connector on NX- 535N module. -
Page 12: Message Table And Lenghts
4. Press the button on the NX-535N module and record your message through the handset. Example: “1420 North Main Street Gladewater, press any key to continue”(*). 5. Press the button again to stop recording. Your message is automatically played back. Recording kiss-off message 1. -
Page 13: Programming The Control Panel
Event message #5 Idem Event message #1 8.5 sec Event message #6 Idem Event message #1 8.5 sec Event message #7 Idem Event message #1 8.5 sec Event message #8 Idem Event message #1 8.5 sec Event message #9 Idem Event message #1 8.5 sec Event message #10 Idem Event message #1... - Page 14 Assigning messages to an event Assigning messages to an event is programmed in the locations for the slow format report codes starting on location 56. Please find below a table where to find back each individual report. Location Event report Location Event report Restore...
-
Page 15: Nx-535N Programming Worksheets
NX-535N programming worksheets (Defaults are in bold italic text) Location Description Default RECORDING / PLAYBACK SETTINGS Segment 1 Cancel operation Recording mode Playback mode Segment 2 Record / playback leader message Record / playback event message 1 Record / playback event message 2 Record / playback event message 3 Record / playback event message 4 Record / playback event message 5... -
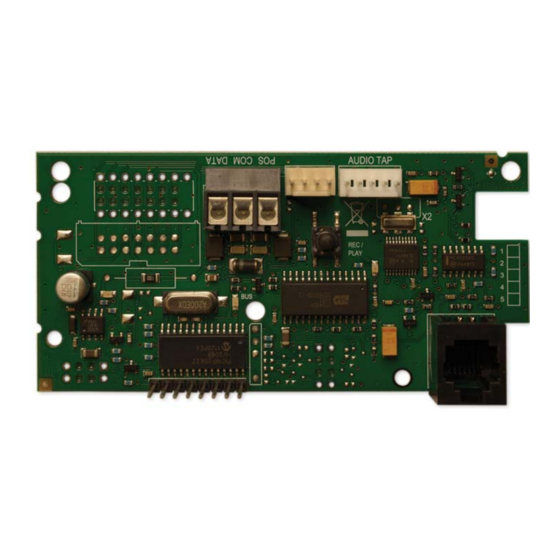
Page 16: Nx-535N Print Layout
NX-535N print layout Description Not used Not used Not used Record / Playback button Processor LED ON during Record / Playback NetworX bus terminals Bus activity LED Connection for telephone handset Audio tap NX-535N Voice Module Installation Manual... -
Page 17: Connection Diagram Vs Control Panel
Connection diagram vs control panel Connect the voice module NX-535N to the bus of the control panel. This can be done by using the screw terminal or the 4 wired bus cable. A special audio cable (included with the NX-535N) needs to be stuffed between the control panel and the voice module NX-535N. -
Page 18: Technical Specifications
Technical specifications Operating power 13.8 VDC supplied by the panel Operating current 30 mA Operating temperature 0 to 40°C / Relative humidity max. 93% Dimensions (PCB) 50 mm wide x 102 mm high x 20 mm deep Weight (PCB) 36 g Compatibility NX-8E-BEL with software 942D or higher NX-8E-FR with software 89C7 or higher... -
Page 19: Index
Index C N connection diagram, 15 NX-535N print layout, 14 L P locations programming configuring handshake and kiss-off, 8 via the LCD keypad, 5 recording / playing back messages, 7 via the LED keypad, 4 programming the control panel, 11 M ...
Need help?
Do you have a question about the Interlogix NX-535N and is the answer not in the manual?
Questions and answers