Table of Contents
Advertisement
Quick Links
重要安全说明
该设备已经通过安全性法规的要求和相关的测试,并已通过国际认证。就如所有电子设备一样,应当
谨慎小心地使用该设备。请阅读并遵守安全说明,以保护自己免受潜在的伤害并最大程度地降低损
请勿使用化学溶液清洁本产品。 只需用软布擦拭即可清洁表面。
请勿将显示器放置在不平坦的表面上。
请勿将显示器与尖锐的金属物品一起存放。
请按照说明和故障排除的内容调整调整显示器设置。
调整或维修机器内部必须由合格的技术人员进行。
请保留用户指南,以备参考。
如果长期不使用或雷雨天气时,请拔下电源并取出电池。
旧电子设备的安全处置
请不要将旧的电子设备视为普通生活垃圾,也不要焚化旧的电子设备。同时,请始终遵循当地的相关
法规,并将其移交给恰当的收集站以安全回收。确保可以有效地处理和回收旧物,以防止我们的环
境和家庭受到负面影响。
坏设备的风险。
请勿将显示器的屏幕朝向地面放置,以免刮伤 LCD 表面。
请避免设备遭受重击。
Advertisement
Table of Contents

Related Manuals for Lilliput PVM220S


Summary of Contents for Lilliput PVM220S
- Page 1 重要安全说明 该设备已经通过安全性法规的要求和相关的测试,并已通过国际认证。就如所有电子设备一样,应当 谨慎小心地使用该设备。请阅读并遵守安全说明,以保护自己免受潜在的伤害并最大程度地降低损 坏设备的风险。 请勿将显示器的屏幕朝向地面放置,以免刮伤 LCD 表面。 请避免设备遭受重击。 请勿使用化学溶液清洁本产品。 只需用软布擦拭即可清洁表面。 请勿将显示器放置在不平坦的表面上。 请勿将显示器与尖锐的金属物品一起存放。 请按照说明和故障排除的内容调整调整显示器设置。 调整或维修机器内部必须由合格的技术人员进行。 请保留用户指南,以备参考。 如果长期不使用或雷雨天气时,请拔下电源并取出电池。 旧电子设备的安全处置 请不要将旧的电子设备视为普通生活垃圾,也不要焚化旧的电子设备。同时,请始终遵循当地的相关 法规,并将其移交给恰当的收集站以安全回收。确保可以有效地处理和回收旧物,以防止我们的环 境和家庭受到负面影响。...
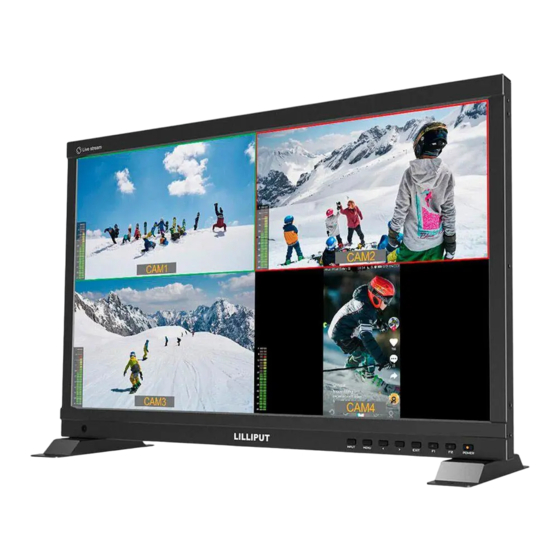
- Page 2 Introduction The 21.5 inch Full HD live streaming multiview monitor can be switched live up to 4 1080P high quality video signal inputs, which make it easy to create professional multi camera events for live streaming. At a time when live stream in mobile phone is popular, monitor innovatively built in phone mode so as to directly display a vertical video in multi camera.
-
Page 3: Table Of Contents
Contents 1. Product Description ........................ 3 1.1 Front Panel and Buttons ....................3 1.2 Rear Enclosure and Interfaces ..................4 1.3 Supported Installations ....................5 2. Menu Settings ........................6 2.1 User-definable Function Buttons ................... 6 2.2 MENU and ▷ / ◁ Buttons ................... 6 2.3 Menu Operation ...................... -
Page 4: Product Description
1. Product Description 1.1 Front Panel and Buttons 1) A window for brightness sensing 2) INPUT: Signal switching sequence: SDI 1, SDI 2, HDMI 1, HDMI 2, USB Type-C. Note! INPUT is available only in Full Screen or Vertical mode 3) MENU: Bring up the menu or confirm the options 4) ◁... -
Page 5: Rear Enclosure And Interfaces
1.2 Rear Enclosure and Interfaces 1) 3G-SDI output interface (PGM output) 2) 3G-SDI 2 loop output interface 3) 3G-SDI 2 input interface 4) 3G-SDI 1 loop output interface 5) 3G-SDI 1 input interface 6) HDMI output interface (PGM output) 7) HDMI 2 input interface 8) HDMI 1 input interface 9) 3.5mm Ear Jack 10) USB TYPE-C input interface... -
Page 6: Supported Installations
1.3 Supported Installations VESA mount bracket Mounting through standard VESA 75mm/100mm holes on the back of monitor: (The bracket is an optional part and supports multi-angle rotation and height adjustment) Base stand bracket Mounting through the screw holes left in the bottom of monitor:... -
Page 7: Menu Settings
2. Menu Settings 2.1 User-definable Function Buttons Press either F1, F2 for 3-5 seconds to bring up the function setting. Press [▷] or [◁] to select the desired option; Press [MENU] to confirm the option and set it as a shortcut function. Press [EXIT] to close the function setting. -
Page 8: Menu Operation
the sub-menu. The [▷] or [◁] buttons allow to switch or adjust the options and values in the menu, press [MENU] to confirm or [EXIT] to exit. When the OSD is not displayed, press the [▷] or [◁] button to adjust the volume. Press [MENU] again to switch between Volume, Brightness, Contrast, Saturation, Tint, Sharpness and Exit in that order. -
Page 9: Multiview
2.3.2 Multiview To set the multiview mode, preset values for the input signal and switch between different signals. PGM source: default value is SDI1/SDI2/HDMI1/HDMI2/TYPE-C, select the source for PGM output. PVW source: default value is SDI1/SDI2/HDMI1/HDMI2/TYPE-C, select PVW preview signal source, through the [PGM Cut] function can realize the PGM source and PVW source signal switch each other. - Page 10 Dual-1 Dual-2 Triple Quad Vertical Display: default is Camera/Phone. In phone mode, the vertical phone signal from USB Type-C output can be displayed in full screen. MV1 source selectable from SDI1/SDI2/HDMI1/HDMI2/TYPE-C, default is SDI1. MV2 source selectable from SDI1/SDI2/HDMI1/HDMI2/TYPE-C, default is SDI2. ...
-
Page 11: Umd
2.3.3 UMD Select to turn UMD on or off. When turn on, each source will display the selected UMD information, the UMD font color can be changed from white/red/green/blue/yellow/cyan/magenta, default is green. (Current demo UMD color is yellow, characters are typed as CAM1~4) Character Editing Method.:... -
Page 12: Picture
2.3.4 Picture Brightness selectable from 0 to 100 Contrast selectable from 0 to 100 Saturation selectable from 0 to 100 Tint selectable from 0 to 100 Sharpness selectable from 0 to 100 Color Temperature Adjustable color temperature level: 6500K, 7500K, 9300K, User. -
Page 13: Marker
2.3.5 Marker Center Marker Select On, it will appear "+" marker on center of screen. Aspect Marker The Aspect Marker provides various aspect ratios. Selectable from: 16:9/1.85:1/2.35:1/4:3/3:2/1.3X/2.0X/2.0X MAG Safety Makrer Used to select and control the size and availability of the safety area. Available type are: 95%/93%/90%/88%/85%/80%. -
Page 14: Function
The colors for Center Marker, Aspect Marker and Safety Marker are available in red, green, blue, white and black. Default is white. Aspect Mat. Aspect Mat darkens the area of the outside of Marker. The degrees of darkness are between [0] to [7]. ... - Page 15 Overscan Some edge of image may be clipped after turning on overscan. Default is Off. Note! The Overscan is not available in Multiview Mode Check Field Used to calibrate or analyse the accuracy of the screen color when Check Field is switched on. Selectable: Off/Red/Green/Blue/Mono.
- Page 16 False Color This monitor has a false color filter to aid in the setting of camera exposure. As the camera Iris is adjusted, elements of the image will change color based on the luminance or brightness values. This enables proper exposure to be achieved without the use of costly, complicated external equipment.
- Page 17 Histogram The horizontal axis of histogram represents the luminance, from left to right indicating low to high luminance. The vertical axis of histogram indicates the number of pixels, from bottom to top indicating the number of pixels from less to more. The higher the histogram bumps in a certain luminance range, the more pixels there are in that luminance range.
-
Page 18: Audio
2.3.7 Audio Volume Adjusts the volume of built-in speaker and headphone, selectable range: 0-100. Default is 50. Mute Disable any sound output when turn it off. Level Meter To achieve optimum audio quality, ensure the audio levels do not reach 0. This is the maximum level, meaning that any audio that exceeds this level will be clipped, resulting in distortion. -
Page 19: System
2.3.8 System Language Available in both Chinese and English. Back Light Mode Optional: Custom/AutoLight AutoLight mode allows the backlight value to be adjusted automatically according to the ambient brightness. Manual adjustment of the backlight value in Custom mode ... -
Page 20: Specifications
3. Specifications DISPLAY Panel 21.5" Physical resolution 1920×1080 Aspect 16:9 Brightness 500 nit Contrast 1500:1 Viewing Angle 170°/170° (H/V) VIDEO INPUT 1080p 60/59.94/50/30/29.97/25/24/23.98; 1080i 60/59.94/50; 720p 60/59.94/50…Backward compatible with other signals HDMI 1080p 60/59.94/50/30/29.97/25/24/23.98; 1080i 60/59.94/50; 720p 60/59.94/50…Backward compatible with other signals USB Type-C 1080p 60/59.94/50/30/29.97/25/24/23.98;... -
Page 21: Accessories
4. Accessories Standard Accessories 1) DC 15V Power Adapter 1 pair 2) Base Stand 1 pair 3) USB Type-C Cable 1 pc 4) Electronic User Manual 1 pc Optional Accessories 1) V-mount or Anton Bauer Battery Plate 1 pc 2) D-tap Cable 1 pc 3) Swivel Bracket 1 pc... -
Page 22: Trouble Shooting
5. Trouble Shooting 1. Only black-and-white display: Check whether the color saturation and check field are properly setup or not. 2. Power on but no pictures: Check whether the cables of HDMI, and 3G-SDI are correctly connected or not. Please use the standard power adapter coming with the product package.
Need help?
Do you have a question about the PVM220S and is the answer not in the manual?
Questions and answers