TESTO 320 Instruction Manual
Flue gas analyzer
Hide thumbs
Also See for 320:
- Instruction manual (74 pages) ,
- Manual (2 pages) ,
- Instruction manual (73 pages)

Related Manuals for TESTO 320


Summary of Contents for TESTO 320
- Page 1 All manuals and user guides at all-guides.com testo 320 · Flue gas analyzer Instruction manual Testo-Direct info@Testo-Direct.com 1.888.610.7664 www. .com...
- Page 2 All manuals and user guides at all-guides.com Testo-Direct info@Testo-Direct.com 1.888.610.7664 www. .com...
-
Page 3: Table Of Contents
Keypad ......................20 4.3.3. Display.......................21 4.3.4. Instrument connections ..................22 4.3.5. Condensate outlet and interfaces ..............22 4.3.6. Rear view ......................23 4.3.7. Components ......................24 4.4. Compact flue gas probe ..............25 4.5. Modular flue gas probe ..............25 Testo-Direct info@Testo-Direct.com 1.888.610.7664 www. .com... - Page 4 6.1.2.10. Language ................... 39 6.1.2.11. Country version .................. 39 6.1.2.12. Password protection ................40 6.1.3. Sensor settings ....................40 6.1.3.1. O reference ..................40 6.1.3.2. Sensor protection ................41 6.1.3.3. Recalibration/adjustment ..............41 6.1.4. Fuels ......................... 42 Testo-Direct info@Testo-Direct.com 1.888.610.7664 www. .com...
- Page 5 Checking the particle filter.................66 7.7.4. Replacing the particle filter................66 7.8. Condensate container ..............66 Tips and assistance................68 8.1. Questions and answers ..............68 8.2. Accessories and spare parts ............69 8.3. Updating the instrument software ..........72 Testo-Direct info@Testo-Direct.com 1.888.610.7664 www. .com...
-
Page 6: Safety And The Environment
Always pay attention to information that is marked by the following warnings with warning pictograms. Implement the specified precautionary measures. Representation Explanation WARNING Indicates potential serious injuries CAUTION indicates potential minor injuries indicates circumstances that may lead to NOTICE damage to the products Testo-Direct info@Testo-Direct.com 1.888.610.7664 www. .com... -
Page 7: Ensure Safety
> Do not perform contact measurements on non-insulated, live parts. > The testo 320 is not suitable for long-term measurements and should not be used as a safety (alarm) instrument. > Do not store the product together with solvents. Do not use any desiccants. -
Page 8: Protecting The Environment
70 °C unless they are expressly permitted for higher temperatures. > The testo 320 must be checked before commissioning for any visible damage. Do not commission the testo 320 if there are signs of damage on the housing, mains unit or supply lines. -
Page 9: Specifications
These systems can be adjusted using the testo 320 and checked for compliance with the applicable limit values. The following tasks can also be carried out with the testo 320: • Regulating the O2, CO and CO2 values in combustion plants for the purpose of ensuring optimal operation. -
Page 10: Bluetooth ® Module (Option)
The FCC demands that the user is to be informed that with any changes and modifications to the device, which have not been explicitly approved by testo AG, the right of the user to use this device will become null and void. -
Page 11: Declaration Of Conformity
All manuals and user guides at all-guides.com 3 Specifications 3.2.3. Declaration of Conformity Testo-Direct info@Testo-Direct.com 1.888.610.7664 www. .com... -
Page 12: Measurement Ranges And Resolution
±0.2 vol.% < 20 s ±20 ppm (0 to 400 ppm) < 60 s ±5% of meas. val. (401 to 2000 ppm) ±10% of meas. val. (2001 to 4000 ppm) Depending on the country version Testo-Direct info@Testo-Direct.com 1.888.610.7664 www. .com... - Page 13 (50.1 to 100.0 hPa) 1203) ±1.5% of meas. val. (rest of range) temperature ± 0.5°C (0.0 to 100.0°C) depending on the probe ±0.5% of meas. val. (rest of range) Efficiency Flue gas loss higher value is valid Testo-Direct info@Testo-Direct.com 1.888.610.7664 www. .com...
-
Page 14: Other Instrument Data
573 g Dimensions 240 x 85 x 65 mm Memory 500 measured values Display Graphic colour display, 240 x 320 pixels Gas leak testing visual indication (LED) probe audible indication by buzzer Optimum rech. batt. Charge level: capacity at 50-80% ambient storage conditions temperature: 10-20°C... -
Page 15: Product Description
Recommended for stowing away the measuring instrument and accessories (example) 4.1.1. Bottom level view 1 Sealing clip 2 Flue gas analyser testo 320 3 Repository for printer accessories • Spare batteries for IRDA printer • 1 roll of spare thermal paper (0554 0568) 4 Repository for printer •... -
Page 16: Top Level View
Flue gas probe (e.g. 0600 9741) • Pitot tube for heating check (0635 2050) 8 Large storage compartment • Mains unit fortesto 320 (0554 1105) • Differential temperature set (0554 1208) • Spare dirt filter (0554 0040) 9 Round storage compartment •... -
Page 17: Case 0516 3301 (Accessory)
5. Surface temperature probe Type K (0604 0994) 4.2. Case 0516 3301 (accessory) Recommended for stowing away the measuring instrument and accessories (example) 4.2.1. Bottom level view 1 Fine pressure probe (0638 0330) 2 testo 308 smoke tester (0632 0308) Testo-Direct info@Testo-Direct.com 1.888.610.7664 www. .com... -
Page 18: Middle Level View
7 Probes • Flue gas probe (e.g. 0600 9741) • Pitot tube for heating check (0635 2050) 8 Large storage compartment • Mains unit for testo 330-1 /-2 LL (0554 1096) • Differential temperature set (0554 1208) Testo-Direct info@Testo-Direct.com 1.888.610.7664 www. -
Page 19: Top Level View
3 Storage compartment • Capillary hose set for fine pressure probe (0554 1215) • Connecting cable for surface probe (0430 1215) 4 Combustion air temperature probe (0600 9787) 5. Surface temperature probe Type K (0604 0994) Testo-Direct info@Testo-Direct.com 1.888.610.7664 www. .com... -
Page 20: Measuring Instrument
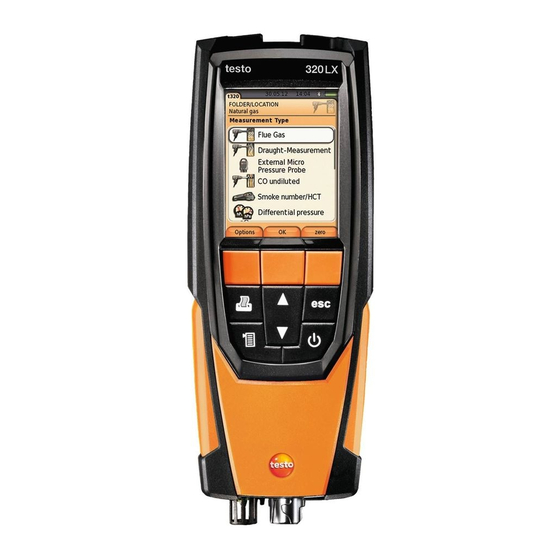
Measuring instrument 4.3.1. Front view 1 Display 2 Function keys 3 Keypad 4.3.2. Keypad Button Functions Switch measuring instrument on / off [OK] Function key (orange, 3x), relevant function is shown on the display Example Testo-Direct info@Testo-Direct.com 1.888.610.7664 www. .com... -
Page 21: Display
Scroll up, increase value, navigate [▼] Scroll down, reduce value, navigate [esc] Back, cancel function Open main menu Transmit data to the Testo protocol printer. 4.3.3. Display 1 Status bar (dark grey background): • Warning symbol (only if there is an instrument error, display of error in instrument diagnosis menu), otherwise: Instrument designation. -
Page 22: Instrument Connections
Instrument connections 1 Probe socket 2 Gas outlet 3 Probe socket 4 Micro USB socket (battery charging, data transfer) 4.3.5. Condensate outlet and interfaces 1 Infrared interface (IrDA) 2 Bluetooth interface (option) 3 Condensate outlet Testo-Direct info@Testo-Direct.com 1.888.610.7664 www. .com... -
Page 23: Rear View
All manuals and user guides at all-guides.com 4 Product description 4.3.6. Rear view 1 Attachment for carrying strap 2 Condensate trap Testo-Direct info@Testo-Direct.com 1.888.610.7664 www. .com... -
Page 24: Components
(e.g. monitors, computers or credit cards). 4 Service lid 4.3.7. Components 1 Rechargeable battery 2 Measured gas pump 3 Slot for O2 sensor 4 Slot for CO sensor, COlow sensor or CO, H2-compensated sensor Testo-Direct info@Testo-Direct.com 1.888.610.7664 www. .com... -
Page 25: Compact Flue Gas Probe
4 Connecting cable 4.5. Modular flue gas probe 1 Removable filter chamber with window and particle filter 2 Lock release 3 Probe module 4 Connector plug for measuring instrument 5 Probe handle 6 Connecting cable Testo-Direct info@Testo-Direct.com 1.888.610.7664 www. .com... -
Page 26: First Steps
New probes are recognised automatically. Connect a probe to the probe socket before switching on the measuring instrument or start sensor detection manually after changing the probe: [Options] → Sensor detection. Connecting flue gas probes/gas pressure adapters/temperature adapters Testo-Direct info@Testo-Direct.com 1.888.610.7664 www. .com... -
Page 27: Switching On
1. Select the country version: [▲], [▼] → [OK]. 2. Confirm confirmation request: → [OK] The testo 320 switches off. 3. Restart instrument: Press If the voltage supply was interrupted for a longer period: The Date/time menu opens. The gas sensors are zeroed. -
Page 28: Entering Values
4. Confirm the entry: [OK]. 5. Repeat steps 1 and 4 as required. 6. Save the entry: [Finished]. Input editor [▲], [▼], [◄], [►]. 1. Select the value (character) to be changed: 2. Apply value: [OK]. Testo-Direct info@Testo-Direct.com 1.888.610.7664 www. .com... -
Page 29: Printing/Saving Data
Errors that have occurred but have not yet been rectified are indicated by a warning symbol ( ) in the header. Error messages that have not yet been cancelled can be displayed in the Error diagnosis menu, <dg_ref_source_inline>. Testo-Direct info@Testo-Direct.com 1.888.610.7664 www. .com... -
Page 30: Switching Off
3. Carry out search according to search setting: [Search] Show all 1. Select address: [▲], [▼]. 2. Show details: [Details]. 3. Enable a location: select the location → [OK]. The location is activated. > Open measurements menu: press [OK] again. Testo-Direct info@Testo-Direct.com 1.888.610.7664 www. .com... - Page 31 A location is always created under an address. 1. Select the address in which the location is to be created. [Options] → New/Location → [OK]. 3. Enter values or make settings. 4. Finalise the entry: [Finished]. Testo-Direct info@Testo-Direct.com 1.888.610.7664 www. .com...
-
Page 32: Measurement Records
[▲], [▼] 2. Start printout: All records for the location are printed out. Options: [Options] Delete Record: delete the selected record. > → > [Options] → Delete all Records: delete all saved records for a location. Testo-Direct info@Testo-Direct.com 1.888.610.7664 www. .com... -
Page 33: Instrument Diagnosis
The status of the sensor is indicated by a traffic light. A sensor is able to recover. The sensor status indication may therefore change from yellow to green or from red to yellow. Displaying instrument information > Device information → [OK]. Information is displayed. Testo-Direct info@Testo-Direct.com 1.888.610.7664 www. .com... -
Page 34: Using The Product
Total overview of selectable measurement parameters and units (available selection depends on the set country version and selected measurement type): Display Measurement parameter Flue gas temperature Combustion air temperature Instrument temperature Testo-Direct info@Testo-Direct.com 1.888.610.7664 www. .com... - Page 35 Efficiency without consideration of the heat value range Dew Pt Flue gas dew point temperature Nett Differential temperature Toxin index qA+ - qA Calling up the function: > → Device settings → [OK] → Measurement view → [OK] Testo-Direct info@Testo-Direct.com 1.888.610.7664 www. .com...
-
Page 36: Alarm Limits
[OK] → Units → [OK]. Adjustable units Parameter Unit Altitude Pressure mbar, 1. Select the line: [▲], [▼]→ [Edit]. 2. Select the unit to be changed: [▲], [▼] → [OK]. 3. Confirm the entry: [Finished]. Testo-Direct info@Testo-Direct.com 1.888.610.7664 www. .com... -
Page 37: Date / Time
Choose measurement type Individual measurement types can be shown or hidden. These are displayed or hidden accordingly under Measurement options. Call up function: > → Device settings → [OK] → Choose measurement type [OK]. → Testo-Direct info@Testo-Direct.com 1.888.610.7664 www. .com... -
Page 38: Printer
Bluetooth. The Bluetooth module can be switched on / off.The relay can now be tested. Calling up the function: Instrument Settings [OK] Bluetooth → [Edit]. > → → → Making settings: > Set parameter → [OK]. Testo-Direct info@Testo-Direct.com 1.888.610.7664 www. .com... -
Page 39: Language
The selection of the country version influences the menu languages that can be enabled. For information concerning the assignment table, the basis for calculation and the country version, see www.testo.com/download- center. Calling up the function: >... -
Page 40: Password Protection
Password protection, page 40. Call up function: > → Sensor settings → O2 reference → [Edit]. Possibly: > Enter the password: [Enter] → Enter password → [Next] → [OK]. Setting the O reference: > Set value → [OK]. Testo-Direct info@Testo-Direct.com 1.888.610.7664 www. .com... -
Page 41: Sensor Protection
Recalibration/adjustment The CO sensor can be recalibrated and adjusted. For recalibration/adjustment, Testo recommends using calibration adapter 0554 1205 or sending the instrument off to Testo Customer Service. If obviously unrealistic measured values are displayed, the sensors should be checked (calibrated) and, if required, adjusted. -
Page 42: Fuels
Call up function: > → Fuels → [OK]. Activating fuels: > Select the fuel → [OK]. The fuel is activated and the main menu is opened. Testo-Direct info@Testo-Direct.com 1.888.610.7664 www. .com... -
Page 43: Measuring
All dependent parameters are calculated using this value. This method of measuring combustion air temperature is sufficient for systems dependent on ambient air. If a temperature probe is connected, the combustion air temperature is measured continuously via this probe. Testo-Direct info@Testo-Direct.com 1.888.610.7664 www. .com... -
Page 44: Using Flue Gas Probe
The tip of the probe must be in the centre of the flue gas flow. > Align the flue gas probe in the flue gas duct so that the tip is in the core current (area of the highest flue gas temperature). Testo-Direct info@Testo-Direct.com 1.888.610.7664 www. -
Page 45: Measurement View
> → is deleted. > [Options] → Save: the measured values are saved in a record. [Options] Fluegas matrix: the measured values are > → displayed as a flue gas matrix, see below. Testo-Direct info@Testo-Direct.com 1.888.610.7664 www. .com... - Page 46 CO2: choose which parameter > → should be assigned to the x-axis of the display matrix (O2 or CO2). > [Options] → Measurement view: (This function is not available during a measurement) Open the measured value display menu. Testo-Direct info@Testo-Direct.com 1.888.610.7664 www. .com...
-
Page 47: Draught Measurement
→ is deleted. [Options] → Save: The measured values are saved in a > record. > [Options] → Measurement view: (This function is not available during a measurement): The measured value display menu is opened. Testo-Direct info@Testo-Direct.com 1.888.610.7664 www. .com... -
Page 48: External Micro Pressure Probe
2. Start measurements > First measurement: > Second and third measurement: [OK] The set measurement parameters, measurement period and measured values are displayed. A signal is sounded after 2 min (recommended measurement period) Testo-Direct info@Testo-Direct.com 1.888.610.7664 www. .com... -
Page 49: Bimschv
, AT, VT) are determined (30 s). The measurement stops automatically. The measured values are displayed and saved automatically in a record. 3. End measurement: [Close] End measurement and call up draught measurement function: [Draught - Measuring]. Testo-Direct info@Testo-Direct.com 1.888.610.7664 www. .com... -
Page 50: Co Undiluted
Smoke No. Oil depos. are only available for oil fuels. Determine smoke tester no./smoke nos./oil depos. with the smoke pump and enter manually: 1. Select parameter → [Edit]. 2. Enter data or values → [OK]. Testo-Direct info@Testo-Direct.com 1.888.610.7664 www. .com... -
Page 51: Pressure
All manuals and user guides at all-guides.com 6 Using the product Determine smoke tester no./smoke nos./oil depos. with the smoke tester testo 308 and transmit wirelessly: The testo 308 must be in data transfer mode ( lights up). > [Options] →... -
Page 52: Differential Temperature
Any data saved to the clipboard is deleted. > [Options] → Save: The measured values are saved in a record. > [Options] → Measurement view: (This function is not available during a measurement): The measured value display menu is opened. Testo-Direct info@Testo-Direct.com 1.888.610.7664 www. .com... -
Page 53: O2 Air
Flow: set the gas flow value. > → [Options] Enter heating value: heating value can be set. > → > [Options] → Units setting: the unit for gas flow, heating value, duration and GasPgr can be changed. Testo-Direct info@Testo-Direct.com 1.888.610.7664 www. .com... -
Page 54: Oil Flow
When using the ambient CO probe and the flue gas probe, note that: the probe must be in the fresh air (CO-free) during the zeroing phase! Call up function: > → Measurement options → [OK] → CO ambient → [OK]. Testo-Direct info@Testo-Direct.com 1.888.610.7664 www. .com... -
Page 55: Co2 Ambient
> [Options] → Clipboard: data is saved to the clipboard. > [Options] → Delete clipboard: any data saved to the clipboard is deleted. > [Options] → Save: the measured values are saved in a record. Testo-Direct info@Testo-Direct.com 1.888.610.7664 www. .com... -
Page 56: Leak Detection
[Options] → Alarm signal: (this function is not available during a measurement) Disable/enable alarm signal. > [Options] → Zeroing probe: perform zeroing. > [Options] → Sensor detection: newly inserted sensor is detected. 2. End detection: Testo-Direct info@Testo-Direct.com 1.888.610.7664 www. .com... -
Page 57: Transferring Data
Transferring data 6.3.1. Report printer To be able to transmit data via infrared or Bluetooth interface to a Testo report printer, the printer to be used must have been activated, see Printer, page 38. Printing out data takes place via [Print] ]. -
Page 58: Maintaining The Product
2. Unscrew, lift up and remove the service cover. 3. Press down on the holder lightly with your fingers. Pull the retaining clip in the direction of the arrow until the catch is released. Remove holder. Testo-Direct info@Testo-Direct.com 1.888.610.7664 www. - Page 59 7. Plug the new rechargeable battery plug-in connection into the slot. 8. Insert the holder into the guide rail and slide it in the direction of the arrow until the holder clicks into place. 9. Refit and close the service cover. Testo-Direct info@Testo-Direct.com 1.888.610.7664 www. .com...
-
Page 60: Charging The Battery
±0 to +35°C. If the rechargeable battery has been completely discharged, the charging time at room temperature with the testo mains unit is approx. 6 h. Charging in the measuring instrument 1. Connect the mains unit instrument plug to the instrument's micro USB socket. -
Page 61: Recalibrating/Adjusting Sensors
(see illustration). Do not use a brush! 3. Fit a new probe module on the handle and engage in place. 7.6.2. Replacing the probe module ✓ Disconnect the flue gas probe from the measuring instrument. Testo-Direct info@Testo-Direct.com 1.888.610.7664 www. .com... -
Page 62: Replacing The Thermocouple
Checking the particle filter > Check the particle filter of the modular flue gas probe regularly for contamination: check visually by looking through the window of the filter chamber. Replace the filter if there are signs of contamination. Testo-Direct info@Testo-Direct.com 1.888.610.7664 www. .com... -
Page 63: Replacing The Particle Filter
✓ Disconnect the flue gas probe from the measuring instrument. 1. Loosen and remove halfshell handles (1). 2. Turn the sealing cap (2) clockwise as far as it will go and remove probe shaft. 3. Blow compressed air through the probe shaft. Testo-Direct info@Testo-Direct.com 1.888.610.7664 www. .com... -
Page 64: Replacing The Thermocouple
✓ Disconnect the flue gas probe from the measuring instrument. 1. Loosen and remove halfshell handles (1). 2. Turn the sealing cap (2) clockwise as far as it will go and remove probe shaft. 3. Release halfshell elements (3) and remove. Testo-Direct info@Testo-Direct.com 1.888.610.7664 www. .com... - Page 65 (9), refit halfshell elements. 7. Replace the probe shaft and lock the sealing cap by tightening it anti-clockwise (as far as it will go, observe markings). 8. Replace halfshell handles and secure with screws. Testo-Direct info@Testo-Direct.com 1.888.610.7664 www.
-
Page 66: Checking The Particle Filter
2. Remove the filter cartridge and replace it with a new one (0554 0040). 3. Attach the filter chamber and lock it: turn slightly clockwise. 7.8. Condensate container The fill level of the condensate container can be read from the markings on the condensate trap. Testo-Direct info@Testo-Direct.com 1.888.610.7664 www. .com... - Page 67 3. Wipe off any drops still on the condensate outlet with a cloth and close the condensate outlet. The condensate outlet must be completely closed (marking), otherwise measuring errors could be caused by infiltrated air. Testo-Direct info@Testo-Direct.com 1.888.610.7664 www. .com...
-
Page 68: Tips And Assistance
> Switch on printer. > Move printer into wireless transmission range. If we could not answer your question, please contact your dealer or Testo Customer Service. For contact details, see back of this document or the website www.testo.com/service-contact. Testo-Direct info@Testo-Direct.com 1.888.610.7664... -
Page 69: Accessories And Spare Parts
1.0 mm, probe shaft diameter: 6 mm incl. cone Flexible compact flue gas probe, length 330 mm, 0600 9742 Tmax. 180 °C, short-term 200 °C, bending radius max. 90° for measurements at difficult to access locations Testo-Direct info@Testo-Direct.com 1.888.610.7664 www. .com... - Page 70 Probe modules/accessories for compact flue gas probes Description Article no. Spare thermocouple for 0600 9740 0430 0383 Spare thermocouple for 0600 9741 0430 0382 Particle filter for compact flue gas probe, 10 pieces 0554 0040 Testo-Direct info@Testo-Direct.com 1.888.610.7664 www. .com...
- Page 71 System case with double floor (height:180 mm) for 0516 3301 instrument, probes and accessories System case (height: 130 mm) for instrument, 0516 3300 probes and accessories System case with tool pouch without contents 0516 0329 Testo-Direct info@Testo-Direct.com 1.888.610.7664 www. .com...
-
Page 72: Updating The Instrument Software
Under www.testo.com/download-center you can download the current instrument software (Firmware) for testo 320 (registration required). > Unplug the micro USB cable and switch off the testo 320. 1. Hold down [▲]. 2. Reconnect the micro USB mains cable to the testo 320, continue holding down [▲]. - Page 73 All manuals and user guides at all-guides.com Testo-Direct info@Testo-Direct.com 1.888.610.7664 www. .com...
- Page 74 All manuals and user guides at all-guides.com 0970 3200 en 03 V01.00 en Testo-Direct info@Testo-Direct.com 1.888.610.7664 www. .com...
Need help?
Do you have a question about the 320 and is the answer not in the manual?
Questions and answers