Table of Contents
Advertisement
Advertisement
Chapters
Table of Contents

Related Manuals for Arjohuntleigh Enterprise E5000X


Summary of Contents for Arjohuntleigh Enterprise E5000X
- Page 1 ENTERPRISE E5000X (E5X) Instructions for Use 746-577-CN_05 • 10/2018...
- Page 2 Design Policy and Copyright ® and ™ are trademarks belonging to the ArjoHuntleigh group of companies unless otherwise stated. © ArjoHuntleigh 2016. As our policy is one of continuous improvement, we reserve the right to modify designs without prior notice. The content of this publication may not be copied either wholly or in part without the consent of ArjoHuntleigh.
-
Page 3: Table Of Contents
Contents Warnings, Cautions and Notes ..............3 General Warnings ..................4 Introduction ................6 Product overview – Head Board On Mattress Platform ........ 8 Head Board On Base ................9 Folding split side rails ................10 Clinical Applications ............11 Intended use .................... -
Page 4: Warnings, Cautions And Notes
Warnings, Cautions and Notes Indicates possible hazards in procedures or conditions which, if not correctly followed, could WARNING result in death, injury or other serious adverse reactions. Indicates possible hazards in procedures or conditions which, if not correctly followed, could Caution result in equipment damage or failure. -
Page 5: General Warnings
Unauthorised modifications or repairs to this product may affect its safety and will invalidate any warranty. ArjoHuntleigh accepts no liability for any incident, accident or reduction in performance that may occur as a result of such repairs or modifications. - Page 6 WARNING Where risk assessment indicates that a patient is at high risk of entrapment owing to their medical condition or other circumstances, and where there is no medical benefit from their being left in a contoured position, place the mattress platform in the flat position and disable the controls (Function lockout) when the patient is unattended.
-
Page 7: Introduction
1. Introduction These instructions contain information for the installation, use and maintenance of the ArjoHuntleigh Enterprise® 5000X range of acute care hospital beds. These beds have multiple functions to provide the optimum nursing position for both patient and carer. Standard features •... - Page 8 The model number and serial number can be found on the specification label; this is located on the bed frame below the head board. Specification label Caution Before using the bed, ensure that the “Power In” rating on the specification label is compatible with the local electricity supply. 746-577-UK-6...
-
Page 9: Product Overview - Head Board On Mattress Platform
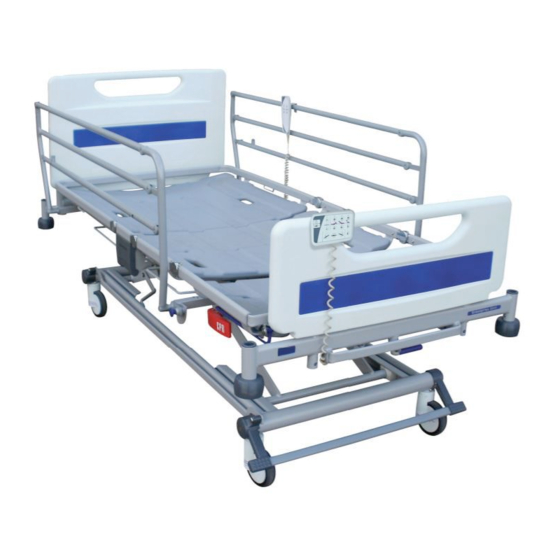
Product overview – Head Board On Mattress Platform A. Bedstripper (linen shelf) L. Lifting pole socket B. Attendant Control Panel (ACP) M. Roller buffer C. Foot board N. Castor D. Calf extension sheet O. Drainage bag rail E. Calf section P. -
Page 10: Head Board On Base
Head Board On Base The bed can be optionally configured with the head board mounted on the base of the bed. The bed can also be configured with 3 or 5 bar easily removable side rails. The easily removable side rails are described more in section “To remove and install the 3 bar or 5 bar ¾... -
Page 11: Folding Split Side Rails
Folding split side rails The bed can be optionally configured to use folding split side rails. In this configuration a side rail release lever is located directly below the side rail. The release lever is described more in section “To lower the folding split side rails:” in Chapter 4. -
Page 12: Clinical Applications
2. Clinical Applications WARNING To ensure the patient can use the bed safely, their age, size and condition should be assessed by a clinically qualified person. The use of head down tilt (Trendelenburg) or foot down tilt (reverse Trendelenburg) may be contraindicated for certain medical conditions. -
Page 13: Contra-Indications
Contra- The safe working load of the bed is indications 250kg. The maximum recommended patient weight is 185kg. The safe working load is calculated as follows (in accordance with EN 60601-2-52:2010): Maximum patient weight 185kg Mattress 20kg Accessories (including attached loads) 45kg TOTAL 250kg... -
Page 14: Installation
3. Installation Connect the mains plug to a suitable socket outlet. Make sure the mains plug is easily accessible so it can be disconnected quickly in an emergency. When the bed is connected to the electricity supply, indicators will light on the control box (1) and Attendant Control Panel. - Page 15 WARNING If the power cord or mains plug is damaged, the complete assembly must be replaced by authorised service personnel. Do not remove the fitted plug, or use a rewireable plug or adapter. Make sure the power supply cord is not stretched, kinked or crushed.
-
Page 16: Mattresses
Mattresses WARNING Always use a mattress of the correct size and type. Incompatible mattresses can create hazards. Entrapment hazards may exist when using a very soft mattress, even if it is the correct size. The maximum recommended mattress thickness for use with side rails is 18cm. - Page 17 • For more information on suitable mattresses and mattress replacements, contact your local ArjoHuntleigh office or approved distributor. A list of ArjoHuntleigh offices can be found at the back of this manual. 746-577-UK-6...
-
Page 18: Operation
4. Operation WARNING Operate the brake pedals with your feet while wearing suitable shoes. Do not operate the pedals with your hands. Brakes and The brake pedals at the foot end of the bed have three positions as shown: steering •... - Page 19 The brake pedals may be linked by a full width brake bar Brake bar (1) which makes it easier to operate the pedals. Brake bar Head end brake Additional brake pedals may be provided at the head end pedals of the bed.
-
Page 20: Side Rails
When using removable ¾ length side rails, do not fit different side rails to those originally supplied by ArjoHuntleigh with the bed. Make sure the serial number label on the side rail corresponds to the serial number on the bed – refer to page 7 for a description of the bed serial number. - Page 21 To lower the ¾ length folding side rail: Hold the top rail (1) just behind the hinge. Pull the blue operating knob (2) and lower the side rail towards the foot end of the bed (3). ¾ length folding side rail operation To raise the side rail: Hold the top rail (1) just behind the hinge.
- Page 22 To remove and install the 3 bar or 5 bar ¾ length folding side rail: Some beds are fitted with easy to remove folding side rails. Removable folding side rails are available in 3 bar or 5 bar configurations. Removable side rails are identical in operation to the fixed ¾...
- Page 23 Hold onto the side rail near the mounting points (2) and pull the side rail away from the bed frame. ¾ length folding side rail removal To install the side rails, slide the rail mounts into the bed frame mounting points (2) and secure with the securing pins.
- Page 24 To lower the folding split side rails: Hold either side rail handle (1). Pull the release lever (2) and lower the side rail (3) so that it folds down below the mattress platform. Folding split side rail operation To raise the side rail: Hold either side rail handle (1).
-
Page 25: Cpr Backrest Release
CPR backrest Manual CPR release handles are located below the calf section on either side of the bed. release If the patient suffers a cardiac arrest, pull the CPR release handle (1). This will lower the backrest to enable cardio-pulmonary resuscitation to be carried out. CPR backrest release WARNING The backrest can fall quickly;... -
Page 26: X-Ray Cassette Tray
X-ray cassette The X-ray cassette tray allows thoracic X-ray photography with the backrest at any angle and without tray the patient moving from the bed. WARNING Position the mattress platform at an ergonomic height to allow easy loading and removal of X-ray cassettes. Return the X-ray cassette tray to its closed position below the backrest before raising or lowering the backrest. - Page 27 Positioning the X-ray cassette Pull the knob and slide the tray underneath the backrest. The red moulding on the top of the X-Ray sitting tool indicates the top right hand corner of the X-Ray cassette. Use this feature to assist in accurate positioning.
-
Page 28: Bed Length Adjustment
Bed length The length of the bed is adjustable to three set positions. These are typically used as follows: adjustment Short, for manoeuvring the bed in confined spaces Standard length, for normal use Extended, to accommodate very tall patients WARNING Install a suitable foam mattress extension (squab) at the head end when the bed is extended. - Page 29 To extend the mattress platform: Lift the blue extension catch bar (1). Hold the middle of the end crossbar (2) and pull out the mattress platform to the required position. Release the catch bar. Extending the mattress platform To shorten the bed: Reverse the above procedure.
-
Page 30: Bedstripper (Linen Shelf)
Bedstripper The bedstripper is used for supporting clean linen when the bed sheets are being changed. (linen shelf) Pull out the bedstripper from its closed position below the foot board. After use, push the bedstripper back to its closed position. -
Page 31: Lifting Pole And Accessory Sockets
Lifting pole Lifting pole sockets (1) are located at the head end of the mattress platform. accessory Sockets to support compatible accessories are located at sockets the head end (2) and foot end (3) of the bed. Lifting pole and accessory sockets (head end) Accessory sockets (foot end) 746-577-UK-6... -
Page 32: Drainage Bag Rails
Drainage bag Rails (1) to support drainage bags, etc. are located below the thigh and backrest sections on either side of rails the bed. The bed may also be fitted with DIN accessory rails (2). Drainage bag rails and DIN rail Caution The maximum weight that can be safely supported by each drainage bag rail and DIN rail is 5kg. -
Page 33: Head And Foot Boards
Head and foot The head and foot boards can be easily lifted off the bed for access to the patient. boards The head and foot boards can each be fitted with locking catches (1) to prevent accidental removal. To unlock a board: pull out the catches (2) and rotate them a quarter-turn (3);... -
Page 34: Mattress Platform Sections
Mattress As standard the bed is supplied with curved platform sections. Optional flat platform sections are available. platform sections The four mattress platform sections (backrest, seat, thigh and calf) can be removed by pulling them upwards off the mattress platform frame. Lift off the calf extension sheet (1) before removing the calf section (2). -
Page 35: Adjusting The Mattress Platform
Adjusting the mattress platform The bed is provided with two control handsets: a patient handset with basic controls only and a more comprehensive attendant control panel (ACP) for use by the carer. The functions on both handsets are described separately over the next few pages. To adjust the mattress platform: press and hold the appropriate button until the required position is achieved. -
Page 36: Patient Handset
Patient handset The patient handset can be positioned on either side of the bed. WARNING Store the handset on the side rail using the clip on the back; this will help to prevent accidental operation of the controls. The patient should be shown how to use the handset by the carer. - Page 37 Bio-Contour The Bio-Contour up button simultaneously raises the backrest and thigh sections to provide upright patient profiling; the raised thigh section prevents the patient sliding down the bed. The Bio-Contour down button returns the mattress platform to a flat position. Backrest angle ...
-
Page 38: Attendant Control Panel (Acp)
Attendant Control Panel (ACP) The ACP is located at the foot end of the bed. WARNING The ACP must be kept out of the reach of the patient. Attendant Control Panel (ACP) Power on indicator - lights when the bed is connected to the electricity supply Battery indicator - refer to the section Backup battery. - Page 39 Thigh section These buttons raise and lower the thigh section. When the thigh section is first raised from the flat position, the calf section will be in the Fowler position (angled downwards). To change the calf section to the vascular (horizontal) position, refer to the section Adjusting the calf position.
-
Page 40: Adjusting The Calf Position
CPR position If the patient suffers a cardiac arrest, press and hold the CPR button. This will flatten the mattress platform (and lower it if necessary) to enable cardio-pulmonary resuscitation to be carried out. The CPR button overrides the function lockout settings. Adjusting the calf position When the thigh section is raised, the calf section can be manually changed to the vascular (horizontal) position:... -
Page 41: Function Lockout
Function lockout Function lockout can be used to prevent operation of the controls, e.g. when inadvertent movement of the mattress platform could injure the patient. The indicator above each function shows its status: on = function locked; off = function unlocked. To lock (prevent) ALL functions: press and hold the Function Lock button for five seconds. -
Page 42: Backup Battery
Backup battery Caution To ensure the battery is kept fully charged and prevent damage to the battery, the bed should be connected to the electricity supply at all times during normal use. The battery is intended for occasional short term use. Its life will be reduced if it is used to power the bed for long periods. -
Page 43: Duty Cycle Lockout
To recharge the battery, connect the bed to the electricity Recharging the backup battery supply. Allow at least eight hours to recharge the battery when it is completely discharged. While the battery is recharging, the ACP battery indicator lights yellow. The indicator will go out when the battery is fully charged. -
Page 44: Product Care
5. Product Care WARNING Disconnect the bed from the electricity supply before starting any cleaning or maintenance activity. The bed will still operate on battery power if the function has not been locked on the ACP. Decontamination WARNING Do not allow the mains plug or power supply cord to get wet. These instructions also apply to accessories but not to mattresses or side rail pads. - Page 45 Many other disinfectants are used in healthcare facilities, and it is not possible for ArjoHuntleigh to test each one to determine whether it may affect the appearance or performance of the bed. If facility protocols require the use of a disinfectant other than NaDCC (e.g.
-
Page 46: Preventive Maintenance
Check for correct fitting of the locking pin on 3 bar and 5 bar removable side rails Check operation of manual CPR release handles on both sides of the bed If the result of any of these tests is unsatisfactory, contact ArjoHuntleigh or an approved service agent. 746-577-UK-6... - Page 47 WARNING The procedures below must be carried out by suitably trained and qualified personnel. Failure to do so may result in injury or an unsafe product. Actions to be done by qualified personnel Yearly Carry out a full test of all electrical bed positioning functions ...
-
Page 48: Battery Test
If the bed fails a second time, contact ArjoHuntleigh or an approved service agent. To maintain best performance, the backup battery should be replaced every four years by an approved service agent. -
Page 49: Troubleshooting
Troubleshooting If the equipment fails to operate correctly, the table below suggests some simple checks and corrective actions. If these steps fail to resolve the problem, contact ArjoHuntleigh or an approved service agent. Symptom Possible cause Action “Beeping” sound when... -
Page 50: Fault Indications
Fault indications The bed’s control software indicates problems in the electrical system by means of flashing indicators on the Attendant Control Panel (ACP). If you experience any of the indications below, contact ArjoHuntleigh or an approved service agent. Indication Possible cause... -
Page 51: Accessories And Cables
6. Accessories and Cables Recommended accessories for the Enterprise 5000X range are shown in the table below. Note that some items may not be available in all countries. Accessory Product Code Lifting pole with strap and handle ENT-ACC01 IV pole ENT-ACC02 Angled IV pole ENT-ACC04... -
Page 52: Technical Data
7. Technical Data General Safe working load 250kg Maximum patient weight 185kg Product weight 144kg approx. Audible noise 50dB approx. Operating conditions Temperature 5°C to 40°C Relative humidity 20% to 90% at 30°C, non-condensing Atmospheric pressure 700hPa to 1060hPa Electrical data Power input 1.25A max. - Page 53 Environmental protection Incorrect disposal of this equipment and its component parts, particularly gas springs, actuators, batteries and other electrical devices, may produce substances that are hazardous to the environment. To minimise these hazards, contact ArjoHuntleigh for information on correct disposal. 746-577-UK-6...
- Page 54 Transportation and storage Handle with care. Do not drop. Avoid shock or violent impact. This equipment should be stored in a clean, dry and well-ventilated area which meets the following conditions: Temperature -10°C to 50°C Relative humidity 20% to 90% at 30°C, non-condensing Atmospheric pressure 700hPa to 1060hPa Caution...
- Page 55 Symbols (continued) Complies with the European Medical Device Directive 93/42/EEC Waste Electrical and Electronic Equipment (WEEE) - do not dispose of this product in general household or commercial waste Serial number Model number Potential equalisation terminal Protective earth (ground) Recommended mattress size Recommended patient height Calf section vascular position Mattress platform extension...
-
Page 56: Warranty And Service
8. Warranty and Service ArjoHuntleigh standard terms and conditions apply to all sales; a copy is available on request. These contain full details of warranty terms and do not limit the statutory rights of the consumer. For service, maintenance and any questions regarding this product, please contact your local ArjoHuntleigh office or approved distributor. -
Page 57: Electromagnetic Compatibility
9. Electromagnetic Compatibility The bed is intended for use in the electromagnetic environment specified in the tables below. The customer or the user of the bed should ensure that it is used in such an environment. Failing to ensure that these tables are properly followed may result in the product not working properly. - Page 58 Guidance and manufacturer’s declaration – electromagnetic immunity The bed is intended for use in the electromagnetic environment specified below. The customer or the user of the bed should assure that it is used in such an environment. IEC 60601 Compliance Electromagnetic environment - Immunity test test level...
- Page 59 Guidance and manufacturer’s declaration – electromagnetic immunity The bed is intended for use in the electromagnetic environment specified below. The customer or the user of the bed should assure that it is used in such an environment. IEC 60601 test Compliance Electromagnetic environment - Immunity test...
- Page 60 Recommended separation distances between portable and mobile RF communications equipment and the bed The bed is intended for use in an electromagnetic environment in which radiated RF disturbances are controlled. The customer or the user of the bed can help prevent electromagnetic interference by maintaining a minimum distance between portable and mobile RF communications equipment (transmitters) and the bed as recommended below, according to the maximum output power of the communications equipment.
- Page 61 This Page Intentionally Left Blank 746-577-UK-6...
- Page 62 This Page Intentionally Left Blank 746-577-UK-6...
- Page 63 目录 警告、注意事项和说明 ................63 常规警告 ..................... 64 前言 ..................66 产品概览 — 床头板集成在床架上............... 68 ................69 床头板集成在基座上 ..................70 分体式侧护栏 临床应用 ................71 产品用途 ..................... 71 适应症 ......................71 禁忌症 ......................72 安装 ..................73 床垫......................75 操作 ..................77 制动和转向...
-
Page 64: 警告、注意事项和说明
警告、注意事项和说明 指出操作过程或某些条件下可能出现的危险,如不 正确遵守操作规程可能会造成死亡、人身伤害或其 警告 他严重不良反应。 指出操作过程或某些条件下可能出现的危险,如不 注意事项 正确遵守操作规程可能会造成设备损坏或故障。 解释或强调某种操作过程或条件。 指出一种可选项目或功能。 746-577-CN_05... -
Page 65: 常规警告
常规警告 警告 请妥善保管本说明书;以便日后可能需要参考。 在操作之前应阅读和理解本手册。必须就本产品、其功能、配件以及任 何附件的正确使用对护理人员进行培训。 为了确保安全有效地使用本产品,包括患者和护理人员的安全,必须遵 守本说明书中的说明。 未经授权改动或维修本产品可能影响其安全性能,并会使所有保修失 效。对于此类维修或变动可能造成的任何事故、异常或性能降低,我司 不承担任何责任。 为避免电击风险,本产品只能连接到具有保护性接地的电源。 切勿在本设备附近吸烟或使用明火,也不要将其暴露于极端温度下。 切勿在存有麻醉剂等可燃性气体的环境(如手术室)中使用电动病床。 本病床设计为仅供室内使用,不应在正常医院环境之外的地方使用。 切勿使用非为用于本病床设计的附件或没有经过许可的附件。 在本病床上使用来自其他供应商或制造商的设备之前,用户应进行风险 评估。 当病床处于静止状态时,切记总是使用制动装置。 为了减小跌落受伤风险,当患者无人看护时,应将病床降低到最低 高度。 当患者无人看护时,不应使其处于头低脚高位姿势。 为了降低失去平衡的风险,不要让患者在床垫平台倾斜时(头或脚朝 下)上下床。 转下页 746-577-CN_05... - Page 66 警告 若风险评估结果表明患者由于自身的健康状况或者其它情况有高危的风 险,同时让其处于Contour体位并无任何医疗效果,当此患者无人看护 功能锁定 时,将床垫平台置于水平体位并停用所有控制功能( )。 在操控病床时,请确保床侧家具等障碍物不会使病床的移动受限。 在移动或操控病床时,请留意所有附加的配件(例如:吊杆)确保不会 撞到门、天花板等。 在推拉病床时,请手握床头板或者床尾板;不可手握护栏或任何附加的 配件。 在操作病床之前,确保患者姿势正确以避免卡夹或失衡。 注意,不要将手持控制器/护理控制面板 (ACP) 以及其他设备的拖曳电 缆挤压或卡夹到病床的移动部件之间。 注意不要让衣物或床单缠绕到病床的移动部件上。 请不要将病床置于倾斜大于 7° 的位置,因为,在危险情况下,这会导 致病床失去平衡。 本产品符合电磁兼容性 (EMC) 适用标准的要求。但是,医疗电气设备 需要在电磁兼容性方面采取特殊预防措施,而且应遵守产品维修手册中 的电磁兼容性信息安装和使用。 医疗电气设备可能会受到便携式和移动射频通信设备(如手机)的 影响。 746-577-CN_05...
- Page 67 1. 前言 本说明书介绍与 ArjoHuntleigh Enterprise® E5000X 系列医用病床安装、使用和维护 相关的信息。这些病床具有多种功能,能够为患者和护理人员提供最佳护理体位。 标准功能 • 电动调整病床高度和腿板高度 • 电动操作的背板回缩功能 • Bio-Contour® 高级仿生体位系统 • Auto-Chair(一键式心脏椅位)功能 • 电动调整头朝下倾斜(头低脚高位)和脚朝下倾斜(头高脚低位) • 手动选择脉管体位 • 带有可拆卸面板的床垫支撑表面 • 可调整长度的床垫平台 • 引流袋导轨 • 弧形床垫平台 可选功能 3条或5条横管 3/4长度的折叠侧护栏 分体式护栏 125mm单脚轮或 150mm(单轮或双轮)脚轮 床单更换延伸架(床单架) 床底灯 横条制动踏板/杆 在头部端的附加制动踏板...
- Page 68 可在规格标签上找到病床的型号 和序列号 ;规格标签位于床头板下方的 床架上。 规格标签 注意事项 在使用病床之前,确保规格标签上的“输入电源”功率与当地供电功率 一致。 746-577-CN_05...
-
Page 69: 产品概览 - 床头板集成在床架上
产品概览 — 床头板集成在床架上 L. 吊杆插孔 A. 床单更换延伸架 B. 护理控制面板 (ACP) M. 缓冲滚轮 C. 床脚板 N. 脚轮 O. 引流袋导轨 D. 小腿延长段 E. 小腿板 P. 侧栏操控旋钮 Q. 心肺复苏术 (CPR) 释放手 F. 大腿板 柄 G. 座椅垫 R. 制动踏板 H. 3 条折叠侧护栏 S. -
Page 70: 床头板集成在基座上
床头板集成在基座上 病床可以选择配置床头板集成在基座上。 病床可以配备 3 到 5 条易拆卸的侧护栏。 第 4 章的 “拆卸和安装 3 或 5 条3/4长度的折叠侧护栏:” 部分将进一步介绍易拆卸 的侧护栏。 A. 底部框架上的吊杆插孔 B. 底部框架上的床头板 C. 带有 X 射线暗盒托盘的靠背 D. 3 到 5 条可拆卸侧护栏 E. 坐板的平板 F. 大腿板的平板 G. 小腿板的平板 当选择带有 射线片盒的背板时,平板垫会作为标准配件提 供。 在此配置中,病床的所有其他功能都是相同的。... - Page 71 分体式侧栏 病床可以选择配置分体式护栏。 在此配置中,解锁手柄位于护栏的正下方。第 4 章的 “调低分体式侧护栏:” 部分将 进一步介绍解锁手柄。 分体式护栏并非在所有国家都有售。 A. 头部端侧护栏 B. 脚部端侧护栏 C. 护栏解锁手柄 在此配置中,病床的所有其他功能都是相同的。 746-577-CN_05...
-
Page 72: 临床应用
2. 临床应用 警告 为了确保患者能够安全使用病床,应由具备临床资格的人员评估患者年 龄、体型和状况。 在某些医疗情况下,可能不适合使用头低脚高位和头高脚低位。只有在 评估患者状况并在有临床资质人员的指导下,才能使用这些倾斜体位。 本病床适合用于 EN 60601-2-52:2010 中定义的应用环境 产品用途 1、2 和 3。 应用环境 1 在医院中提供危重症监护,要求 24 小时医疗观察和持续 监护的场所,如 ITU、ICU 和 CCU。 应用环境 2 在医院或其他医疗机构中提供急救监护,要求医疗观察和 监护的场所,如普通内科和外科病房。 应用环境 3 在医疗领域的长期护理,要求医疗观察且在必要时提供监 护的场所,如护理中心和老年病医疗机构。 本病床适用于有活动和移位困难的高度依赖患者,和/或临 适应症 床疾病要求这些患者有少量的体位调整。 根据护理人员的判断,具有适当自理能力的患者可以使用 控件调整自己的体位。 床垫平台可以根据临床设置中定义的应用环境 1、2 和 3 的要求进行体位调整,以协助对病人的治疗。... -
Page 73: 禁忌症
禁忌症 病床的安全工作负荷是 250 公斤。 患者体重最好不超过 185 公斤。 安全承重的计算方式如下(根据 EN 60601-2-52:2010 标准): 185 公斤 患者最大重量 20 公斤 气垫 45 公斤 附件(包括连接负荷) 250 公斤 合计 警告 如果床垫和附件的总重量超出 65 公斤,必须相应减少如上的最大患者 体重。 建议患者身高是 146 到 190 cm。 由护理人员酌情决定,如果病人的身高超过 190 厘米可能 需要延长病床以适应容纳病人的身高 — 请参阅第 4 章“病 床长度的调节”。确保患者的身高不超过第... - Page 74 3. 安装 将电源插头连接到匹配的插座,并确保可以在紧急情况 下迅速断开电源插头。 病床连接到电源后,电控箱 (1) 和护理控制面板上的指示 灯会亮起。 电源线 (2) 配有一个塑料挂钩 (3)。当不使用病床时或者移 动病床前,将挂钩夹在床头板上,卷起电线并如图所示将 电线挂在挂钩上。 要将病床与电源断开,请将电源插头从插座拔出。 电缆存放和电位均衡端子 电位均衡端子 (4) 位于病床的头部端。 当其他电气设备处于患者或护理人员的接触范围时,通 过将它们的电位均衡端子连接在一起,可以最大限度减 少设备之间的电位差。 746-577-CN_05...
- Page 75 警告 若电源线或电源插件损坏,必须由授权的维修人员更换整个组件。请勿 移除安装的插件,或使用可重新接线的插头或转接器。 确保电源线没有出现拉伸、扭结或挤压状况。 切勿让电源线拖在地面上,这可能会造成绊倒危险。 确保电源线不会与病床移动部件缠结到一起。 在移动病床之前,将电源线与电源断开,并如图所示存放。 注意事项 在第一次使用前,或者病床已经超过 3 个月未使用,请将病床接通电源 至少 24 小时,以确保备用电池完全充电。如果不这样做,可能会减短 电池的使用寿命。 病床的定位应使得缓冲滚轮距离后壁至少 20cm,以防止当病床处于头 朝下倾斜位置时(垂头仰卧姿势)头板碰到墙壁。 推荐距离后墙的位置 746-577-CN_05...
- Page 76 床垫 警告 请务必使用正确尺寸和种类的床垫。不搭配的床垫可能引发危险。 即使尺寸正确,使用很软的床垫也可能出现卡夹危险。 与侧护栏配合使用的最大建议床垫厚度是 18cm。 请阅读床垫随附的使用说明书。 如果为床垫指定的最大可承受患者体重不同于为病床指定的值,应以较 低值为准。 小腿延长板上的标签列出正确的床垫尺寸: 床垫尺寸标签 标签上的数字 、 和 表示不同的床垫平台长度;请参考 “ ” 第 章的 病床长度调整 。 转下页 746-577-CN_05...
- Page 77 床垫和侧护栏 在选择病床和床垫组合时,应谨慎根据每个患者的临床 评估以及当地政策来考虑侧护栏的使用。 在评估床垫是否适合与侧护栏配合使用时,应考虑以下 因素: • 病床设计为使用厚度最高 18cm 的泡沫床垫时具有的 可接受侧护栏高度。 • 专业电动充气/泡沫床垫在患者躺下时通常会包裹 住患者,而且会比泡沫床垫更深,但不影响安全 性。所有ArjoHuntleigh专业床垫在患者和侧护栏之 间保持足够间隙,以保持侧护栏的功能。其它品牌 的专用床垫替代垫必须在使用前逐一进行评估,以 验证替代垫可以保持足够的间隙。 • 不建议直接在本病床上使用覆层床垫。 • 为确保遵守 EN 60601-2-52:2010,应使用经许可的 ArjoHuntleigh床垫。使用其他床垫时,必须由使用 者确认是否遵守该标准。根据这一标准,使用其它 床垫必须经用户验证。 • 欲获得更多关于合适的床垫和替代床垫的详细信息, 请与您当地ArjoHuntleigh 办事处或经认证的经销联 系。背面列载了ArjoHuntleigh 各办事处的列表。 746-577-CN_05...
-
Page 78: 制动和转向
4. 操作 警告 在穿着适脚的鞋的情况下用脚操作制动踏板。请勿用手操作踏板。 病床脚部端的制动踏板有如下所示的三个位置: 制动和转向 • 制动:所有四个脚轮均施加制动。 • 自由:所有四个脚轮均可自由滚动和转向。 • 直行:所有四个脚轮均可滚动,但其中的直行脚轮 (见下面)被锁定,所以它不能旋转。这可使床沿 着直线移动。 直行 制动 自由 使用直行脚轮 将病床放于适当位置,使所有的脚轮都朝着病床行进的 方向。抬起踏板锁住直行脚轮,并在床的另一端推移病 床。 直行脚轮可以位于病床的任意一端,由客户订购时指定。 746-577-CN_05... - Page 79 制动踏板可以联接全宽度制动杆 (1),这样可以更轻松地 制动杆 操作踏板。 制动杆 头部端制动 额外的制动踏板可安装在病床的头端。这些踏板的操作同 踏板 床尾的踏板一样。 746-577-CN_05...
- Page 80 护栏 病床可以配备3/4长度的 3 或 5 条折叠护栏或者分体式护栏。 分体式护栏并非在所有国家都有售。 警告 — 没有配置侧栏的病床 在使用此病床前,具备临床资质的人员有责任考虑患者的年龄、体型和 病情决定是否可以使用此病床。 切勿在病床上安装护栏(包括那些由 ArjoHuntleigh 制造的护栏)。 警告 — 有配置侧栏的病床 在使用此病床前,具备临床资质的人员有责任考虑患者的年龄、体型和 病情决定是否可以使用此病床。 侧护栏不是用来限制试图离开病床的患者。 病床只能使用配套提供的侧护栏。切勿使用其他制造商的侧护栏。 确保床垫适合与侧护栏配合使用,请参阅第 3 章的指导。 这个符号标出了侧护栏接触点。保持手和手指远离这些区域。 当使用3/4长度的侧护栏时,切勿用其它侧护栏去搭配由 ArjoHuntleigh 病床原配的护栏。确保侧护栏上的序列号标签对 应病床上的序列号 — 请参见第 7 页关于病床序列号的说明。 安装可拆卸侧护栏时,确保安全销已安装并且正确匹配。 746-577-CN_05...
- Page 81 调低3/4折叠护栏: 握住铰链后上方的护栏 (1)。向外拉动蓝色的操作旋钮 (2) 并向病床的脚端 (3) 调低护栏。 3/4长度的折叠护栏操作 升高侧护栏: 握住铰链后上方的护栏 (1)。拉起侧护栏直到其锁定在升 高的位置,并伴有“喀嚓”的声音。 警告 在侧护栏提高时,确保其牢固地被锁定到当前位置。如果在蓝色操控旋 钮后方可见防松螺栓 (4),切勿让侧护栏处于升高位置。 746-577-CN_05...
- Page 82 拆卸和安装 或 条3/4长度的折叠侧护栏: 有些病床配备方便拆卸折叠侧护栏的装置。每张病床可配置 3 到 5 条可拆卸折叠侧 护栏。可拆卸侧护栏的操作跟上文所描述的3/4长度侧护栏的操作一致。 确保侧护栏处于抬升位置。 将安全销放置于病床两端的侧护栏和床架之间。 将每个销上的安全环 (2) 拉开并从框架 (3) 中取出安 全销。 销 3/4长度的护栏的安全销 调低折叠 侧护栏(参考第 80 页)。 警告 调低侧护栏和拆卸安全销后,侧护栏会意外移动。在拆卸时要小心谨慎 以免护栏移动而卡夹四肢。注意第 79 页所描述的接触点。 746-577-CN_05...
- Page 83 抓住安装点旁 (2) 的侧护栏并将侧护栏从床架上拉开。 3/4长度的护栏的拆卸 安装侧护栏时,需要将护栏支架移至床架安装点 (2) 并用 安全销固定住。 746-577-CN_05...
- Page 84 降低分体式侧护栏: 握住任意一个侧护栏手柄 (1)。向外拉解锁手柄 (2) 并调 低侧护栏 (3),这样就可以将它降低到床垫平台下。 分体式侧护栏的操作 升高侧护栏: 握住任意一个侧护栏手柄 (1)。拉起侧护栏并向远离病床 方向,直到其锁定在升高的位置,并伴有“喀嚓”的声音。 头部端和脚部端侧护栏的操作方式相同 746-577-CN_05...
-
Page 85: Cpr 靠背释放
CPR 靠背释放 手动 CPR 解锁手柄位于病床任意一侧小腿垫的下方。 如果患者发生心搏骤停,拉动 CPR 解锁手柄 (1)。此操作 将降低被后垫的高度以进行心肺复苏。 CPR 靠背释放 警告 靠背会迅速落下;应将手远离以避免夹伤。 注意事项 只应在紧急情况下使用手动 CPR 解锁;每天重复使用会导致永久 磨损。 746-577-CN_05... -
Page 86: 射线片盒
X 射线片盒 该 X 射线片盒允许在任何角度靠着靠背进行胸部 X 射线 拍片,并且患者不需要离开病床。 警告 将床垫平台定位在人体工程学的高度以便装载或移除 X 射线片盒。 在调高或调低靠背之前,请将 X 射线片盒放回它在靠背下面的闭合 位置。 请勿坐在或放过重的物体于 X 射线片盒上。 确保 X 射线片盒始终安全地固定于其所在位置。 操作 施加脚轮制动。从病床上拆下床头板。 拉动旋钮 (1) 释放卡锁并将托盘拉出 (2) 直到不能再拉。 X 射线片盒操作 在完全打开的位置 (3) 释放该按钮来托住托盘。将 X 射 线片盒 (4) 放在托盘上,让它的底部紧靠着托盘足底部的 边缘。... - Page 87 放置 X 射线片盒 拉动旋钮并在靠背下方滑动托盘。 X 射线坐姿工具顶部的红色模制件表示 X 射线片盒的右 上角。该功能可帮助精确定位。 X 射线坐姿工具 释放旋钮以将托盘固定在其中一个锁定位置。 使用完后,将托盘拉出到完全打开的位置并卸下 X 射线 片盒。将托盘放回在靠背下面的闭合位置并将床头板恢 复原位。 746-577-CN_05...
-
Page 88: 病床长度调整
病床长度调整 病床的长度可调节至三个位置。病床长度调节使用如下 所示: 缩短长度,用于在有限空间中对病床进行转向 标准长度,用于常规用途 加长长度,以容纳身材高大的患者 警告 在加长病床时,在病床头端安装一个合适的泡沫床垫延展 (Squab)。 应始终将床架和床垫平台调整到相同长度,并确保二者的闩锁牢固地卡 合到位。 在调整病床长度之前放平床垫平台。 在升起推动杆时,应注意不要夹住手指。 延长床架: 向外拉出蓝色的延长锁定手柄 (1)。将床架 (2) 拉出至所需 位置并释放手柄。 延长床架 746-577-CN_05... - Page 89 延长床垫平台: 提起蓝色的延长推动杆 (1)。握住尾端的横梁中部 (2) 并拉 出床垫平台到所需位置。释放推动杆。 延长床垫平台 缩短病床: 按照相反顺序执行上述步骤。 746-577-CN_05...
-
Page 90: 床单更换延伸架(床单架
床单更换 床单更换延伸架用于更换床单时放置清洁床单。 延伸架 从尾板下方的闭合位置拉出床单更换延伸架。 (床单架) 使用后,将床单更换延伸架推回到闭合位置。 床单更换延伸架(床单架) 注意事项 床单更换延伸架的安全工作负荷是 20 公斤。 在使用床单更换延伸架之前应放平床垫平台。 746-577-CN_05... -
Page 91: 吊杆和 附件插孔
吊杆插孔 (1) 位于床垫平台的头部端。 吊杆和 附件插孔 用于支撑兼容附件的插孔位于病床的头部端 (2) 和 脚部端 (3)。 吊杆和附件插孔(头部端) 附件插孔(脚部端) 746-577-CN_05... -
Page 92: 引流袋导轨
用来支撑引流袋的导轨 (1) 位于病床任意一侧大腿板和背 引流袋导轨 板的下方。 病床还可以配备 DIN 附件导轨 (2)。 引流袋导轨和 DIN 导轨 注意事项 每个引流袋导轨和 DIN 导轨可以安全承受的最大重量是 5 公斤。 746-577-CN_05... -
Page 93: 头板和尾板
头板和尾板 可以将头板和尾板轻松地从病床提下,以便接触患者。 头板和尾板均可配备锁定搭扣 (1) 以防意外移动。解锁 其中一个板:拉开搭扣 (2) 并将它们旋转一个直角回转 (3);现在可以将板从病床上提下了。 锁定床尾板(尾端展示的例子) 在更换病床上的床板后,旋转搭扣直到它们弹回到锁定 位置。 746-577-CN_05... -
Page 94: 床垫平台板
床垫平台板 一张标准的病床会配备弧形的床垫平台。也有平面床垫 平台可选。 床垫平台的四个部分(背板、坐板、大腿板和小腿板) 可以通过向上拉动从床垫平台架拆下。 提起小腿延长板 (1),然后拆下小腿板 (2)。 床垫平台板(俯视图) 要放回每个部分,应确保在床垫平台架上正确定位,然后 牢固下压,直到它啮合到位。 将小腿延长板 (1) 夹到床垫平台架的末端,以将其放回。 请勿组合使用平面和弧形的床垫平台。为了帮助区别两种类型 的板,一般弧形板比深灰色的平面板颜色要淡一些。 头板和尾板 可以将头板和尾板轻松地从病床提下,以便接触患者。 病床任意一侧的床底灯可以照亮地面。 床底灯 除了使用备用电池操作病床外,该灯一直亮起。 746-577-CN_05... -
Page 95: 调整床垫平台
调整床垫平台 病床配有两个手持控制器: 一个是供患者使用的仅有基本 控制功能的控制器;另一个是供护理人员使用的功能更全 面的护理控制面板 (ACP)。以下几页分别介绍了两种控制 器的功能。 调整床垫平台:按住相应的按钮直到病床达到所需的位 置。床垫平台会持续移动直到松开按钮或达到活动范围。 如果在按下按钮时警告声(哔哔声)响起,这表明病床正在使用 — 备用电池工作 请参阅 部分。 备用电池 如果按住某按钮超过 秒,其功能会自动禁用,直到释放按 钮。然后必须根据 部分的说明对其功能进行解锁。 功能锁定 警告 如果患者手持控制器或 ACP 跌落到坚硬表面,应检查所有按钮能否正 常工作。 746-577-CN_05... -
Page 96: 患者手持控制器
患者手持控制器 患者手持控制器可以放置在病床任意一侧。 警告 将手持控制器通过其背部的挂钩挂放在侧护栏上;这样有助于防止意外 操作控制器。 护理人员应向患者说明如何使用手持控制器。 患者手持控制器 有些病床型号的患者手持控制器没有调节床垫平台高度、背板或 大腿板功能。 746-577-CN_05... - Page 97 Bio-Contour Bio-Contour up 按钮用于同时抬升靠背板和大腿板,使患 者处于正坐姿势;大腿板升高可防止患者从病床滑下。 Bio-Contour down 按钮可将床垫平台返回水平位置。 背板角度 这些按钮用于升高和降低背板。 在达到水平线之上约 30° 的角度后,靠背将暂停。 大腿垫 这些按钮用于升高和降低大腿板。 第一次从水平位置升起大腿板时,小腿板将处于 Fowler 体 位(呈向下角度)。 要将小腿板改为脉管(水平)体位,请参考调整小腿体位 部分。 床垫平台高度 这些按钮用于升高和降低床垫平台。 当床垫平台降低到地面上方 38cm* 时,它将暂停,然后继 续降低,直到达到最低高度。 * 采用 150mm 脚轮的病床为 40cm。 746-577-CN_05...
-
Page 98: 护理控制面板 (Acp)
护理控制面板 (ACP) 护理控制面板位于病床脚部端。 警告 护理控制面板必须放在患者不可及的地方。 护理控制面板 (ACP) 电源接通指示灯 — 病床连接到电源时亮起 电池指示灯 — 请参考备用电池部分 床垫平台高度 这些按钮用于升高和降低床垫平台。 当床垫平台降低到地面上方 38cm* 时,它将暂停,然后继 续降低,直到达到最低高度。 (*采用 150mm 脚轮的病床为 40cm) 警告 病床达到最低高度时,床下的空隙将减少。不要让您的脚进入侧护栏下 面的区域,在使用患者移位机或类似设备时要格外小心。 746-577-CN_05... - Page 99 大腿垫 这些按钮用于升高和降低大腿板。 第一次从水平位置升起大腿板时,小腿板将处于 Fowler 体 位(呈向下角度)。 要将小腿板改为脉管(水平)体位,请参考调整小腿体位 部分。 背板 这些按钮用于升高和降低背板。 在达到水平线之上约 30° 的角度后,靠背将暂停。 Auto-Chair Auto-Chair 向上 按钮同时升起背板和大腿板,当背板达到 45° 时暂停。继续按住该按钮,将床垫平台的脚部端降低为 心脏椅位。 在升起背板和大腿板时,再次按下 Auto-Chair 向上按钮会 将床垫平台的脚部端降低为心脏椅位体位; 如果背板角度 大于 45°,它将返回到 45° 来阻止患者前倾。 Auto-Chair 向下 按钮可将床垫平台返回平直位置。 倾斜角度 该按钮用来降低床垫平台的头部端(垂头仰卧姿势)。 该按钮用来降低床垫平台的脚部端(头高脚低位)。 从倾斜体位返回时,床垫平台将在水平(无倾斜)位置暂停。 746-577-CN_05...
-
Page 100: 调整小腿位置
体位 如果患者发生心搏骤停,请按住 CPR 按钮。这会将床垫平 台放平(如有必要可降低),以便做心肺复苏术。 CPR 按钮能够撤消功能锁定设置。 调整小腿位置 升起大腿板时,可以将小腿板手动更改为脉管(水平) 体位。 握住小腿部位的床架。向上抬起小腿板直到其锁定。 从 Fowler 体位(左)更改为水平体位 要将小腿板返回到 Fowler 体位: 使用患者手持控制器或 ACP 将大腿部位降低到水平位置; 然后再次升起大腿垫。 警告 在升起小腿板时应小心。应遵守当地的手动操作规定。 746-577-CN_05... -
Page 101: 功能锁定
功能锁定 功能锁定可以用来阻止控件操作,例如,不慎移动床垫平 台可能会伤害患者。 每个功能上方的指示灯表示其状态:亮起 = 功能已锁定; 熄灭 = 功能已解除锁定。 按下并按住 锁定(阻止)所有功能: 功能锁定按钮五秒 钟。每个功能上方的“锁定”指示灯均亮起。 有选择地锁定(阻止)功能: 按下功能锁定按钮。按钮上方的指示灯将亮起。 按下与要锁定的功能对应的 ACP 按钮。按钮上方的“锁定” 指示灯将亮起。 五秒钟后,功能锁定按钮上方的指示灯将熄灭,而且锁定 设置得到保存。 在锁定某项功能时,任何相关功能会被自动禁用,例如锁定背板 Bio-Contour Auto-Chair 会同时禁用 和 功能。 如果病床断开电源,功能锁定设置会保留。 要解锁(允许)以前锁定的功能: 按下功能锁定按钮。按钮上方的指示灯将亮起。 按下需要解锁的功能对应的 ACP 按钮。按钮上方的“锁定” 指示灯将熄灭。 五秒钟后,功能锁定按钮上方的指示灯将熄灭,而且锁定 设置得到保存。 746-577-CN_05... -
Page 102: 备用电池
备用电池 注意事项 为了确保电池完全充电并防止电池受损,在正常使用期间应始终将病床 连接到电源。 电池只供偶尔短期使用。使用电池长时间为病床供电会缩短电池使用 寿命。 当病床与电源断开连接,或者出现紧急情况但没有电源可 用时,可以使用备用电池短时间为病床供电。 电池的充电程度如下所示: 哔哔哔声 如果在操作病床时发出间歇警告音( ),电池电 量为 75% 到 100%。 在这种情况下可以使用所有病床功能。 如果在操作病床时发出连续警告音,电池电量为 10% 到 75%。 如果 ACP 电池指示灯亮起为红色,电池电量低于 10%。 在这种情况下,所有功能均被锁定。 转下页 746-577-CN_05... -
Page 103: 占空比锁定
备用电池充电 将病床连接电源为电池充电。在电池完全耗尽时,请容许 至少 8 个小时的充电。 当电池充电时,ACP 电池指示灯呈黄色。在电池完全充电 后指示灯将熄灭。 警告 必须使用内置充电器为电池充电。切勿另外使用充电器或者电源。 备 用 电 池 充 电 时 , 必 须 保 持 通 风 。 切 勿 遮 盖 电 池 或 在 其 周 围 放 置 障碍物。 备用电池的位置 占空比锁定... -
Page 104: 产品维护
5. 产品维护 警告 在开始任何清洁或保养前请切断病床的电源。如果没有在 ACP 上锁定 功能,病床仍可通过电池供电继续运作。 清洁消毒 警告 切勿使电源插头或电源线潮湿。 这些说明也适用于附件,但不适用于床垫或侧护栏垫。 有关吊带和手柄信息,请参阅本产品随附的制造商说明。 为了更好地消毒病床和可拆卸侧护栏,请从病床上拆下侧护栏。 病床应每星期予以清洁和消毒,而且在新患者使用病床前 也需进行清洁和消毒。 清洁 从病床拆下床垫和所有附件。 应将头板/尾板和床垫平台板从病床拆下来进行清洁。 穿着适当防护服,使用温水浸湿的一次性抹布和中性清洗 剂,清洁所有表面。 先清理床的上面部分并沿着所有水平表面进行。有条理地 向床的较低部分清洁,最后清洗车轮。要格外注意清洁可 能积攒灰尘或污物的区域。 用浸有净水的新一次性布擦拭,并用一次性纸巾擦干清洁 过的表面。 等一段时间让清洁部分晾干,然后再放回床垫。 转下页 746-577-CN_05... - Page 105 消毒 在 按 照 上 述 说 明 清 洁 病 床 后 , 使 用 浓 度 为 百 万 分 之 1,000 (0.1%) 有效氯的二氯异氰尿酸钠 (NaDCC) 擦洗所 有的表面。 如果沾有体液,如血液,二氯异氰尿酸钠 (NaDCC) 的浓 度应增大到百万分之 10,000 (1%) 有效氯。 我司建议使用二氯异氰尿酸钠 (NaDCC) 作 为消毒剂, 使用其他消毒剂...
-
Page 106: 预防性维护
预防性维护 本产品在使用过程中会发生磨损和裂纹。为确保其性能继续符合出厂时规格,应按照 所给时间间隔执行预防性维护操作。 警告 本列表列举了建议的最低限度预防性维护。当本产品被重度使用或者用 于恶劣的环境中,或在当地法规要求的情况下,应进行更频繁的检查。 未能执行这些检查,或者在发现问题后继续使用本产品,可能会危害患 者和护理人员的安全。预防性维护可以帮助预防事故。 由护理人员执行的操作 每天 每星期 检查侧护栏的状况 检查患者手持控制器及连接电缆 检查 ACP 及连接电缆 目测脚轮 目测电源线和插头 检查床垫有无损坏和液体浸入 检查吊杆、吊带和手柄 检查侧护栏衬垫有无损坏 检查 3 到 5 条侧护栏上的锁销是否正确装配 检查病床两侧的手动 CPR 释放手柄的操作 ... - Page 107 警告 以下操作必须由经过适当培训和合格的人员执行。如果不这样做,可能 会导致人身伤害或者产品不安全。 由具备资格人员执行的操作 每年 对所有病床电动定位功能(背板、高度、倾斜等)进行完全测试 检查当施加最大头高脚低位倾斜度时,床单更换延伸架是否保持 在闭合位置 检查病床能否使用备用电池正常工作(根据下一节电池测试中描 述的操作) 检查病床两侧的手动 CPR 释放手柄的操作 检查脚轮的操作,特别注意制动和转向功能 检查当手动升起时,小腿板的闩锁在水平(脉管)位置是否牢固 卡合 检查病床延长段是否在所有三个位置都牢固锁紧 检查电源线和电源插头,如果损坏,更换整个组件;切勿使用可 重接电线的插头 检查所有可触及的软电缆是否出现损坏或退化 查看所有可触及螺母、螺栓和其他紧固件是否到位并正确拧紧 检查装配到病床的所有附件,要特别注意紧固件和移动部件 746-577-CN_05...
-
Page 108: 电池测试
电池测试 通过执行以下测试,检查备用电池的状况。 1. 切断病床的电源 2. 将床垫平台升高到最高限度 — 忽略电池的警告音。 3. 将靠背垫和大腿垫升高到最高限度。 4. 按住 CPR 按钮。床垫平台将移动到水平的中等高度 位置。 5. 将床垫平台降低到最低位置。 6. 施加最大头低脚高位倾斜度(垂头仰卧姿势)。 7. 将床垫平台回复到水平位置。施加最大头高脚低位倾斜 度(垂脚仰卧姿势)。 如果这个测试没有成功完成,请将病床连接电源给电池充 电至少 8 小时,然后再次进行测试。如果病床仍然无法正 常运行,请联系 ArjoHuntleigh 或者授权维修的代理。 为了保持最佳性能,应每隔四年由授权维修代理更换备用 电池。 746-577-CN_05... -
Page 109: 故障排除
故障排除 如果设备无法正常运行,请参阅以下建议的一些简单的 检查和纠正措施。如果这些步骤未能解决问题,请联系 ArjoHuntleigh 或者授权维修的代理。 故障表现 可能原因 措施 使用病床时发出哔哔声 病 床 正 使 用 备 用 电 池 检查电源线是否插上,电 工作 源是否正常。 检查电源插头中的保险丝 (如果已安装) 一 项 或 多 项 病 床 功 能 护理控制面板上锁定了 在 护 理 控 制 面 板 上 解 锁... -
Page 110: 故障指示
故障指示 病床控制软件通过护理控制面板 (ACP) 上闪烁的指示灯 来显示电气系统中的问题。如果您遇到以下任何现象, 请联系 ArjoHuntleigh 或者经认可的服务代理。 指示 可能原因 ACP 床垫平台高度和头低脚高位指 高度驱动器故障 示灯闪烁 (脚部端) ACP 床垫平台高度和头高脚低位指 高度驱动器故障 示灯闪烁 (头部端) ACP 背板指示灯闪烁 背板驱动器故障 ACP 大腿板指示灯闪烁 大腿板驱动器故障 床垫平台高度、倾斜、背板和大腿板指示灯闪烁 控制单元故障 产品使用寿命 本设备的使用寿命通常是十 (10) 年。使用寿命的定义如 下:遵照使用说明书中的要求,在正常使用条件下工作 并得到维护的情况下,产品保持指定性能和安全性的持 续时间。 746-577-CN_05... -
Page 111: 配件和电缆
6. 配件和电缆 建议的用于 Enterprise E5000X 系列的附件示于以下列表中。 请注意,有些附件并非在所有国家都有售。 附件 产品编号 ENT-ACC01 带有吊带和手柄的吊杆 ENT-ACC02 静脉输液架 ENT-ACC04 静脉输液架(斜式) 骨科牵引架 ENT-ACC05 ENT-ACC06 侧护栏垫 ENT-ACC07 注射泵承载架 ENT-ACC08 氧气瓶架(用于CD/D/E以及PD型号的圆筒气缸) ENT-ACC10 小型牵引组件 ENT-ACC11 护理控制面板固定器 ENT-ACC14 静脉输液架上外加的挂钩 ENT-ACC15 电源线收纳挂钩(随病床提供) ENT-ACC18 氧气瓶承托架(用于B5圆筒气缸) ENT-ACC19 尿壶承托架 ENT-ACC24 高承载静脉输液架 ENT-ACC26 传感器装配杆 ENT-ACC32 头部端牵引组件... -
Page 112: 技术数据
7. 技术数据 综述 250 公斤 安全承重 185 公斤 患者最大重量 约 144 公斤 产品重量 50dB 约 噪音 工作电压 5°C 至 40°C 温度 30°C 条件下 20% 至 90%,非冷凝 相对湿度 700hPa 至 1060hPa 气压 电气数据 最大 1.25A,交流 230V 50/60 赫兹 电源输入 在交流电压 120 伏特,最大电流 2 安培 50/60 赫兹... - Page 113 34cm-78cm 水平床板 34cm-78cm 弧形床板 150mm 采用 脚轮 36cm-80cm 水平床板 12° (下限-10%,上限不计) 头低脚高位倾斜角度 12° (下限-10%,上限不计) 头高脚低位倾斜角度 床垫 尺寸(详细信息请参见第 3 章) 202cm x 88cm,12.5 至 18cm 厚 位置 (标准) (下限不计 上限+10%) 床垫平台角度 (下限不计,上限+10%) (下限不计,上限+10%) (下限-10%,上限不计) 环境保护 不当处置本设备及其零部件,尤其是气弹簧、驱动器、电池和其他电子装 置,可能产生对环境有害的物质。为了最大限度地减少这些危害,请联 系 ArjoHuntleigh 以获得有关正确处置的信息。 746-577-CN_05...
- Page 114 运输和储存 小心搬运。请勿摔落。避免触电或猛烈撞击。 本设备应存放在清洁、干燥、通风良好且应满足下列条件的区域: -10°C 至 50°C 温度 30°C 条件下 20% 至 90%,非冷凝 相对湿度 700hPa 至 1060hPa 气压 注意事项 如果长时间存放病床,应每隔三个月将其连接到电源并持续 24 小时 为备用电池充电,否则备用电池可能将不能使用。 符号 安全承重 患者最大重量 交流 (AC) 注意事项 请参阅使用说明书 B 型应用部件。这些应用部件通常为:上部床架部 分、病床控制、侧护栏、头端和脚端挡板 制造商/生产日期 746-577-CN_05...
- Page 115 符号(续) 符合欧洲医疗器械指令 93/42/EEC 废弃电气电子设备 (WEEE) — 切勿将本产品废弃 到一般家庭或商业垃圾中 序列号 型号 电位均衡端子 保护接地(接地) 推荐床垫尺寸 推荐患者高度 小腿板脉管体位 床垫平台延长 切勿在床上安装侧护栏 参阅手册 746-577-CN_05...
-
Page 116: 保修和服务
8. 保修和服务 我司的标准条款适用于所有销售;如有需要可获得一份此条款。这些条款包含保修条 款的全部详细信息,但不影响消费者的法定权利。 如您有任何有关本产品维修、保养和任何其它问题,请联系您当地的 ArjoHuntleigh 办 公室或者经认证的分销商。本手册背面列载了 ArjoHuntleigh 各办事处的列表。 联系我司来咨询服务、备件或附件时,请准备好设备的型号和序列号。 746-577-CN_05... -
Page 117: 电磁兼容性
9. 电磁兼容性 床设计为在下表指定的电磁环境中使用。客户或用户应保证在此类环境下使用该设备。如果不遵守表内所列要 求,可能导致产品无法正常工作。注:本产品只能用于医疗环境。 便携式和移动频率通信设备可能影响 E5000X 的正常使用,请在建议的电磁环境下使用 E5000X。 注意事项 使用未经制造商推荐的零配件可导致设备的辐射性增加以及耐腐蚀性降低,从 而影响其性能。产品使用说明书中包含了经过批准审核的附件列表。请参阅第 6 章 — 配件和电缆。 如果使用本设备时需要靠近其它电气设备,必须在使用前检查设备正常运行 情况。 指南和制造商声明 — 电磁发射 床设计为在下面指定的电磁环境中使用。客户或用户应保证在此类环境下使用该设备。 电磁环境 — 指南 发射试验 符合性 仅将射频能量用于内部功能。因此,其射频辐射非常低, 射频发射 组别 1 CISPR 11 不太可能对附近的电子设备产生任何干扰。 射频发射 B 级 CISPR 11 谐波发射 Class A 床适于在所有的设施中使用,包括家用设施和直接连接... - Page 118 指南和制造商声明 — 电磁抗扰度 床设计为在下面指定的电磁环境中使用。客户或用户应保证在此类环境下使用该 设备。 IEC 60601 电磁环境 — 指南 抗扰度试验 符合电平 试验电平 地板应为木质、水泥或瓷砖。如果地板 ± 6 kV 接触放电 ± 6 kV 接触放电 静电放电 (ESD) 上 覆 盖合 成材 料 ,相 对湿 度 应至 少为 IEC 610000-4-2 ± 8 kV 空气放电 ±...
- Page 119 指南和制造商声明 — 电磁抗扰度 床设计为在下面指定的电磁环境中使用。客户或用户应保证在此类环境下使用该 设备。 IEC 60601 电磁环境 — 指南 抗扰度试验 符合电平 试验电平 便携式和移动式射频通信设备不应比推荐 的隔离距离更靠近床的任何部分使用,包 括电缆。该距离应由与发射机频率相应的 公式计算。 推荐的间隔距离 3V rms 射频传导 = 1 2 . 150kHz 到 80MHz IEC 61000-4-6 3V/m 射频辐射 = 1 2 . 3V/m 80MHz 到 800MHz 80MHz 到...
- Page 120 便携式及移动式射频通信设备和床之间的推荐隔离距离 床预期在射频辐射骚扰受控的电磁环境中使用。依据通信设备最大额定输出功率,购 买者或使用者可通过下面推荐的维持便携式及移动式射频通信设备(发射机)和床之 间最小距离来防止电磁干扰。 对应发射机不同频率的隔离距离 发射机的最大额定 输出功率 150kHz 到 80MHz 80MHz 到 800MHz 800MHz 到 2.5GHz = 1 2 . = 1 2 . = 2.3 0.01 0.12 0.12 0.23 0.38 0.38 0.73 对于上表未列出的发射机最大额定输出功率,推荐隔离距离 d,以米 (m) 为单位,可用相应发射机频率 栏中的公式来确定,这里 P 是由发射机制造商提供的发射机最大额定输出功率,以瓦特 (W) 为单位。 注...
- Page 121 本页特意留空 746-577-CN_05...
- Page 122 本页特意留空 746-577-CN_05...
- Page 123 AUSTRALIA FRANCE POLSKA ArjoHuntleigh Pty Ltd ArjoHuntleigh SAS ArjoHuntleigh Polska Sp. z o.o. 78, Forsyth Street 2 Avenue Alcide de Gasperi ul. Ks Piotra Wawrzyniaka 2 O’Connor CS 70133 PL-62-052 KOMORNIKI (Poznan) AU-6163 Western Australia FR-59436 RONCQ CEDEX Tel: +48 61 662 15 50 Tel: +61 89337 4111 Tél: +33 (0) 3 20 28 13 13...
- Page 124 Getinge Group is a leading global provider of products and systems that contribute to quality enhancement and cost efficiency within healthcare and life sciences. We operate under the three brands of ArjoHuntleigh, Getinge and Maquet. Getinge provides solutions for infection control within healthcare and contamination prevention within life sciences. Maquet specializes in solutions, therapies and products for surgical interventions, interventional cardiology and intensive care.
Need help?
Do you have a question about the Enterprise E5000X and is the answer not in the manual?
Questions and answers
I am looking for information about the connection between the patient remote control and the Arjo Huntleigh Enterprise 5000 X bed as I have one of these and want to get a voice control made as I have restricted use of my hands