Advertisement
Quick Links
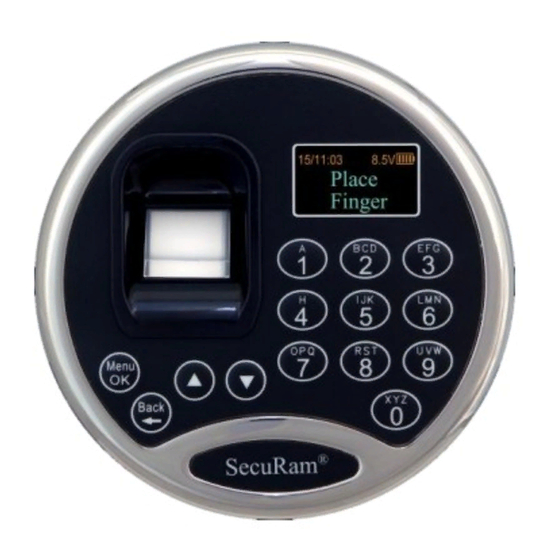
ScanLogic B22 Operation Instructions
Model No: FPC-1701A-B22-II
Version No: V1.0
1.0 System Installation
1.1 System Components
1.2 Pairing the EntryPad with the Lock
1.3 Lock and EntryPad Installation
1.4 Installing Battery
1.5 Test Lock Operation
2.0 Lock Operation
2.1 Opening the Lock
3.0 Set Date and Time
3.1 Set Clock Time
4.0 Code/Fingerprint Management
4.1 Change Code
4.2 Enroll Manager 2
4.3 Enroll New User
4.4 Delete One User
4.5 Delete All Users
4.6 Add Finger
4.7 Delete Finger
5.0 Smartphone Management
5.1 Pair Phone
5.2 Delete Phone
6.0 System Identification
6.1 System Info
7.0 Lock Settings
7.1 Factory Reset (Firmware)
7.2 Show Audit Trail
7.3 Enable/Disable Vibration Sensor
7.4 Security Level
7.5 Set Vibration Sensitivity
7.6 Set Battery Efficiency
8.0 Data Management
8.1 Encryption Key Set
9.0 Recovering the System – Reset to Default
9.1 Recovery Code Set
9.2 Recover System
9.3 Mechanical Reset
10.0 Shortcut Operations
10.1 Add User
10.2 Delete User
11.0 Menus
12.0 Specification
13.0 Precaution
14.0 Certification
15.0 Packing List
16.0 FCC Warning
Advertisement

Related Manuals for Securam ScanLogic B22


Summary of Contents for Securam ScanLogic B22
- Page 1 4.1 Change Code 4.2 Enroll Manager 2 4.3 Enroll New User 4.4 Delete One User 4.5 Delete All Users 4.6 Add Finger ScanLogic B22 Operation Instructions 4.7 Delete Finger Model No: FPC-1701A-B22-II Version No: V1.0 5.0 Smartphone Management 5.1 Pair Phone 5.2 Delete Phone...
- Page 2 SECURAM safe lock systems can operate in two different modes depending upon the type of EntryPad being used with the lock body. The ScanLogic B22 is a digital lock system and therefore the lock must also be programmed in digital mode. Both modes follow the same steps to reset / set which is done by following the steps detailed below: Step 1: Ensure the battery is connected to the Entry Pad.
- Page 3 *Note: In many cases, the Super Code (ID00) is changed from default and maintained by the safe manufacturer as a reset code for your security. If you have difficulty resetting the lock, please call SECURAM Tech Support at (805) 988-8088 or email techsupport@SECURAMsys.com.
- Page 4 ScanLogic B22 Operation Instructions 1.5 Testing the Lock Operation The ScanLogic B22 comes with two factory default codes: • Super Code (ID00) is 111111 • Manager Code (ID01) is 123456 Enter one of the valid codes and press the Menu/OK button, to verify the communication between the lock and EntryPad.
- Page 5 Step 6: Each of the elements of the date and time will flash when it is available to be set. Use the “▼”or “▲” to scroll to the correct value and press OK to move to the next element. 4.0 Code Management The ScanLogic B22 comes with two default codes: • Super Code (ID00) is 111111...
- Page 6 ScanLogic B22 Operation Instructions • Manager Code (ID01) is 123456 It is strongly recommended that both these default codes are changed before the lock system is put into service. 4.1 Change Code The B22 has 2 codes by default: ...
- Page 7 The New Code has now been saved and is available for use. 4.2 Enroll Manager 2 The ScanLogic B22 can add a second Manager and one User, in addition to the default codes. Note: Manager Codes have full access to the programming menu. The User Code only has access to the change code menu option, and cannot modify any lock settings.
- Page 8 ScanLogic B22 Operation Instructions Step 7: Now screen will prompt “Set Code?” If you only want fingerprint only, you can press Back button to skip Step 8 & 9. Otherwise, press Menu/OK to continue set up a code for Manager2.
- Page 9 ScanLogic B22 Operation Instructions Step 5: Next the screen will show “Enroll New User”. Press Menu/OK Step 6: The screen will ask you to place your 1 finger and then to place your 2 finger after successfully enrolled. If you do not want to enroll any fingerprints, press Back button to skip this step.
- Page 10 ScanLogic B22 Operation Instructions Step 4: After logging in, the screen will show “Users”. Press Menu/OK. Step 4: Scroll “▼”or “▲” to the menu selection “Delete One User” and press Menu/OK Step 5: The user information will be displayed as indicated below.
- Page 11 ScanLogic B22 Operation Instructions Step 2: At “My Menu”, press the Menu/OK button Step 3: The display will prompt you to login. Enter a valid Super or Manager Code and press Menu/OK; or place an enrolled finger on the fingerprint scanner.
- Page 12 ScanLogic B22 Operation Instructions Step 3: The display will prompt you to login. Enter a valid Super or Manager Code and press Menu/OK; or place an enrolled finger on the fingerprint scanner. Step 4: After logging in, the screen will show “Users”.
- Page 13 Note: All enrolled fingerprints will be deleted for this user. 5.0 Smartphone Management The ScanLogic B22 uses a smartphone to allow for remote management and control. Download the SECURAM app on the App Store for iPhones or on the Google Play Store for Android.
- Page 14 ScanLogic B22 Operation Instructions Step 4: After logging in, the screen will show “Users”. Step 5: Scroll “▼”or “▲” to the menu selection “Pair Phone” and press Menu/OK Follow the steps on the APP to complete the pairing option. 5.2 Delete Phone This feature is used to remove any mobile device connected to the system.
- Page 15 ScanLogic B22 Operation Instructions Step1: Press the Menu/OK button Note: If this operation is performed, the smartphone APP will not be able to open the lock. If the operation such as opening the lock through the APP is required, it needs to be paired again.
- Page 16 ScanLogic B22 Operation Instructions Step 3: The display will prompt you to login. Enter a valid Super or Manager Code and press Menu/OK; or place an enrolled finger on the fingerprint scanner. Step 4: After logging in, the screen will show “Users”.
- Page 17 Note: The system records the 400 latest audit events in its internal memory. 7.3 Enable/Disable Vibration Sensor The ScanLogic B22 has a built-in vibration sensor. The vibration sensor will send a notification to the app in the event that the safe is being attacked. By default the Vibration sensor is enabled.
- Page 18 Note: When alarming, use of a valid code to open the lock will cancel the vibration alarm on the APP. 7.4 Security Level The ScanLogic B22 has the ability to be set in two different security modes as follows: Security Level 1 requires either a fingerprint or a code to open the lock or access menus.
- Page 19 ScanLogic B22 Operation Instructions Step 4: After logging in, the screen will show “Users”. Step 5: Scroll ▼”or “▲”to the menu selection “Lock Settings” and press Menu/OK Step 6: Scroll “▼”or “▲”to the menu selection “Security Level 2” or “Security Level 1” and press Menu/OK to change the security level.
- Page 20 ScanLogic B22 Operation Instructions Step 6: Scroll “▼”or “▲”to the menu selection “Set VIB SENS” Step 7: Scroll “▼”or “▲”to the select the level of sensitivity and press Menu/OK. 7.6 Set Battery Efficiency There are two battery efficiency levels HI and LOW. When battery efficiency is set to HI, the system will conserve power consumption and the battery will last longer.
- Page 21 8.1 Encryption Key Set The ScanLogic B22 sends and receives data to the lock in an encrypted form. This is a security measure to ensure that all data is protected. The Encryption Key is set during the manufacturing process with a default encryption key value.
- Page 22 9.0 Recovering the System – Reset to Default The ScanLogic B22 safe lock system has the ability to be reset to factory default settings using a very unique secure method. Each system has a default recovery code. The Default code is 999999 - this code can be changed as necessary (refer to the Recovery Code Set selection).
- Page 23 The system is unresponsive to commands and may need to be reset. For this recovery service, a SECURAM certified locksmith is needed to present at the lock. Step1: Press the Menu/OK button Step 2: Press the "▼" button to the menu selection “Recover System” and press Menu/OK Step 3: To confirm the action, press Menu/OK.
- Page 24 Note: The pairing of the StrikeBolt and the ScanLogic B22 EntryPad is not UL listed. If the lock body that you are pairing the ScanLogic B22 with has been paired previously with an analog system, for example the SafeLogic Basic (or any other SafeLogic Series EntryPad)or was set at the factory...
- Page 25 ScanLogic B22 Operation Instructions Step 4: Depress the reset button and hold it in its depressed position. While the reset button is depressed, connect the cable to the lock. Step 5: Continue to hold the reset button in its depressed position for another 5 seconds, then release.
- Page 26 Step 4: Press the “▼” or “▲” to select the user you want to delete, and finally press Menu/OK. Step 5: Press Menu/OK, the screen prompts: 11.0 Menus ScanLogic B22 Menu Root Menu Sub Menu – Super/Manager Codes My Menu ...
-
Page 27: Alkaline Battery
ScanLogic B22 Operation Instructions Lock Settings Level Sub Menu – Lock Settings Set Time Factory Reset Enroll Manager 2 / New User Show Audit Trail Delete One User Security Level 2 Delete All Users ... -
Page 28: Maintenance
ScanLogic B22 Operation Instructions This device is not a toy. Children should use the device under adult supervision. Maintenance Equipment damage caused by human factors is not covered by the warranty. When the battery is too low, please replace the battery in time to prevent the device ... - Page 29 ScanLogic B22 Operation Instructions -- Consult the dealer or an experienced radio/TV technician for help. To maintain compliance with FCC’s RF Exposure guidelines, this equipment should be installed and operated with minimum distance between 20cm the radiator your body: Use only the supplied antenna.
-
Page 30: Warranty
17.0 Warranty SecuRam Safe Lock systems are protected by a 12 month warranty against Manufacturer’s defects. This warranty is applicable for 12 months from the Date of Manufacture or 12 months from the Date of Consumer Purchase, if the product has been registered for the Consumer Purchase Warranty.
Need help?
Do you have a question about the ScanLogic B22 and is the answer not in the manual?
Questions and answers