
Related Manuals for Directed Smart Start ASRF-1510


Summary of Contents for Directed Smart Start ASRF-1510
- Page 1 T R A N S M I S S I O N R E M O T E S T A R T E R Model: ASRF-1510 User Guide Designed & Engineered in Canada Doc#: 120709 Rev:1.4 © © 2012 Directed. All Rights Reserved...
- Page 2 WARNING! It is the responsibility of the vehicle operator to ensure that their vehicle is parked in a safe and responsible manner. 1. a) Manual Transmission: When leaving vehicle, it is the user’s responsibility to ensure that the gearshift lever is in the NEUTRAL position and the parking brake is engaged in order to avoid accidents upon remote starting.
-
Page 3: Table Of Contents
Table of Contents Government regulations ..................4 Introduction with SmartStart™ ................ 5 Using the Remote Control ................. 6 Vehicle Presets ....................7 Heater ......................7 Windshield Wipers & Radio & Headlights ............7 Arming and disarming the starter kill (if installed) .......... 7 Remote-Starting Your Vehicle ................ -
Page 4: Government Regulations
Government regulations This device complies with part 15 of the FCC Rules. Operation is subject to the following two conditions: (1) This device may not cause harmful interference, and (2) this device must accept any interference received, including interference that may cause undesired operation. -
Page 5: Introduction With Smartstart
With many advanced functions, this product will satisfy any one of your expectations from high-end commodity and security systems, without neglecting any standard feature commonly offered by entry-level starters. Certain conditions apply. See your authorised Directed Canada dealer. User Guide... -
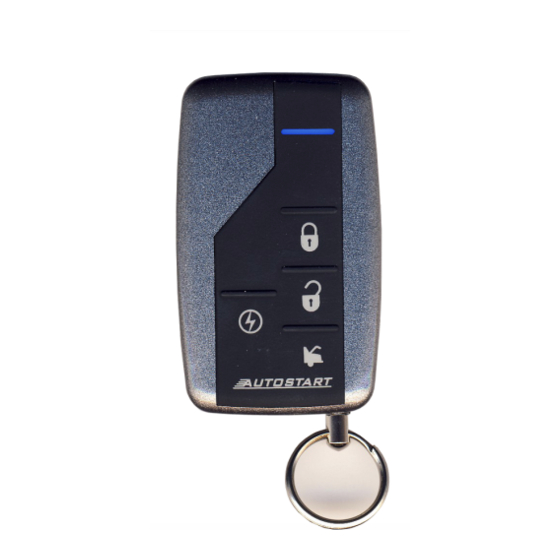
Page 6: Using The Remote Control
Using the Remote Control Your Remote Car Starter is equipped with a 5-button multi-channel remote control. It can operate two independent vehicles equipped with a Remote Car Starter (see Multi-Car Operation page 20, later in this Guide, for second-car transmitter functions). The functions of the transmitter are as follows: LOCK: Locks the DOORS and arms the STARTER KILL (if... -
Page 7: Vehicle Presets
Vehicle Presets Heater When leaving the vehicle it is recommended to preset the accessory controls in preparation for the next remote start. Settings for the blower motor (fan), front and rear, should not be left on HIGH. It is recommended to leave the settings on LOW or MEDIUM instead. - Page 8 Passive mode: To arm the Starter Kill: Press the button on the transmitter. Let the Starter Kill arm automatically 1 minute (by default) or 3 minutes (if configured this way) after the ignition is turned OFF or once the last door is closed (if the doors are monitored).
-
Page 9: Remote-Starting Your Vehicle
Remote-Starting Your Vehicle Setting Your Vehicle in to Ready Mode If your vehicle has a manual transmission you must read the following indications. The unit must first be set to Ready Mode in order to start the vehicle by remote. If the unit is not set to Ready Mode, it cannot remote start the vehicle. Please note that Ready Mode can be enabled by the remote or the handbrake, depending on the option that was selected by your installer. -
Page 10: Remote-Starting
Exit the vehicle. All doors should be closed, including the hood and trunk. THERE ARE THREE POSSIBLE OPTIONS TO COMPLETE READY MODE (programmable by installer) OPTION 2: OPTION 1: OPTION 3: Manual shutdown Automatic shutdown Automatic shutdown without auto lock with auto lock (default) The engine runs for... -
Page 11: Remote Starter Features
Turn the ignition key to the IGNITION ON (RUN) position. (Do not turn the key to the CRANK position while the engine is running. This would cause the starter motor to re-engage.) Press the brake pedal to disengage the remote starter unit. You are now ready to drive off. -
Page 12: Idle Mode
Idle Mode Convenience feature: Idle Mode allows you to keep the engine running and the doors locked while you stop, for example, at a convenience store or for a short delivery This feature allows you to let the remote starter take over control of the vehicle (i.e. -
Page 13: Valet Mode
availability of this feature.) Follow the same steps as the normal Idle Mode procedure, except for when re-entering the vehicle while the engine is running; Press unlock Open then close all doors. You have 1.5 minutes (or 3 minutes) to press on the brake pedal, to get in gear and drive off. -
Page 14: Panic Mode
Using the TRANSMITTER (Remote Valet Mode): Press the buttons simultaneously until the parking lights flash 3 times. The LED on the antenna will stay ON indicating that the vehicle has successfully entered Valet mode. To take the system out of Valet Mode Using the KEY (Ignition Valet Mode): Insert the ignition key into the ignition switch. -
Page 15: Quick Lockout Tm
Quick Lockout (Also called Secure Panic.) For fast protection in emergency situations, the system will LOCK all doors when you press the brake pedal while you hear the Horn sounding. (Quick Lockout is only available when panic mode has been set off.) Cold Weather Mode If the vehicle has a manual transmission, Ready mode (page 9) should be set... -
Page 16: Extended Run Time
Extended Run Time With the vehicle running under a remote start, pressing and holding the button for more than 3 seconds will reset the run time counter to zero and restart the run time cycle from the beginning. The horn (if programmed) will honk once; ... -
Page 17: Advanced Features: Installation-Programmable Options
Advanced Features: Installation-programmable Options The Remote Car Starter was designed with flexibility and OEM integration in mind. With its programmable options, this unit can single-handedly control nearly any electrical system in your vehicle. Caution: The programming of your system should be left to a professional. Changing any one of the settings may affect the operation of your Remote Car Starter. -
Page 18: Engine Run Time
Swap start: If this feature is enabled; Rapidly press AUX twice. The remote’s LED will start flashing. While the LED is flashing, press to remote start the car. The AUX 2 output can be activated by pressing the button. Engine Run Time On a gas engine, the Remote Car Starter can be programmed to run the engine for 3, 15, or 25 minutes (15 minutes by default). -
Page 19: Home Valet Tm " Mode
The parking lights will flash 3 times and remain lit. The OEM-style alarm and starter kill (if configured) will be armed. Press to unlock the doors and have the engine shut down after 60 seconds; The parking lights will flash 3 times and remain lit. ... -
Page 20: Aux 1
AUX 1 Note: This 500 mA negative Aux 1 output can be used for many different applications Priority door: This great feature allows the user to unlock solely the driver’s door with a single press of the button on the transmitter, and to unlock the other doors, if desired, by pressing the button for a second time. -
Page 21: Aux 2
Note: Pressing the AUX button 2x quickly causes the LED to flash slowly and to shift to level 1 (AUX 2, configurable by your installer). Pressing the AUX button 3x quickly causes the LED to flash fast and to shift to level 2 (second car operation). -
Page 22: Troubleshooting Poor Transmitting Range
If an intrusion has occurred and pressed, the horn provides an intrusion code corresponding to the type of intrusion that occurred. Diagnostic Table: 1x = power interruption 4x = Doors intrusion 3x = Hood 6x = Ignition Troubleshooting Poor Transmitting Range Many factors may affect the operating range of the transmitter. -
Page 23: Diagnostics - Parking Light Flash Table
Diagnostics – Parking Light Flash Table Parking lights Description flashes Doors locked. Trunk released. Start signal received from the remote. Runtime has expired Doors unlocked 2 fast Valet mode is deactivated 2 slow Shutdown by remote ... -
Page 24: Battery Replacement
Battery Replacement The transmitter is powered by two lithium cells (CRXXXX). When the transmitter stops functioning, replace the batteries. Release the lock on the battery cover. Remove the battery cover. Remove the old batteries. Install two new lithium batteries (CRXXXX) into the transmitter with the positive (+) mark toward the battery cover.
Need help?
Do you have a question about the Smart Start ASRF-1510 and is the answer not in the manual?
Questions and answers
The blue light on my receiver is no longer flashing and, therefore, the remote starter isn't working. I don't know how to get it back to the blue light flashing?
To enable the LED flashing on your Directed Smart Start ASRF-1510 receiver, press and hold the designated buttons simultaneously until the parking lights flash once.
This answer is automatically generated