
Related Manuals for Leica SM2010 R


Summary of Contents for Leica SM2010 R
- Page 1 Leica SM2010 R Sliding Microtome Instructions for Use English Order No.: 14 0508 80101 - Revision I Always keep this manual with the instrument. Read carefully before working with the instrument.
- Page 3 Only in this way is it possible to continuously improve the technology and manufacturing techniques used in our products. This document is protected under copyright laws. All copyrights to this documentation are held by Leica Biosystems Nussloch GmbH.
-
Page 4: Table Of Contents
Table of contents Important Information ..........................Symbols and their meanings.......................... 6 Qualification of personnele ..........................7 Intended purpose ............................. 7 Instrument type ..............................7 Safety ................................Safety notes ..............................8 Warnings ................................8 Integrated safety devices..........................10 Instrument Components and Specifications ..................Overview - instrument components ...................... - Page 5 Table of contents Warranty and Service ..........................Decontamination Confirmation ......................Leica SM2010 R...
-
Page 6: Important Information
Symbols and their meanings Caution Leica Biosystems GmbH assumes no liability for consequential loss or damage due to failure to observe the following instructions, particularly in relation to transportation and package handling, and failure to observe the instructions for handling the instrument carefully. -
Page 7: Qualification Of Personnele
Qualification of personnele • The Leica SM2010 R may be operated by trained laboratory personnel only. The instrument is intended for professional use only. • All laboratory personnel designated to operate the Leica instrument must read these Instructions for Use carefully and must be familiar with all technical features of the instrument before attempting to operate it. -
Page 8: Safety
Warning Be sure to comply with the safety instructions and warnings provided in this chapter. Be sure to read these instructions, even if you are already familiar with the operation and use of other Leica products. Safety notes These Instructions for Use include important information related to the operating safety and maintenance of the instrument. - Page 9 • Do not use solvents that contain acetone or xylene! • Ensure that liquids do not enter the interior of the instrument during cleaning! • When using cleaners, please comply with the safety instructions of the manufacturer and the laboratory safety regulations! Leica SM2010 R...
-
Page 10: Integrated Safety Devices
Safety Integrated safety devices The instrument is equipped with the following safety devices: • Knife guard (→ Fig. 1-1) on the blade/knife holder. • Knife sledge locking knob (→ Fig. 1-2) for the knife sledge. Fig. 1 Knife sledge locking knob The knife sledge is locked in place using the locking knob (→... - Page 11 Prior to any manipulation of the knife or specimen, or each change of specimen, and during breaks, always cover the cutting edge of the blade/knife with the knife guard (→ Fig. 2-1)! Caution When the knife guard is pushed over the blade, do not reach into the blade from below! Leica SM2010 R...
-
Page 12: Instrument Components And Specifications
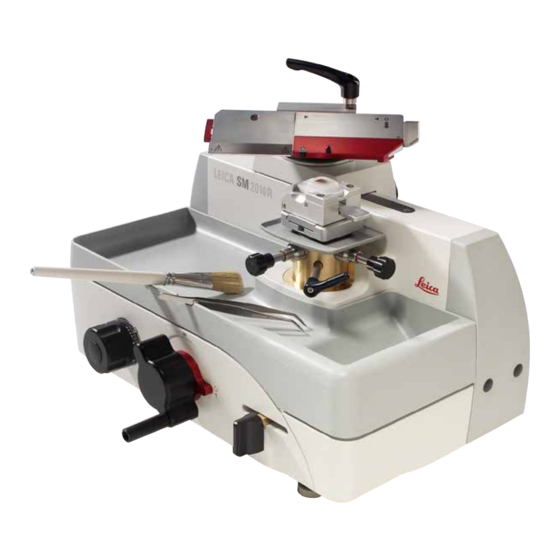
Instrument Components and Specifications Instrument Components and Specifications Overview - instrument components Fig. 3 Clamping lever for lateral displacement Lever for clamping the blade Universal cassettes clamp Blade holder SE Setscrew for orientation in cutting direction 10 Knife guard on the blade holder Specimen cylinder 11 Quick clamping system for holding the specimen clamps... - Page 13 Ergo handle for moving the knife sledge HN40 tensioning clamp Adjusting knob of automatic feed Setscrew for orientation perpendicular to 10 Knife sledge cutting direction Removable section waste tray 11 Magnetic knife sledge immobilizer Clearance angle scale Leica SM2010 R...
-
Page 14: Technical Data
Instrument Components and Specifications Technical data General Approvals: The instrument-specific marks are located on the name plate. Operating temperature range: +18 °C to +30 °C Operating relative humidity: 20% to max. 80% non-condensing Operating altitude: Up to 2000 m above sea level Transport temperature range: -29 °C to +50 °C Storage temperature range:... -
Page 15: Instrument Specifications
Instrument Components and Specifications Instrument specifications • The Leica SM2010 R is a manually operated sliding microtome, designed as a low-maintenance tabletop instrument with roller-guided knife sledges and automatic section thickness feed. • Stable, torsion-free basic design with micrometer feed system in a closed housing, protected from ingress of paraffin waste. -
Page 16: Instrument Setup
The accessories ordered are included in a separate box. Carefully check the delivery against the packing list and the delivery note. Should you find any discrepancies, please contact your Leica sales office without delay. Site requirements • Stable, vibration-free laboratory table with horizontal, flat table top, as far as possible vibration-free ground. -
Page 17: Setup
Loosening the transport locking screw of the knife sledge Note The locking knob (→ Fig. 6-1) secures the knife sledge during transport. In daily operation, it is also used to lock the knife sledge in place. Fig. 6 Leica SM2010 R... - Page 18 Instrument Setup Horizontal alignment For safe and accurate work, it is important that all instrument feet are in uniform contact with the installation surfaces. The microtome is horizontally aligned at the factory. If a completely level or horizontal surface is not available at the installation site, the instrument must be realigned.
-
Page 19: Assembling The Knife Holder Sn
(→ Fig. 9-1). • As shown in (→ Fig. 9), place the intermediate plate on the mounting table. Make sure that the two index markings (→ Fig. 9-5) are at the top and point towards the back. Leica SM2010 R... - Page 20 Instrument Setup Fig. 9 • Insert the five countersunk screws (→ Fig. 10-1) (→ Fig. 10-2) (→ Fig. 10-3) (→ Fig. 10-4) (→ Fig. 10-5) into the bores and tighten them crosswise (in the sequence shown in (→ Fig. 10)) using an Allen key T25 (→...
- Page 21 (→ Fig. 11-5) of the intermediate plate (→ Fig. 11-6). Fig. 11 • Continue turning the clamping lever (→ Fig. 12-1) in a clockwise direction until the knife holder is firmly screwed on (→ Fig. 12). Fig. 12 Leica SM2010 R...
- Page 22 Instrument Setup Note The clamping lever (→ Fig. 12-1) has a plastic handle that can be turned into whatever position is best. To do so, pull the handle upwards and turn it into the desired position (→ Fig. 12). It will then lock automatically when released.
-
Page 23: Assembling The Blade Holder Se
SE has a lateral movement, so that the entire width of the blade can be used. Warning Important! The mounting table must be absolutely clean and dry. There must not be any foreign particles on it. Otherwise, sections could become contaminated. Leica SM2010 R... - Page 24 Instrument Setup Mounting the grooved plate • Lock the knife sledge (→ Fig. 15-1) in place using the locking knob (→ Fig. 15-2) so that it cannot be moved. • The grooved plate (→ Fig. 15-3), which is intended for the blade holder SE, is mounted on the mounting table (→...
- Page 25 • To clamp the blade holder on the grooved plate, tighten the screw (→ Fig. 18-2) on the back of the blade holder base (→ Fig. 17) using a size 6 Allen key (→ Fig. 19). Leica SM2010 R...
- Page 26 Instrument Setup Fig. 18 Inclination (declination) of the blade holder SE • Unscrew the Allen screw (→ Fig. 19-1) at the back of the blade-holder base using an Allen key SW 6. • Turn the blade holder to the required position. • Set the required declination (inclination of the blade holder to the cutting direction) on the scale (→...
- Page 27 (→ Fig. 21-3) which serves as a reference point when adjusting the clearance angle. • Loosen the screw (→ Fig. 21-4) using a size 4 Allen key until the segment arc (→ Fig. 21-1) can be moved. Fig. 21 Leica SM2010 R...
-
Page 28: Inserting The Universal Cassette Clamp
Instrument Setup • Using the blade holder, move the segment arc until the index mark coincides with that of the desired setting. • Hold down the blade holder in this position and retighten the screw (→ Fig. 21-4) for clamping. Enlarged detail: Scale for setting the clearance angle. - Page 29 Note Since all stage clamps available as accessories are equipped with the same kind of guide on the back, they are inserted in the same way as described here using the example of the universal cassette clamp. Leica SM2010 R...
-
Page 30: Operation
Operation Operation Operating elements and their functions 5.1.1 Section thickness setting The section thickness is set by turning the adjusting knob (→ Fig. 25-1) on the left side of the microtome. The scaled knob has a notch for each value that can be set. Setting range: 0.5 - 60 μm from 0.5 - 5.0 μm in 0.5 μm increments from 5.0 - 10.0 μm in 1.0 μm increments... -
Page 31: Manual Feed
• Each time the lever is pushed or pulled, this causes a feed motion for trimming or sectioning by the value set on the scaled adjusting knob (→ Fig. 26-2). Fig. 26 Leica SM2010 R... -
Page 32: Automatic Feed
Operation 5.1.4 Automatic feed The position of the adjusting knob (→ Fig. 27-1) determines the point of the knife sledge movement where the automatic feed takes place. It should take place immediately in front of the specimen. Caution The automatic feed is only effective up to a section thickness of 30 μm. All values set beyond that are not defined. - Page 33 (→ Fig. 28-2) (→ Fig. 28-3) has a red mark (→ Fig. 28-4). When both marks are visible and both setscrews are in zero position at the same time (notch point!), the specimen orientation is in zero position (0°). Leica SM2010 R...
-
Page 34: Clamping The Specimen In The Universal Cassette Clamp (Ucc)
Operation Clamping the specimen in the universal cassette clamp (UCC) Caution Always clamp the specimen block BEFORE clamping the knife. Lock the knife sledge and cover the knife edge / blade edge with the knife guard prior to any manipulation of knife/blade or specimen, prior to changing the specimen block and during all work breaks! • Move the cassette clamp (→... -
Page 35: Clamping A Disposable Blade
• Push the clamping lever (→ Fig. 30-1) downwards to clamp the blade. • Make sure that the blade is clamped parallel to the front edge of the pressure plate. Fig. 30 Leica SM2010 R... - Page 36 Operation Removal aid A removal aid is provided for removing used blades (→ Fig. 31-1). • Loosen the clamping lever (→ Fig. 31-2) of the pressure plate (→ Fig. 31-3). • Push the knife guard (→ Fig. 31-4) towards the left while holding down the black push button (→...
-
Page 37: Replacing The Pressure Plate
32). The pressure plate (→ Fig. 32-1) can now be taken off (→ Fig. 33). Fig. 33 • To mount another pressure plate, please proceed in the reverse sequence. Only use the pressure plate together with the matching insertion aid. Leica SM2010 R... - Page 38 Operation • Pressure plate kit (→ Fig. 34). Pressure plate (→ Fig. 34-1) Insertion aid (→ Fig. 34-2) Fig. 34 Warning The slotted screw (→ Fig. 34-3) in the pressure plate is adjusted at the factory and glued in. It must not be altered.
-
Page 39: Inserting The Knife
• Take the knife out of the knife case and insert it carefully. Fig. 35 • Tighten the two clamping screws (→ Fig. 36-1) in alternation until both are secure and cover the knife with the knife guard (→ Fig. 36-2). Fig. 36 Leica SM2010 R... -
Page 40: Sectioning
Operation Note Proceed the same way to clamp a blade rail. Sectioning Cutting into the specimen (trimming) For trimming, the specimen feed can be disengaged either by turning the coarse driving wheel (→ Fig. 37-4) or by operating the manual feed lever (→... -
Page 41: Changing The Specimen Or Interrupting Sectioning
• Remove the specimen from the specimen clamp. • Push all section debris into the section waste tray and empty the tray. • Clean the instrument (→ p. 42 – 6.1 Cleaning the instrument). Leica SM2010 R... -
Page 42: Cleaning And Maintenance
Cleaning and maintenance Cleaning and maintenance Cleaning the instrument Warning • Always remove the knife or blade before detaching the knife/blade holder from the instrument! • Always put the knives back into the knife case when not in use! • Never place a knife anywhere with the cutting edge facing upwards and never try to catch a falling knife! • When using cleaning agents, observe the manufacturer's safety instructions and the laboratory regulations valid in the country of use. -
Page 43: Maintenance Instructions
(e.g. after cleaning in the heating oven or with solvents) using oil no. 405. • Have the instrument checked at least 1 x year by a qualified service technician authorized by Leica. The intervals depend on how heavily the instrument is used. -
Page 44: Optional Accessories
Optional accessories Optional accessories Ordering information Designation Order No. Supermega cassette clamp with adapter, silver 14 0508 42634 Universal cassette clamp with adapter, silver 14 0508 42635 HN40 clamp with adapter, silver 14 0508 42637 Standard specimen clamp with adapter, silver 14 0508 42632 Dry ice tub with adapter, silver 14 0508 42641... - Page 45 14 0508 42635 Fig. 39 HN40 tensioning clamp, with adapter, silver for mounting in the quick change system for specimen imaging Maximum specimen size: 59 x 45 mm (L x W) Order No 14 0508 42637 Fig. 40 Leica SM2010 R...
- Page 46 Optional accessories Standard specimen clamp, with adapter, silver for mounting in the quick change system for specimen imaging Maximum specimen size: 79 x 60 mm (L x W) Order No 14 0508 42632 Fig. 41 Dry ice tub with adapter, silver Order No 14 0508 42641 1 pair of cold protection gloves, size 8...
- Page 47 14 0508 43686 Order No 14 0508 43693 Pressure plate kit BB, assembly consisting of: 1 pressure plate BB 14 0508 43691 1 blade insertion aid BB 14 0508 43687 Order No 14 0508 43694 Fig. 45 Leica SM2010 R...
- Page 48 Optional accessories Knife holder SN, assembly for resharpenable knives or blade rails. Blade holder declination with scale for reproducible adjustment up to 45°. 2 clamping screws for quickly and securely clamping the cutting tool. Safe lateral displacement of the cutting tool for using the entire blade edge.
- Page 49 14 0216 07132 Knife, 22 cm Profile C, steel for paraffin and cryosections; Note: including knife case 14 0213 11141 Fig. 52 Order No 14 0216 07116 Ball handle, assembly Order No 14 0508 42565 Fig. 53 Leica SM2010 R...
- Page 50 Optional accessories Leica low-profile disposable blades - Type 819 Length 80 mm, height 8 mm 1 package of 50 pieces Order No 14 0358 38925 Fig. 54 Leica high-profile disposable blades - Type 818 Length 80 mm, height 14 mm...
-
Page 51: Troubleshooting
High blade consumption • Too great of a sectioning force • Adjust the sectioning speed was applied. and/or section thickness when trimming. Select a smaller section thickness, move knife sledge more slowly. Leica SM2010 R... - Page 52 Leica sales organization or the organization from which you have purchased the contractual product shall apply exclusively. Service information If you are in need of technical customer service or spare parts, please contact your Leica representative or the Leica dealer where you purchased the unit. Please provide the following information: • Model name and serial number of the instrument.
- Page 53 Decontamination Confirmation Decontamination Confirmation Every product that is returned to Leica Biosystems or that requires on-site maintenance must be properly cleaned and decontaminated. You can find the dedicated template of the decontamination confirmation on our website www.LeicaBiosystems.com within the product menu. This template has to be used for gathering all required data.
- Page 54 Notes Version 1.8, Revision I...
- Page 56 Leica Biosystems Nussloch GmbH Heidelberger Strasse 17 - 19 D-69226 Nussloch Germany Tel.: +49 - (0) 6224 - 143 0 Fax: +49 - (0) 6224 - 143 268 Web: www.LeicaBiosystems.com...
Need help?
Do you have a question about the SM2010 R and is the answer not in the manual?
Questions and answers