Cabletron Systems SmartSwitch 6500 Overview And Setup Manual
Enterasys smartswitch 6500: install guide
Hide thumbs
Also See for SmartSwitch 6500:
- Reference manual (358 pages) ,
- User manual (150 pages) ,
- Installation and setup manual (62 pages)
Table of Contents
Advertisement
Quick Links
Advertisement
Table of Contents

Related Manuals for Cabletron Systems SmartSwitch 6500


Summary of Contents for Cabletron Systems SmartSwitch 6500
- Page 1 6C110 SmartSwitch 6500 Overview and Setup Guide 9032752-02...
-
Page 3: Fcc Notice
Only qualified personnel should perform installation procedures. Cabletron Systems reserves the right to make changes in specifications and other information contained in this document without prior notice. The reader should in all cases consult Cabletron Systems to determine whether any such changes have been made. The hardware, firmware, or software described in this manual is subject to change without notice. -
Page 4: Industry Canada Notice
Notice INDUSTRY CANADA NOTICE This digital apparatus does not exceed the Class A limits for radio noise emissions from digital apparatus set out in the Radio Interference Regulations of the Canadian Department of Communications. Le présent appareil numérique n’émet pas de bruits radioélectriques dépassant les limites applicables aux appareils numériques de la class A prescrites dans le Règlement sur le brouillage radioélectrique édicté... - Page 5 CABLETRON SOFTWARE PROGRAM LICENSE LICENSE. You have the right to use only the one (1) copy of the Program provided in this package subject to the terms and conditions of this License Agreement. You may not copy, reproduce or transmit any part of the Program except as permitted by the Copyright Act of the United States or as authorized in writing by Cabletron.
-
Page 6: Declaration Of Conformity
Notice DECLARATION OF CONFORMITY Application of Council Directive(s): Manufacturer’s Name: Manufacturer’s Address: European Representative Name: European Representative Address: Conformance to Directive(s)/Product Standards: Equipment Type/Environment: We the undersigned, hereby declare, under our sole responsibility, that the equipment packaged with this notice conforms to the above directives. Manufacturer Mr. -
Page 7: Table Of Contents
CHAPTER 1 INTRODUCTION Using This Guide ... 1-1 Structure of This Guide... 1-1 Document Conventions ... 1-2 Using the 6C110 Manual Set... 1-2 Getting Help... 1-3 Overview... 1-4 Features ... 1-6 CHAPTER 2 INSTALLATION REQUIREMENTS AND SPECIFICATIONS Site Guidelines ... 2-1 Configuration Guidelines ... - Page 8 Contents 6C110 Overview and Setup Guide...
-
Page 9: Chapter 1 Introduction
Read through this guide completely to familiarize yourself with its contents and to gain an understanding of the features and capabilities of the 6C110 SmartSwitch 6500. This guide lists the features and options of the 6C110 SmartSwitch 6500 and explains how to remove and reinstall the fan tray, and install the power supply(ies), modules and the cable management bar. -
Page 10: Document Conventions
Chapter 1: Introduction DOCUMENT CONVENTIONS Throughout this guide the following symbols are used to call attention to important information. Note symbol. Calls the reader’s attention to any item of NOTE information that may be of special importance. Caution symbol. Contains information essential to avoid damage to the equipment. -
Page 11: Getting Help
GETTING HELP For additional support related to this device or document, contact Cabletron Systems using one of the following methods: World Wide Web Phone Internet mail Login Password To send comments or suggestions concerning this document, contact the Cabletron Systems Technical Writing Department via the following email address: TechWriting@cabletron.com Make sure to include the document Part Number in the email message. -
Page 12: Overview
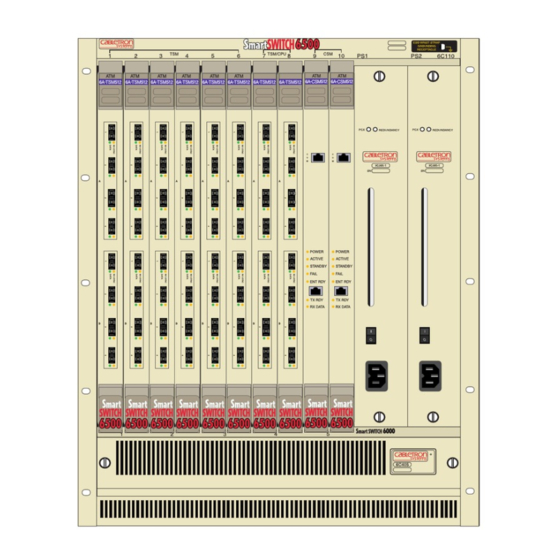
Chapter 1: Introduction OVERVIEW The Cabletron Systems 6C110 chassis design provides ten 1.2-inch slots that can contain a variety of interface modules. The 19-inch rackmountable chassis supports redundant power supplies and LANVIEW diagnostic LEDs. All chassis components (power supplies, fan tray, and modules) are installed from the front of the chassis for ease of maintenance. - Page 13 Overview Interface Modules (10) Redundant Power Supplies (2) Fan Tray Figure 1-1 The 6C110 Chassis with Redundant Power Supplies 6C110 Overview and Setup Guide...
-
Page 14: Features
Chapter 1: Introduction FEATURES Redundant Power Supply Modules The 6C110 supports two power supply modules which reside in the slots labeled PS1 and PS2. If the 6C110 is configured with a single power supply module, it must be located in slot PS1. CAUTION Installing one ac power supply and one dc power supply in the same chassis is NOT allowed. - Page 15 Power Supply Status Via Local Management The 6C110 power supply modules report information to the modules installed in the chassis regarding the present operating status. This information includes the following: • Power Supply ID (PS1, PS2) • Power Supply Status (normal/fault/not installed) •...
- Page 16 Chapter 1: Introduction 6C110 Overview and Setup Guide...
-
Page 17: Chapter 2 Installation Requirements And Specifications
INSTALLATION REQUIREMENTS AND This chapter describes the following: • Site guidelines that must be met before installing a 6C110 into a rack or cabinet • 6C110 configuration guidelines • Operating specifications for the 6C110 enclosure and power supply modules Only qualified personnel should install or service this unit. SITE GUIDELINES The following guidelines must be followed when a site is selected for the 6C110. -
Page 18: Configuration Guidelines
Chapter 2: Installation Requirements and Specifications CONFIGURATION GUIDELINES The 6C110 has 10 slots that accept interface modules. The slots are numbered 1 to 10 beginning from the left. There are two additional slots located on the far right of the chassis that are reserved for power supply modules. -
Page 19: Physical Specifications
2.3.1 Physical Specifications The physical specifications for the 6C110 chassis, 6C205-2, 6C205-3, 6C210-1, and 6C210-2 power supply modules and the 6C405 fan tray module are as follows: 6C110 Chassis Dimensions: Weight (with factory installed fan tray): 6C205-2 Power Supply Dimensions: Weight: 6C205-3 Power Supply Dimensions:... -
Page 20: Power Supply Requirements
Chapter 2: Installation Requirements and Specifications 6C405 Fan Tray Dimensions: Weight: 2.3.2 Power Supply Requirements The power supply requirements for the 6C205-2, 6C205-3, 6C210-1, and 6C210-2 power supply modules are as follows: 6C205-2 DC Power Supply Input Frequency: Input: (Voltage/Current): 6C205-3 AC Power Supply Input Frequency: Input: (Voltage/Current):... -
Page 21: Leds
LEDs The following subsections describe the functions and definitions of the LANVIEW LEDs for the power supply module and the fan tray unit for the 6C110. All four power supplies available for the 6C110 chassis have NOTE the same LEDs. 2.4.1 Power Supply LEDs There are two LEDs on the power supply. - Page 22 Chapter 2: Installation Requirements and Specifications Redundancy LED PWR LED 2016_03 Figure 2-1 Power Supply LEDs 6C110 Overview and Setup Guide...
-
Page 23: Fan Tray Led
2.4.2 Fan Tray LED The following table describes the different states of the fan tray LED and their definitions. Refer to Table 2-2 Fan Tray LED States and Their Definitions LED Color Green When the 6C110 is first powered up, the Fan Tray LED will NOTE display red briefly, until the fans are operating at the proper speed. - Page 24 Chapter 2: Installation Requirements and Specifications 6C110 Overview and Setup Guide...
-
Page 25: Chapter 3 6C110 Setup
This chapter contains instructions on setting up the Cabletron Systems 6C110 chassis. A Phillips screwdriver is needed to install the unit in a 19-inch equipment rack, to install the cable management bar, to secure the power supply module(s), remove and reinstall the power bridge adapter, and to remove and reinstall the fan tray. -
Page 26: Setting Up The 6C110
Chapter 3: 6C110 Setup Remove the accessory package. Remove the Electrostatic Discharge (ESD) Wrist Strap package. Remove the Console Cable Kit and set aside. SETTING UP THE 6C110 The following subsection describes the procedures that must be followed to complete the installation of the 6C110. 3.2.1 Installation Order Once a suitable site has been chosen, the 6C110 can be installed. -
Page 27: Installing The Cable Management Bar
INSTALLING THE CABLE MANAGEMENT BAR To install the cable management bar, proceed as follows: Remove the cable management bar from the shipping box. Ensure that there are four screws inside the bag with the cable management bar. Refer to Figure 3-1. -
Page 28: Rack Mounting The 6C110
Chapter 3: 6C110 Setup RACK MOUNTING THE 6C110 The 6C110 can be mounted in a standard 19-inch equipment rack. If the rack is not secured to the floor, it is recommended that the chassis be installed in the bottom half of the rack. This CAUTION prevents the rack from being top heavy. -
Page 29: Attaching The Electrostatic Discharge Wrist Strap
Attaching the Electrostatic Discharge Wrist Strap ATTACHING THE ELECTROSTATIC DISCHARGE WRIST STRAP The Electrostatic Discharge (ESD) wrist strap must be attached before handling the power supplies, fan tray, or modules for the 6C110. In addition, observe all precautions when handling these modules to prevent damage from ESD. -
Page 30: Removing The Power Bridge Adapter
Chapter 3: 6C110 Setup REMOVING THE POWER BRIDGE ADAPTER This section applies to users that will equip the 6C110 chassis with 6C205-2 or 6C205-3 power supplies ONLY. If 6C210-1 or CAUTION 6C210-2 power supplies will be used, DO NOT remove the power bridge adapter. - Page 31 Remove the two lower screws and the two upper screws that hold the power bridge adapter in place. Save the screws. Disconnect the power bridge adapter from the lower backplane. Place the power bridge adapter in a safe place in the event the power supplies are upgraded to the 6C210-1 or 6C210-2 models.
-
Page 32: Installing The Power Bridge Adapter
Chapter 3: 6C110 Setup INSTALLING THE POWER BRIDGE ADAPTER This section applies to users that will equip the 6C110 chassis with 6C210-1 or 6C210-2 power supplies, and the 6C110 CAUTION chassis has already had the power bridge adapter removed. If legacy 6C205-2 or 6C205-3 power supplies will be used, DO NOT install the power bridge adapter. - Page 33 Upper Backplane Lower Backplane Figure 3-7 Removing the Screws Using a .25-inch hex nut driver, install the three standoffs into the holes that formerly held the screws removed in Install the support clip by sliding the notched end over the rear chassis card cage, in the space provided next to the upper right hand corner of the lower backplane.
- Page 34 Chapter 3: 6C110 Setup Upper Backplane Lower Backplane Figure 3-9 Installing the Standoffs Connect the rear (black) power bridge adapter connectors to the lower backplane connectors of the chassis. Ensure the connectors are firmly seated together, and the screw holes of the power bridge adapter align with the standoffs installed in step 5.
- Page 35 Lower Backplane Connectors (2) Figure 3-10 Installing the Power Bridge Adapter Attach the power bridge adapter to the lower backplane by fastening the three screws to the standoffs installed in the support lip installed in Installation is complete. 6C110 Overview and Setup Guide Installing the Power Bridge Adapter 6C405 step 4...
-
Page 36: Power Supply Requirements
Chapter 3: 6C110 Setup POWER SUPPLY REQUIREMENTS Before installing the power supplies into the 6C110 chassis, ensure the following power supply requirements are met: Ensure the requirements outlined in this section are met. Serious injury or death may occur if these requirements are not followed. -
Page 37: Installing A Power Supply Module
INSTALLING A POWER SUPPLY MODULE Before installing the power supplies, refer to Section 3.6 CAUTION requirements for the 6C110 chassis. Installing legacy 6C205-2 and 6C205-3 power supplies with 6C210-1 or 6C210-2 power supplies in the same chassis is NOT allowed. You must install at least one power supply in the 6C110 chassis. - Page 38 Chapter 3: 6C110 Setup Slide the power supply module into the slot labeled PS1 as follows: Hold the module by placing one hand on the handle located on the module front panel and using the other hand to support the body of the module.
- Page 39 Metal Back-Panel Figure 3-11 Installing the Power Supply Module(s) After installation of the power supply modules is completed the 6C110 is ready to be powered up; however, Cabletron Systems recommends that installation of all modules for the 6C110 be completed before powering up the 6C110.
-
Page 40: Interface Module Slot Requirements
Table 3-1 refers to specific interface modules that are required NOTE for the SmartSwitch 6500 to function properly. Refer to your interface module documentation set to ensure that the required modules are at the installation site before installing any new interface modules. -
Page 41: Installing 6C110 Interface Modules
3.11 INSTALLING 6C110 INTERFACE MODULES To install a module, refer to the slot requirements covered in and proceed as follows: Remove the blank panel covering the slot in which the interface module will be installed. All other slots must remain covered to ensure proper airflow and cooling. - Page 42 Chapter 3: 6C110 Setup Metal Back-Panel Figure 3-12 Installing a Module 3-18 Slot Number Backplane Connectors Circuit Card Card Guides 6C110 Overview and Setup Guide Plastic Locking Tab 2159-01 Plastic Locking Tab 2361-02...
-
Page 43: Powering Up A 6C110 With Ac Power Supplies
510 watts. The 6C210-2 power supply has an on/off switch and an input power strip, and is rated at 800 watts. The on/off power switches and input power strips are similar to... - Page 44 Chapter 3: 6C110 Setup DC Input Power Strip Figure 3-13 Power Supply DC ON/OFF Switch and DC Input Power Strip ONLY QUALIFIED PERSONNEL SHOULD PERFORM THESE INSTALLATION PROCEDURES. TO REDUCE THE RISK OF ELECTRIC SHOCK OR ENERGY HAZARDS: • CONNECT TO A RELIABLY GROUNDED 48/60 VDC SELV SOURCE.
-
Page 45: Connecting A 6C205-2 Or 6C210-2 To A 48/60 Vdc Power Source
Installation Requirement Each dc power supply input requires either a 48 Vdc or 60 Vdc power source supplied by three 10 AWG (American Wire Gauge) copper wires. These wires must be terminated with either ring or spade terminals that accept a #6 screw. 3.13.1 Connecting a 6C205-2 or 6C210-2 to a 48/60 Vdc Power Source To connect the 6C205-2 or 6C210-2 to a 48/60 Vdc power source, face the... -
Page 46: Removing And Reinstalling The Fan Tray
Chapter 3: 6C110 Setup Press the on/off power switch of each power switch to on. The 6C205-2 and 6C210-2 sound an audible alarm if there is a NOTE polarity reversal. If the alarm sounds, turn off the 48/60 Vdc power source to that power supply. Then reverse the positive and negative leads to the dc input power strip of that power supply. -
Page 47: 3.14.2 Reinstalling The Fan Tray
Slotted Screws (2) Figure 3-15 Removing the Fan Tray 3.14.2 Reinstalling the Fan Tray To reinstall the fan tray, refer to Locate the ESD wrist strap shipped with the 6C110. Attach the ESD wrist strap to your wrist and plug the cable from the ESD wrist strap into the ESD grounding receptacle at the upper right corner of the 6C110. - Page 48 This LED should be red for a moment after the power switch is turned on, and then change to green to indicate that all fans are operating properly. If this LED remains red, it indicates that one or more of the fans are not operating at the proper speed.
- Page 49 Removing and Reinstalling the Fan Tray 6C405 Slot Guides Slotted Screws (2) 2016_08 Figure 3-16 Reinstalling the Fan Tray 6C110 Overview and Setup Guide 3-25...
- Page 50 Chapter 3: 6C110 Setup 3-26 6C110 Overview and Setup Guide...
Need help?
Do you have a question about the SmartSwitch 6500 and is the answer not in the manual?
Questions and answers