Table of Contents
Advertisement
Quick Links
Advertisement
Table of Contents

Related Manuals for Insportline 20145


Summary of Contents for Insportline 20145
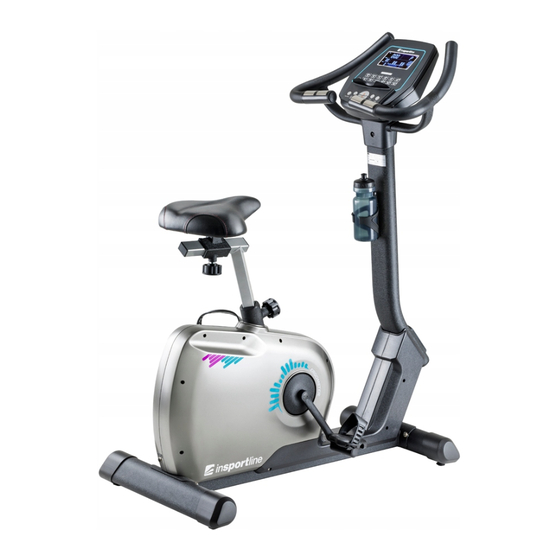
- Page 1 USER MANUAL – EN IN 20145 Exercise bike inSPORTline Valdosa...
-
Page 2: Table Of Contents
CONTENTS SAFETY INS TRUCTIONS ......................3 IMPORTANT NOTES ........................3 PARTS LIS T ..........................4 ASSEMBLY ..........................6 CONSOLE ...........................11 USE ............................19 CORRE CT BODY POSTURE .......................19 MAINTE NA NCE ...........................20 STORAGE ...........................20 IMPORTANT NOTICE ........................20 ENVIRONMENT P ROTE CTION....................20 TE RMS AND CONDITIONS OF WARRANTY, WA RRA NTY CLAIMS ..........20... -
Page 3: Safety Instructions
SAFETY INSTRUCTIONS • To ensure the best saf ety of the exerciser, regularly check it on damages and worn parts. • If you pass on this exerciser to another person or if you allow another person to use it, make sure that that person is f amiliar with the content and instructions in these instructions. -
Page 4: Parts List
• Be sure to set up the exerciser in a dry and even place and always protect it f rom humidity. If you wish to protect the place particularly against pressure points, contamination, etc., it is recommended to put a suitable, non-slip mat under the exerciser. •... - Page 5 Front plastic cover Rear plastic cover Handlebars Seat tube and seat basement Console Seat Screw M10 x 70 mm Washer M10 K1/K2 Lef t and right pedals L1/L2 Bottle holder and bottle Tools...
-
Page 6: Assembly
ASSEMBLY STEP 1 Remove the pre-installed screws (J1), spring washers (J2) and washers (J3) f rom the rear stabilizer (C). Attach the rear stabilizer (C) to the main f rame (A) with screws (J1), spring washer (J2) and washer (J3). You need a 5 mm Allen key. - Page 7 STEP 3 Ask another person to connect the cables. Connect the cable (A1) and cable (D1), making sure they are properly connected. (Be caref ul not to pinch cables between f rame and post) Place the middle post (D) on the main f rame (A) and connect with a 6 mm Allen key using a screw (J4) and washer (J5).
- Page 8 STEP 5 Remove the 4 screws (G1) on the back of the console (G) Connect the cables (D1, E1) and the pulse measurement cable to the console. Gently slide the console into the bracket be caref ul not to pinch the cables. Insert any excess cables in the middle pillar.
- Page 9 STEP 7 Remove the nuts (H1) and washers (H2) f rom the seat (H). Place the seat (H) on the seat post (F1) and secure with the nut (H1) and washer (H2). Loosen the screw (A2) and adjust the desired seat position. Then tighten the screw again. Seat adjustment Adjust the saddle position with A2 and F2 screws.
- Page 10 STEP 8 Attach the pedals marked L (lef t) and R (right). Attach the lef t pedal (K1) counterclockwise. Attach the right pedal (K2) clockwise. Attach and adjust the pedal tapes as required by the user. TRANSPORT Ask another adult person f or help. Lif t the exercise bike by the rear stabilizer and place the exercise bike on the f ront transport wheels.
-
Page 11: Console
CONSOLE BUTTONS Increase value or resistance DOWN Decrease value or resistance ENTER Conf irm settings (press) START/STOP Press the button to start / stop program To reset the current program settings, it is necessary to have the program selected. RESET Hold down the button f or 2 seconds to reset all values. - Page 12 Displays calories burned f rom 0 to 990 calories. The value change is 10 calories. CALORIES The data are f or guidance only, not f or medical purposes. PULSE Displays a pulse f rom 0-30 to 230. WATTS Displays power f rom 0 to 999. TURN ON Make sure that the device is connected to the power supply, press RESET f or 2 seconds, the LCD display will light up, 78.0 will be displayed and an sound signal will sound (f ig.
- Page 13 QUICK START MANUAL PROGRAM Press ENTER to enter the MANUAL program; the display will f lash (f ig. 13). Press START / STOP to start the program; you can set the resistance during exercise (Fig. 14). Press the START / STOP button to stop the program.
- Page 14 MANUAL MODE Select MANUAL (Fig. 13) using the rotary knob (1 to 16) and press ENTER to conf irm. The user can set the target time, distance, calories, pulse, and press START / STOP to start the program. Press RESET to return to the settings. Resistance can be adjusted during exercise.
- Page 15 PROGRAM (preset programs) Af ter entering the settings, use the rotary knob to select program P1 - P12, press ENTER to conf irm. You can set the training time, press START / STOP to start the program. Af ter starting, the time will be subtracted f rom the set value. When the time reaches 0, a sound signal sounds, press any button to turn of f the sound signal.
- Page 16 USER PROGRAM Af ter entering the user program settings, the user prof ile will f lash (f ig. 25), turn the knob to set the resistance (f ig. 26) f or the given program. Af ter setting 20 program segments, press MODE f or 2 seconds to exit the setting and set the time. While creating a prof ile, press RESET to return to the main menu.
- Page 17 If the device cannot detect a pulse, the display will show WATT CONSTANT In standby mode, select WATT and press ENTER. The preset value 120 will f lash, use the rotary knob to set the value f rom 10 to 350 and press START to start the program.
- Page 18 Actual value = 25% of set value - maintain speed Current value <25% of set value – speed up RECOVERY Af ter exercising, hold the sensors on the handrails and press RECOVERY. The time countdown starts f rom 00:60 to 00:00. The result f rom F1 to F6 is displayed, where F1 is the best result and F6 the worst result.
-
Page 19: Use
NOTES: If no action is taken f or 4 minutes, the console enters sleep mode, any action wakes the console. The console is powered by a 9V, 1A adapter. If you notice abnormal console behavior, disconnect and reco nnect the adapter. Exercise on the exercise bike is based on very simple movements, but you will surely f all in love with them. -
Page 20: Maintenance
MAINTENANCE • When assembling, tighten all screws and adjust the bike to the horizontal position. • Check the screws af ter 10 hours of use. • Wipe the sweat af ter the exercise. Clean the device with a cloth and gentle cleanser. Do not use solvents or aggressive cleaners on the plastic parts. - Page 21 The seller is SEVEN SPORT s.r.o. with its registered of f ice in Borivojova Street 35/878, Prague 13000, Company Registration Number: 26847264, registered in the Trade Register at Regional Court in Prague, Section C, Insert No. 116888. According to valid legal regulations it depends whether the Buyer is the End Customer or not. “The Buyer who is the End Customer”...
- Page 22 to exchange the def ected Goods f or a f ully compatible Good s of the same or better technical characteristics. The Seller is entitled to choose the f orm of the Warranty Claim Procedures d escribed in this paragraph. The Seller shall settle the Warranty Claim within 30 days af ter the delivery of the def ective Goods, unless a longer period has been agreed upon.
Need help?
Do you have a question about the 20145 and is the answer not in the manual?
Questions and answers