Table of Contents
Advertisement
Quick Links
Advertisement
Table of Contents

Related Manuals for Insportline inCondi UB45i


Summary of Contents for Insportline inCondi UB45i
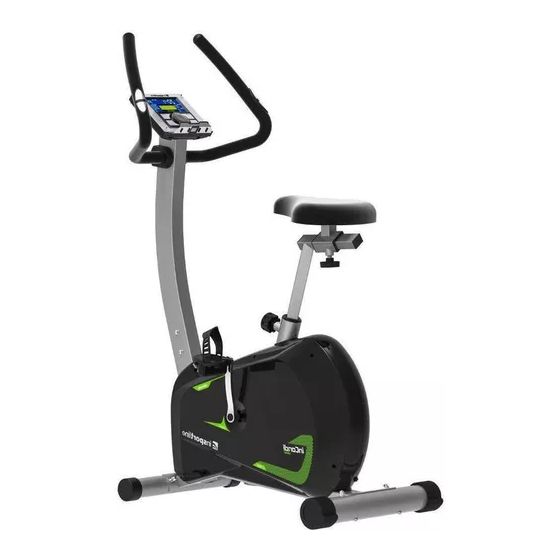
- Page 1 USER MANUAL – EN IN 20142 Exercise bike inSPORTline inCondi UB45i...
-
Page 2: Table Of Contents
CONTENTS SAFETY INSTRUCTIONS ........................3 IMPORTANT NOTES ..........................3 PARTS LIST ............................4 ASSEMBLY ............................. 7 CONSOLE ............................. 11 BUTTONS ............................11 PROGRAM SELECTION ........................11 DISPLAY ............................12 iCONSOLE APPLICATION ........................19 SIGN IN .............................. 19 HISTORY ............................21 REST HR TEST .......................... -
Page 3: Safety Instructions
SAFETY INSTRUCTIONS • To ensure the best safety of the exerciser, regularly check it on damages and worn parts. • If you pass on this exerciser to another person or if you allow another person to use it, make sure that that person is familiar with the content and instructions in these instructions. •... -
Page 4: Parts List
• The general rule is that exercisers and training devices are no toys. Therefore, they must only be used by properly informed or instructed persons. • Stop your work-out immediately in case of dizziness, nausea, chest pain or any other physical symptoms. - Page 5 Handlebars E1/E2 Handlebars covers Seat adjustment Seat Console Screw M8 x 75L Screw M8 x 90L Nut M8 Spring washer M8 Washer M8 Screw M4...
- Page 6 K1/K2 Pedals left/right Tools Bottle holder Screw...
-
Page 7: Assembly
ASSEMBLY STEP 1 Attach the front stabilizer (C) to the main frame (A) with screws (J1), washer (J5) and nut (J3) in the direction of the sticker on the stabilizer. Attach the rear stabilizer (D) to the main frame (A) with screws (J2), washer (J5), spring washer (J4) and nut (J3). - Page 8 STEP 3 Pass the cables through the bracket handle. Attach the handlebar to the middle post using pre- installed nuts (J7) and wave washer (J8). Attach the handle caps (E1 and E2). Now go to the STEP 4. Be careful not to pinch the cables. STEP 4 Remove the 4 bolts (H1) from the console (H).
- Page 9 STEP 5 Attach the seat post (F) to the main frame (A) with screws (F1). Make sure the screw is in the positioning hole. Secure the seat (G) to the seat post (F3) using the pre-installed nuts (G1) and washer (G2) on the bottom of the seat.
- Page 10 BOTTLE HOLDER Remove pre-installed screws (M2). Attach the bottle holder (M1) to the support tube (B) with screws (M2). TRANSPORT For moving grab the handles (E) and tilt slightly, push the exercise bike to the desired location. CONENCTION Place the device as close as possible to the outlet and connect.
-
Page 11: Console
CONSOLE BUTTONS ENTER Confirm selection UP / DOWN Menu navigation START / STOP Turn on or off the program Return to main menu, if the RESET program is stopped, the return button will delete preset setting TOTAL RESET Delete all data RECOVERY Heart rate test PROGRAM SELECTION... -
Page 12: Display
DISPLAY SPEED display speed during training values 0.0 – 99.9 display revolutions per minute values 0 – 999 TIME display training time values 0:00 – 99:59, adjustable values 0:00 – 99:00 DISTANCE display distance values 0:00 – 99.9, adjustable values 1.0 – 99.0 CALORIES display burned calories values 0 –... - Page 13 MANUAL PROGRAM Press START in main menu for manual program 1. Use UP and DOWN button to select MANUAL program and press ENTER. 2. Use UP and DOWN button to set up TIME, DISTANCE, CALORIES, PULSE and confirm with MODE button. 3.
- Page 14 BEGGINER PROGRAM 1. Use UP and DOWN button to select BEGGINER program and press ENTER. 2. Use UP and DOWN button to select program BEGGINER 1 – BEGGINER 4, confirm with MODE button. 3. Use UP and DOWN button to set up TIME. 4.
- Page 15 ADVANCE PROGRAM 1. Use UP and DOWN button to select ADVANCE program and press ENTER. 2. Use UP and DOWN button to select program ADVANCE 1 – ADVANCE 4, confirm with MODE button. 3. Use UP and DOWN button to set up TIME. 4.
- Page 16 SPORTY PROGRAM 1. Use UP and DOWN button to select SPORTY program and press ENTER. 2. Use UP and DOWN button to select program SPORTY 1 – SPORTY 4, confirm with MODE button. 3. Use UP and DOWN button to set up TIME. 4.
- Page 17 CARDIO PROGRAM 1. Use UP and DOWN button to select CARDIO program and press ENTER. 2. Use UP and DOWN button to enter AGE. 3. Use UP and DOWN button to select 55%, 75%, 90% or TAG (30 – 230) and confirm with MODE.
- Page 18 WATT PROGRAM 1. Use UP and DOWN button to select WATT program and press ENTER. 2. Use UP and DOWN button to set WATT (10 – 350) and confirm with MODE. 3. Use UP and DOWN button to set up TIME. 4.
-
Page 19: Iconsole Application
iCONSOLE APPLICATION In iConsole +, select MY TRAINING. Here you can see a summary of your training (total distance, total time, calories burned) SIGN IN 1. Choose your avatar on left side to enter profile 2. Log in with your Facebook, Gmail or WeChat... - Page 20 settings account 3. If you forgot your password you can choose Reset my password. Your new password will be send to your email. MEMBERSHIP • Choose your profile picture to enter profile settings. • You can change profile picture or update your profile information. (If don’t enter all required information, calculated data may not be calculated correctly.) SIGN OUT •...
-
Page 21: History
HISTORY Select profile picture and then select TRAINING The measured data will be displayed: number of HISTORY. workouts, calories, training time and list of workouts. Choose to delete data. Used device, program, RPM, time, distance and calorie data are recorded. Select a workout to display the information. -
Page 23: Rest Hr Test
REST HR TEST WARNING! A system for monitoring heart rate may not be accurate. Overloading during training may cause serious injury or death. If you feel any discomfort, immediately stop the exercise! Select your profile picture to expand the menu. Select source: Apple watch or BLE HRM Select REST HR TEST. -
Page 24: Support
SUPPORT Select your profile picture to expand the menu. Select SUPPORT. SETTING Select your profile picture to expand the menu. Select unit: metric or imperial. Select SETTING. - Page 25 Select source: Apple watch or BLE HRM Check the program version...
-
Page 26: Quick Start
QUICK START 1. Bluetooth connection: Select the device you are using. If you are using a heart rate monitor, you can select it below. 2. Once the devices are paired, click> icon in the top right corner. 3. If you cannot find the device, make sure that Bluetooth turned... -
Page 27: Interval
5. Select the pin icon to pin the data. 6. When you finish the exercise a summary of the exercise is displayed. You can compare results with previous workouts. INTERVAL 1. You can select the number of repetitions (interval cycles) (number in green circle), time (exercise time and rest time), level, target RMP, select go to start the program... - Page 28 2. After turning on the program, you can set the load or pause / stop the program. 3. Select the pin icon to pin the data.
-
Page 29: Map My Route
4. When you finish the exercise a summary of the exercise is displayed. You can compare results with previous workouts. MAP MY ROUTE 1. Select a location. 2. Select a start point. 3. Select the route and swipe the yellow GO button to the left. - Page 30 4. If you do not want to set the route yourself, you can select one of the preset routes. You can choose between China routes or worldwide routes. 5. After turning on the program, you can set the load or pause / stop the program. 6.
-
Page 31: Constant Power
CONSTANT POWER 1. After pairing with Bluetooth, set time, target power, target RPM, target cadence 2. Training graphs are displayed, select one of the two graphs (Cadence Power). following information displayed or by pined with the pin button... - Page 32 3. Touch the display to pause or stop the training. 4. Workout at constant speed.
- Page 33 5. When you finish the exercise a summary of the exercise is displayed. You can compare the results with previous workouts.
-
Page 34: Programs
PROGRAMS 1. After pairing with Bluetooth, select the program. preset programs displayed. 2. The display shows the progress of the training. 3. Select the pin icon to pin the data. - Page 35 4. Touch the screen to stop or pause the program or select the load. 5. When you finish the exercise a summary of the exercise is displayed. You can compare results with previous workouts.
-
Page 36: Ai Training
AI TRAINING 1. After pairing with Bluetooth, select the machine (you select multiple machines). 2. Select your goal / program... -
Page 37: Gym Center
3. Set your schedule. 4. Training Overview 5. Training time, machine and goal / program change GYM CENTER In GYM CENTER, the user can download various training programs. 1. Download the selected program 2. Turn on iRoute + program 3. For iRoute + (Google Maps) training, the user must have wifi on and be logged in. -
Page 38: Use
Exercise on the exercise bike is based on very simple movements, but you will surely fall in love with them. Thanks to simplicity of the exercise on the exercise bike in can be done by elderly people. Prior to exercise, it is necessary to adjust the height of the saddle. It is important that you sit comfortably. The bicycle saddle must be set so that you can hold the ergonomically shaped handles when sitting. -
Page 39: Storage
• Wipe the sweat after the exercise. Clean the device with a cloth and gentle cleanser. Do not use solvents or aggressive cleaners on the plastic parts. • When noise is increased, it is necessary to check that all joints are tightened properly. •... - Page 40 “The Buyer who is not the End Customer” is a Businessman that buys Goods or uses services for the purpose of using the Goods or services for his own business activities. The Buyer conforms to the General Purchase Agreement and business conditions. These Conditions of Warranty and Warranty Claims are an integral part of every Purchase Agreement made between the Seller and the Buyer.
- Page 41 26847264 VAT ID: CZ26847264 Phone: +420 556 300 970 E-mail: eshop@insportline.cz reklamace@insportline.cz servis@insportline.cz Web: www.inSPORTline.cz inSPORTline s.r.o. Headquaters, warranty & service center: Električná 6471, Trenčín 911 01, SK CRN: 36311723 VAT ID: SK2020177082 Phone: +421(0)326 526 701 E-mail: objednavky@insportline.sk reklamacie@insportline.sk servis@insportline.sk...
Need help?
Do you have a question about the inCondi UB45i and is the answer not in the manual?
Questions and answers