Advertisement
Quick Links
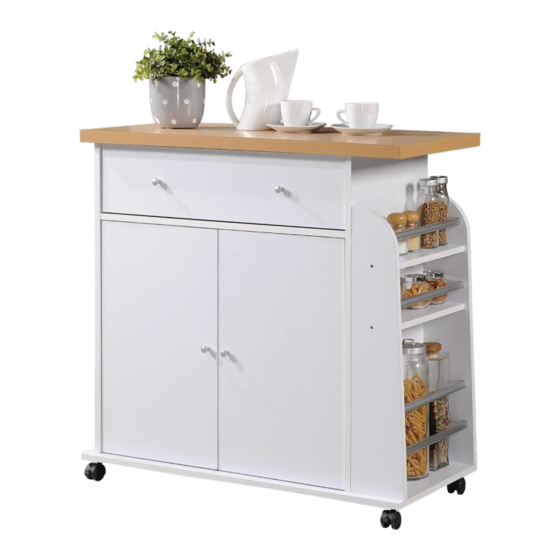
HODEDAH
Assembly Instructions
This instruction booklet contains important safety information, please read and keep for future reference.
ITEM # HIK 65-T (MOP)
KITCHEN CART
FRONT VIEW
Product Dimensions : Height 35'' x Width 35.4' x Depth 16.5''
www.Hodedah.com
2 people
70 mins
1 YR LTD
1 Box
REAR VIEW
1 | Page
Advertisement

Related Manuals for Hodedah HIK 65-T


Summary of Contents for Hodedah HIK 65-T
- Page 1 HODEDAH Assembly Instructions 2 people This instruction booklet contains important safety information, please read and keep for future reference. 70 mins ITEM # HIK 65-T (MOP) 1 YR LTD KITCHEN CART 1 Box FRONT VIEW REAR VIEW Product Dimensions : Height 35'' x Width 35.4' x Depth 16.5'' 1 | Page www.Hodedah.com...
-
Page 2: Warranty
WARRANTY Hodedah warrants this product to be free from defect in materials and workmanship and agrees to remedy and such defect. This warranty covers one year from the date of original purchase. This is solely limited to replacement of defective parts and no assembly for labor is included. -
Page 3: Hardware List
HODEDAH Hardware List Shelf Support M8X25MM M3.5X16MM Door Support Spring M4X38MM M6X50MM Minifix Nut Minifix Bolt Minifix Cap 3.5kg Metal Piece Magnet (1 Hole) M3X12MM Handle M4X25MM M4X45MM 311 KNOB Nail 5/8 Drawer Slide 14'' Drawer Slide 14'' Caster Caster... - Page 4 HODEDAH Hardware List Shelf Support M8X25MM M3.5X16MM Door Support Spring M4X38MM M6X50MM Minifix Nut Minifix Bolt Minifix Cap 3.5kg Metal Piece Magnet (1 Hole) M3X12MM Handle M4X25MM M4X45MM 311 KNOB Nail 5/8 Drawer Slide 14'' Drawer Slide 14'' Caster Caster...
- Page 5 HODEDAH Hardware List Chrome Pipe Important 1. Before you throw the package, please use the Check Box to identify the parts and hardware to ensure that you have everything you need. 2. Check and measure the bolts before applying them to parts.
-
Page 6: Parts List
HODEDAH Parts List 788x376x15mm 708x150x15mm 344x100x15mm 708x150x15mm 788x376x15mm 698x90x15mm 900x396x15mm 900x420x30mm 692x163x15mm 350x114x15mm 640x114x15mm 670x350x2.5mm 594x343x15mm 594x343x15mm 698x352x15mm 830x364x2.5mm 344x112x15mm 6 | Page www.Hodedah.com... - Page 7 HODEDAH The Breakdown... 7 | Page www.Hodedah.com...
- Page 8 HODEDAH Step 1 WOOD DOWEL M8X25MM SHELF SUPPORT MINIFIX BOLT RIGHT VIEW LEFT VIEW BOTTOM VIEW 1. Insert 22 x wood dowel (A) into panel (1,2,3,4,5,6 & 17). 2. Insert 4 x minifix bolt (G2) into panel (8) at bottom side.
- Page 9 HODEDAH Step 2 CB SCREW M3X12MM HANDLE 311 KNOB CB SCREW M3.5X16MM CB SCREW M4X25MM DOOR SUPPORT SPRING DRAWER SLIDE 14'' METAL PIECE RIGHT VIEW LEFT VIEW REAR VIEW 1. Assemble 2 x drawer slide (L1) to panel (1 & 5) with 6 x cb screws M3.5x16mm (C).
- Page 10 HODEDAH Step 3 CB SCREW M6X50MM ALLEN KEY 3.5KG MAGNET (1 HOLE) MINIFIX CAP 1. Insert 2 x magnet (I1) into panel (7). 2. Connect panel (2) to panel (1) by using 2 x csk M6x50mm (E) with allen key (N). After that, insert 2 x cap (G3).
- Page 11 HODEDAH Step 4 CB SCREW M6X50MM ALLEN KEY MINIFIX CAP CB SCREW M4X25MM 1. Connect panel (3 & 17) to panel (2) by using 2 x csk M6x50mm (E) with allen key (N). After that, insert 2 x cap (H).
- Page 12 HODEDAH Step 5 CSK CAP WOOD M6X50MM ALLEN KEY MINIFIX CAP 1. Connect panel (6) to panel (5) by using 1 x csk M6x50mm (E) with allen key (N). After that, insert 1 x cap (G3). 2. Connect panel (6) to panel (1) by using 3 x csk M6x50mm (E) with allen key (N). After that, insert 1 x cap (G3).
- Page 13 HODEDAH Step 6 CB SCREW M3.5X16MM CASTER W/OUT STOPPER CASTER WITH STOPPER 1. Fix 4 x caster (M1) & caster (M2) onto panel (7) base by using 16 x cb screws M3.5x16mm (C). 13 | Page www.Hodedah.com...
- Page 14 HODEDAH Step 7 CB SCREW M4X38MM HANDLE 311 KNOB MINIFIX NUT CB SCREW M4X45MM MINIFIX CAP ALLEN KEY 1. Connect panel (8) to panel (1 & 5) by using 4 x minifix nut (G1) with allen key (N). After that, insert 4 x cap (G3).
- Page 15 HODEDAH Step 8 CB SCREW M3.5X16MM DRAWER SLIDE 14'' NAIL 5/8 RIGHT VIEW LEFT VIEW 1. Fix 2 x drawer slide (L2) into panel (10) by using cb screws M3.5x16mm (C). 2. Slide 1 x panel (12) into panel (10) groove. After that, use 15 x power nails (K) for fix it.
- Page 16 HODEDAH Step 9 Final step... & & 1. Press the door support spring (F) at the panel (13 & 14) top side. After that, inside to the hole at panel (6). 2. Press the door support spring (F) at the panel (13 & 14) bottom side. After that, inside to the hole at panel (7).
- Page 17 HODEDAH Job Complete... Enjoy & Thank you for purchasing from Hodedah! 17 | Page www.Hodedah.com...
-
Page 18: Kit Includes
Failure to detach this restraint before moving furniture may result in injury and damage. If the safety kit is not in the box, please contact our consumer service team at Tel. 1 (718) 456 0505 or Email Support@Hodedah.com in order to obtain one before using the furniture. - Page 19 HODEDAH FITTING OF ANTI-TIP SAFETY STRAP STEP 1: Attach the mounting bracket to the furniture in the solid part below the top panel a few inches away from the side of the unit. Screw through the smallest hole of STEP 2:...
Need help?
Do you have a question about the HIK 65-T and is the answer not in the manual?
Questions and answers