Advertisement
Quick Links
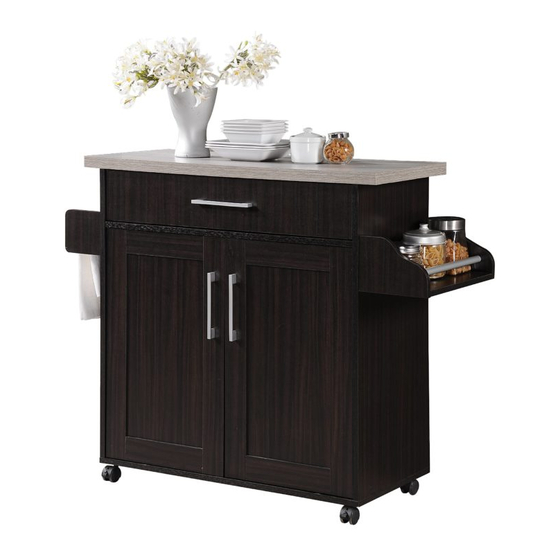
HIK 78 (KITCHEN TROLLEY)
~ Follow these steps to assemble the Kitchen Trolley ~
~ Before assembly, please read the instructions ~
~ Keep these instructions for future reference ~
FRONT VIEW
REAR VIEW
THIS INSTRUCTION BOOKLET CONTAINS IMPORTANT INFORMATION ABOUT ASSEMBLY AND
SAFETY. PLEASE READ AND KEEP FOR FUTURE REFERENCE.
1
Advertisement

Subscribe to Our Youtube Channel
Related Manuals for Hodedah HIK 78


Summary of Contents for Hodedah HIK 78
- Page 1 HIK 78 (KITCHEN TROLLEY) ~ Follow these steps to assemble the Kitchen Trolley ~ ~ Before assembly, please read the instructions ~ ~ Keep these instructions for future reference ~ FRONT VIEW REAR VIEW THIS INSTRUCTION BOOKLET CONTAINS IMPORTANT INFORMATION ABOUT ASSEMBLY AND...
- Page 2 SMALL SIDE (L/R) SIDE PANEL (L) 120 x 120 x 15 800 x 394 x 15 The parts of the product are packed in one box. These are inner box(es) or package(s) that included components and accessories required to complete the assembly. I) Main Unit : II) Door &...
- Page 6 Tighten minifix (A2) to panel (7). 3 BOX BOTTOM PANEL 4 BOX SIDE (L/R) SMALL SIDE (L/R) 7 TOP PANEL BOTTOM VIEW 2 SIDE PANEL (L) 5 SIDE PANEL (R) 6 MIDDLE SUPPORT Insert door spring support (H) to door panel (15) and (16).
- Page 7 Insert magnet (F2) onto panel (6) 's non-thru holes as shown, make sure the magnets, iron side facing frontward to edging direction. Tighten 2 Screws (O) from Door Panel (15 & 16) into the handle (M) hole. MIDDLE SUPPORT BOTTOM VIEW 15 DOOR PANEL (L) DOOR PANEL (R) Fix and tighten metal piece (F1) with screw (G) at...
- Page 8 - Place 2 panel 12 on each side of panel as shown - Then tighten screw (J) to panel 13 lower thru holes to fix them onto panel 12 - Holes to fix up to the panel 11 - Filp drawer with bottom side up, place panel 12 onto the drawer and align properly.
- Page 9 Put in the chrome pipe (S) to panel (4) then fix onto panel (3) by inserting dowels (C) onto non-thru at panel (3) use allen key (L) to tighten screws (D) from the thru-holes of panel (4) after that insert CSK CAP (E).
- Page 10 Fix Panel (3,4) onto panel (5) by inserting dowels (C) onto non-thru at panel (3,4) use allen key (L) to tighten screws (D) from the thru-holes of panel (5) after that insert CSK CAP (E).
- Page 11 Put in the chrome pipe (S) to panel (1) Then fix onto panel (2) by inserting dowels (C) onto non-thru at panel (1) use allen key (L) to tighten screws (D) from the thru-holes of panel (2) after that insert CSK CAP (E).
- Page 12 Fix Panel (6) on both sides panel (2 & 5) by inserting dowels (C) onto non-thru at panel (6) use allen key (L) to tighten screws (D) from the thru-holes of panel (2 & 5) after that insert CSK CAP (E).
- Page 13 Fix panel (7) onto side panel (2,5) by inserting minifix (A1) into panel (2,5) 's L-thru holes and using allen key (L) to tighten it after that insert minifix cap (B).
- Page 14 Fix bottom panel (8) onto panel (2,5) by inserting dowels (C) onto non-thru at panel (2,5) use allen key (L) to tighten screws (D) from the thru-holes of panel (2,5) after that insert CSK CAP (E).
- Page 15 Fix caster (P) & (Q) onto panel (8) by inserting screw (K) into panel (8) 's L-thru holes and using screw tighten it.
- Page 16 At face down position, Place back panel (10) onto the back of the main unit and align it properly for nailing. Use hammer to nail the nails one by one on the line drawn and at center of 4 side edges. Gap between 2 nails should be about 90mm for all...
- Page 17 - Put in the drawer by slotting the rollers at each and of drawer slide (R2) onto the rail of drawer slide (R1) fixed at side panel 2 and 5. Then push the drawer in slowly. - Take panel (9) and place it inside the top compartment by putting it on the 4 shelf support as shown.
- Page 18 Fix down door panel (15 ,16) by pushing and slotting the door support (H) onto each holes at bottom of panel (8) and middle support (6).
Need help?
Do you have a question about the HIK 78 and is the answer not in the manual?
Questions and answers