
Subscribe to Our Youtube Channel
Related Manuals for RADEMACHER Troll Basic DuoFern 5615


Summary of Contents for RADEMACHER Troll Basic DuoFern 5615
- Page 1 Troll Basic DuoFern 5615 / 5615-AL Instruction manual for the electrical connection and for commissioning Item No.: 3650 01 72 (ultra-white) 3650 01 82 (aluminium) VBD 600-2 (01.21)
-
Page 2: Dear Customer
With your purchase of a Troll Basic DuoFern, you have chosen a quality product manufactured by RADEMACHER. Thank you for the trust you have placed in us. The Troll Basic DuoFern has been designed both in order to provide optimal convenience and operability as well as to ensure solidity and durability. -
Page 3: Table Of Contents
Table of Contents Dear Customer, ........2 13. Set the motor running time ....26 13.1 Setting the motor running time 1. Included in delivery ......4 with the Troll Basic DuoFern ..... 26 2. General view - operating unit ....5 13.2 Time the running duration of 2.1 Brief description of the keys ....5 the motor and enter it into the 3. -
Page 4: Included In Delivery
1. Included in delivery Legend 1. Control unit (50 x 50 mm) 2. Frame 3. Installation housing Operating instructions (no illustration) Installation, see page 18... -
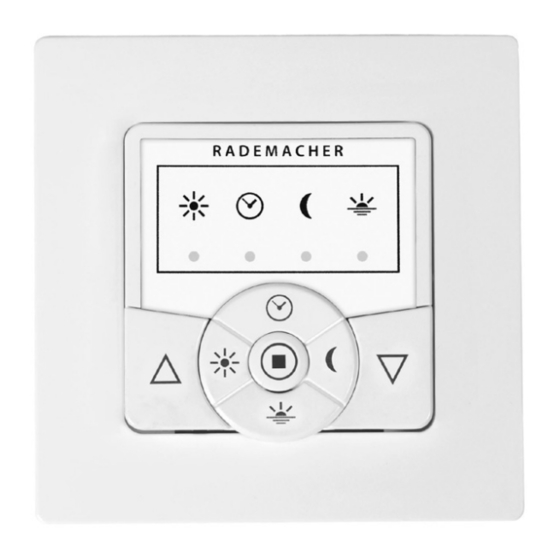
Page 5: General View - Operating Unit
2. General view - operating unit Operating unit Dawn LED Sun LED Dusk LED Timer LED Timer key Up key Down key Sun key Dusk key Dawn key SET/Stop key 2.1 Brief description of the keys The operating keys [ up / down ] Sun key, [ ◆... -
Page 6: The Function Of The Keys And Leds
Automatic dusk function on / off Lights red max. all LEDs Automatic system on / off light up red or are switched off End point setting only for RADEMACHER Flashes red electronic tubular motors Reversal of direction of rotation Flashes red Accept sunshine position... -
Page 7: Key To Symbols
4. Key to symbols Risk of fatal electric shock. This sign warns of danger when working on electrical connections, components, etc. It requires that safety precautions be taken to protect the life and health of the person concerned. This concerns your safety. -
Page 8: Safety Informations
5. Safety informations The use of defective equipment can lead to personal injury and damage to property (electric shocks, short circuiting). ◆ Never use defective or damaged equipment. Please contact our Customer Service depart- ment in the event of faults, see page 40. Incorrect use leads to an increased risk of injury. -
Page 9: Improper Use
5.1 Intended use NOTE Radio systems which transmit on the same frequency can cause interference. 5.2 Improper use Using the Troll Basic DuoFern for purposes other than previously mentioned is impermissible and is regarded as improper use. Improper use can lead to serious injuries or property damage. ◆... -
Page 10: Brief Description
DuoFern network. NOTE You can find a detailed description of the various functions, configuration options and possible combinations for the DuoFern system at: http://www.rademacher.de/duofern Roller shutter control The system enables roller shutters to be automated. Manual operation (normal mode) It is possible to manually control the connected tubular motor at any time by using the controls. -
Page 11: Compatible Switch Ranges
The Troll Basic DuoFern can be integrated into most commercially available switch ranges with the help of a corresponding intermediate frame 50 x 50 (DIN 49075). Suitable switch ranges are detailed on the following page. 6.1 Compatible switch ranges (www.rademacher.de) Manufacturer switch range... -
Page 12: Duofern Network Function Table
6.2 DuoFern network function table DuoFern HomePilot® DuoFern environmental sensor DuoFern manual central operating unit WR ConfigTool with DuoFern manual central operating unit RolloTron Comfort DuoFern DuoFern manual transmitter standard DuoFern wall controller DuoFern radio transmitter, flush-mounted DuoFern functions Value range Factory setting C D E F G H 1. - Page 13 0 ms / 160 ms / 480 ms 0 ms (off) ● ● The "WR ConfigTool" software can be downloaded from our website at www.rademacher.de * Only available via radio ** Not supported by Troll Basic DuoFern. # only with Venetian blinds mode activated...
-
Page 14: Troll Basic Duofern Function Overview
◆ Switch the automatic solar function on/off ◆ Automatic dawn function on / off ◆ Automatic dusk function on / off ◆ End point setting (example circuit for RADEMACHER electronic tubular motors, from 2000 onwards) ◆ Switching reversal of rotation direction on/off ◆... -
Page 15: Important Information Prior To Electrical Installation And Mounting
Parallel connection of electronic tubular motors A maximum of 3 tubular motors can be connected in parallel to the Troll Basic DuoFern (e.g. RADEMACHER electronic tubular motors). To do so, please refer to the operating manual for the corresponding tubular motor. -
Page 16: Safety Instructions For Electrical Connection
7.1 Safety instructions for electrical connection Prior to connecting, check that the voltage / frequency on the type plate corresponds to the local mains conditions. There is a risk of fatal electric shock when touching electrical components. ◆ Carry out all installation and connection work only in an isolated, zero-volts state. ◆... -
Page 17: Connecting A Tubular Motor
Inputs E1 / E2 (230 V / 50 Hz) , only if required. Connecting the white set cord (SET) from RADEMACHER tubular motors * The white set cord (SET) from RADEMACHER tubular motors must be con- nected to the neutral terminal [ N ] to ensure trouble-free operation of the... -
Page 18: Assembly
8. Assembly The Troll Basic DuoFern is designed for flush-mounted installation. For this, you require a 58mm flush-mounted box. We recommend using a deep box. Connecting terminals on bottom > [ 4 ] [ 2 ] [ 1 ] [ 5 ] [ 3 ] Installation procedure: Switch off the mains. -
Page 19: Important Information Prior To Initial Commissioning
◆ In order to do so, follow the information provided in the operating manual for the respective tubular motor. ◆ For electronic RADEMACHER tubular motors from year of manufacture 2000 onwards, the end points can be configured with the help of the Troll Basic DuoFern, see page 35. -
Page 20: Manual Operation (Jog Mode)
10.1 Manual operation (jog mode) As soon as Venetian blinds mode is activated with the help of a DuoFern controller (e.g. HomePilot®), it is possible to manually operate the Troll Basic DuoFern in jog mode. Jog mode provides a convenient way to configure Venetian blinds. In doing so, the Venetian blinds motor is powered only as long as the control key is actuated. -
Page 21: Logging Duofern Transmitters On / Off; Brief Description
You can assign a maximum of 20 DuoFern devices to a single Troll Basic DuoFern. NOTE ◆ A Troll Basic DuoFern cannot be connected to another Troll Basic DuoFern device. ◆ Additional information about logging on can be obtained from the login matrix on our website under: www.rademacher.de... -
Page 22: Login For Duofern Transmitters
11.1 Login for DuoFern transmitters Activate login mode. Simultaneously press and hold the buttons for approx. 4 seconds. The timer LED flashes green: Login mode remains active for approx. 120 seconds. Switch the desired DuoFern transmitter to login mode. Pay attention to the timer LED. Flashes green Login mode is active. -
Page 23: Logging Off Duofern Transmitters
11.2 Logging off DuoFern transmitters Activate logout mode. Simultaneously press and hold the buttons for approx. 4 seconds. The timer LED flashes red: Logout mode remains active for approx. 120 seconds. Switch the desired DuoFern transmitter to logout mode. Pay attention to the timer LED. flashes red Logout mode is active. -
Page 24: Clearing The Duofern Network
11.3 Clearing the DuoFern network This function enables you to log off all DuoFern transmitters from the Troll Basic DuoFern that are no longer accessible via radio. NOTE ◆ Not all battery-operated DuoFern transmitters (e.g. the DuoFern manual central operating unit) can be logged off in this way. -
Page 25: Automatic Mode; Brief Description
12. Automatic mode; brief description The Troll Basic DuoFern features four automatic modes which can be switched on/off individually on the device. ◆ Automated solar function ◆ Automatic timer ◆ Automatic dusk function ◆ Automatic dawn function The automatic functions are only available if the Troll Basic DuoFern is operated with a respective controller (e.g. -
Page 26: Set The Motor Running Time
13. Set the motor running time In order to be able to use all of the functions, such as ventilation position and sunshine position, it is vital that the motor running time is correctly configured beforehand. The running time can be configured directly with the Troll Basic DuoFern or you can enter it in the central DuoFern controller (e.g. -
Page 27: Time The Running Duration Of The Motor And Enter It Into The Duofern Controller
13.2 Time the running duration of the motor and enter it into the DuoFern controller Subsequently move the roller shutters to the upper end point and make a note of the time required. Enter the noted time in the central DuoFern controller (e.g. HomePilot®). NOTE ◆... -
Page 28: Switching The Automated Solar Function On/Off
14.1 Switching the automated solar function on/off The automated solar function enables brightness-dependent control of your roller shutters. The control signals for this function are provided by a light sensor on the DuoFern network. When the automated solar function is triggered, your roller shutters will then lower to the configured sunshine position. -
Page 29: Switching The Automatic Timer On/Off
15. Switching the automatic timer on/off Execution of control signals from the DuoFern network. If the automatic timer is activated, control signals for opening and closing times will be received from the DuoFern network and executed by the system. NOTE ◆... -
Page 30: Switching The Automatic Dusk Function On/Off
16. Switching the automatic dusk function on/off The automatic dusk function causes the roller shutters to close automatically to their lower end point or the configured ventilation position (see page 33). The control signals for this function are provided by a DuoFern transmitter on the DuoFern network. -
Page 31: Automatic Wind Function; Brief Description
18. Automatic wind function; brief description This function enables you to use the Troll Basic DuoFern to operate, for example, connected Venetian blinds or awnings in relation to the weather conditions. The automatic wind function can also be switched on/off by an overriding DuoFern controller (e.g. HomePilot®). As soon as an external "wind"... -
Page 32: Rain Function; Brief Description
19. Rain function; brief description This function enables you to use the Troll Basic DuoFern to operate, for example, a connected awning in relation to the weather conditions. The automatic rain function can also be switched on/off by an overriding DuoFern controller (e.g. HomePilot®). As soon as an external "rain"... -
Page 33: Set The Ventilation Position
20. Set the ventilation position If you do not want the roller shutters to close fully to the lower end point, you can use this function to configure an arbitrary position (e.g. as ventilation position). ◆ When closing automatically, the roller shutters will stop at the ventilation position, however, they can subsequently be closed completely via manual operation. -
Page 34: Venetian Blinds Mode; Brief Description
21. Venetian blinds mode; brief description This function enables you to use the Troll Basic DuoFern to control Venetian blinds. The Venetian blinds mode can also be switched on/off by an overriding DuoFern controller (e.g. HomePilot®). The following modes are possible: ◆... -
Page 35: Switching Reversal Of Rotation Direction On/Off
It is imperative that both end points are configured, otherwise malfunctions may occur. ◆ The end point setting function is only available for RADEMACHER electronic tubular motors from 2000 onwards. ◆ The end point setting can not be adjusted for tubular motors connected in parallel. - Page 36 23. End point adjustment Set the upper end point. Simultaneously press and hold the buttons. The roller shutters travel up. The solar LED flashes red by way of confirmation. Release the buttons..as soon as the roller shutter achieve the desired position for the upper end point.
-
Page 37: Function Of External Inputs E1 And E2
24. Function of external inputs E1 and E2 The Troll Basic DuoFern features two external inputs E1 (up) and E2 (down) for connecting an external switch. If all automatic functions are deactivated, the inputs will not be taken into consideration by the system. Function in normal mode The mode of operation and order of switching corresponds to manual mode, as described on page 19. -
Page 38: Dismantling
Leave the connector so that it is secured against reconnection or fit with a new unit if required. 27. Simplified EU Declaration of Conformity RADEMACHER Geräte-Elektronik GmbH hereby declares that the Troll Basic DuoFern complies with the Directive 2014/53/EU (Radio Equipment Directive) . -
Page 39: Technical Specifications
28. Technical Specifications External dimensions control unit [ 1 ]: 50 x 50 x 12 mm (according to DIN 49075) Nominal voltage: 230 V / 50 Hz; 230 V / 60 Hz Max. switching capacity: 8 (4) A µ (Type 1B) Standby consumption: <... -
Page 40: Warranty Conditions
Proof of this must be provided by presenting a copy of the bill. RADEMACHER shall remedy any defects, which occur within the warranty period free of charge either by repair or by replacement of the affected parts or by supply of a new replacement unit or one to the same value.
Need help?
Do you have a question about the Troll Basic DuoFern 5615 and is the answer not in the manual?
Questions and answers