Table of Contents
Advertisement
Advertisement
Table of Contents

Related Manuals for Proceq PAROTESTER 2


Summary of Contents for Proceq PAROTESTER 2
- Page 1 PAROTESTER 2 Operating Instructions Paper and film tester...
- Page 2 #02 - 02A Morningstar Centre Singapore 536202 Phone +65 - 6382 - 3966 +65 - 6382 - 3307 info - asia@proceq.com Subject to change without notice. Copyright © 2012 by Proceq SA Schwerzenbach 820 360 01 E ver 03 2012...
-
Page 3: Table Of Contents
Other settings......10 14 Form of supply and part designation ..32 © 2012 Proceq SA Table of Contents... -
Page 4: Safety
Use with harder materials can damage the respective impact bodies and result in faulty measurement results. The PAROTESTER2 display device serves for data acquisition, display and storage. It may only used for these purposes and must be protected against external influences. Safety © 2012 Proceq SA... -
Page 5: Important Information
PAROTESTER 2 display device (battery supply). PAROTESTER - model ( 1 ). These impact devices can also be used with the PAROTESTER 2 if the impact Compatibility with printing of the device cable has a BNC connection. -
Page 6: Measurements
The measured values from the impact and rebound speeds are converted in the display device to the hardness value L. Measurements © 2012 Proceq SA... -
Page 7: Functional Checks
75 x 180 x 80 mm set value marked on the test block and the range R is Weight: < 20 L . Also refer to the section 12.3 «Test block U». 750 g, incl. batteries © 2012 Proceq SA Connecting the devices... -
Page 8: Impact Devices
1.0 mm Impact device length: 300 mm Contact force ~10 N (by hand) Weight without cable: 920 g Impact device diameter: 20 mm Impact device length: 150 mm Weight without cable: 50 g Connecting the devices © 2012 Proceq SA... -
Page 9: Connections And Controls
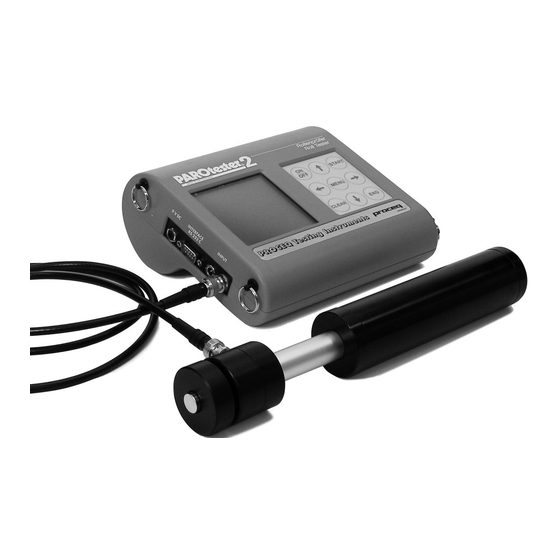
Carrying lugs Signal output RS232C interface Ext. battery connection 9 V DC 0.2 A Battery compartment, housing bottom section Battery compartment lid, housing bottom section 10. Housing top section 11. Housing bottom section Connections and controls © 2012 Proceq SA... -
Page 10: Device Operation
Cursor down Finishes menu input measurement to menu level or concludes measure- • Multi-language capability ment series • Mains independent Operating keys field and display field Connections Fig. 8 Fig. 6 Fig. 7 Operation of the devices © 2012 Proceq SA... -
Page 11: Main Necessary Settings
Fig. 11 Fig. 12 After the «MENU» key is pressed for confirmation, the main menu opens where the «Impact direction» menu item can be selected with the cursor Fig. 9 Fig. 10 Operation of the devices © 2012 Proceq SA... -
Page 12: Other Settings
( g / f ). A black square below the roll the roll number if the «Roll number» menu item identification [ ] shows whether the set characters are is selected. alphabetic, numeric or special characters. Operation of the devices © 2012 Proceq SA... - Page 13 «Display Option» menu item can be selected • Roll identification; example 3: 123456AQS - with the cursor ( Fig. 17 ). 14AZ:009:A123AB • Roll identification; example 4: A - BETA:0211: or A - BETA:0211 © 2012 Proceq SA Operation of the devices...
- Page 14 When the arrow key ( f ) is pressed, the cursor is on the «Mean value» menu item. The display of the mean value x : is set to «small» Fig. 22 Fig. 23 Operation of the devices © 2012 Proceq SA...
- Page 15 ( h / i ) ( Fig. 27 ). This comparison or conversion is only possible for paper rolls and for the PAROTESTER impact devices type P and type U. Operation of the devices © 2012 Proceq SA...
- Page 16 Press the «MENU» key to return to the main menu arrow keys ( h / i ) ( Fig. 33 ). where conversion can be selected with the cursor ( Fig. 30 ). Operation of the devices © 2012 Proceq SA...
-
Page 17: Data Output
If the PAROTESTER2 display device is connected to the computer with any other commercially available cable, faulty function, higher power consumption or permanent damage of the PAROTESTER2 and the serial interface of the computer can result. Data output © 2012 Proceq SA... -
Page 18: Transferring The Memory
( Fig.39 ). PAROLINK3 questions Select the «Memory transfer» menu item with the arrow keys When the PAROLINK3 ( h / i ). ( Fig. 40 ) is ready, press the «START» key. Fig. 40 Data output © 2012 Proceq SA... -
Page 19: Clear Memory
(Fig.43) with the arrow keys ( h / i ). Press the «START» key. Fig. 44 Fig. 45 After pressing the «START» key twice, all data in the mem- ory are permanently deleted ( Fig. 45 ). Data output © 2012 Proceq SA... -
Page 20: Online Data Transfer To The Printer
Online transfer to the printer is carried out manually when the «END» key is pressed or automatically. Manual online transfer: The data are always transferred manually when the «END» key is pressed. Data output © 2012 Proceq SA... -
Page 21: Online Data Upload To The Pc
Fig. 50 The data format is: Baudrate: 9600 / Data bits : 8 / Stop bits: 1 / Parity: None / Protocol: None The data are uploaded to the PC in the following sequence: © 2012 Proceq SA Data output... -
Page 22: Operation
1. Position the impact device vertically to the test surface General PAROTESTER impact devices and display device are measuring instruments and must be treated as such. PAROTESTER2 can be used in three impact directions. Refer to Fig. 51. Fig. 52 Operation © 2012 Proceq SA... -
Page 23: Information On The Lcd Display
6 Roll hardness profile not carry out the described procedure too quickly. The 7 Roll number PAROTESTER 2 electronic system signals errors if the 8 Impact device type loading movements are carried out too quickly ( section 9 Impact direction 10.0). -
Page 24: Depiction And Interpretation Of The Measurements
«DOUBLE BEEP». The following message measured values has reached then appears on the LCD screen instead of the roll identi- 50 (Fig.57). fication ( Fig. 60 ): Fig. 57 Measurement limits © 2012 Proceq SA... -
Page 25: Error Messages
( n = 200) (Fig.62) No other measured values are displayed, recorded or stored.. Stop mea- surement or the measurement series with the «END» key. Fig. 62 © 2012 Proceq SA Error messages... -
Page 26: Do Not Test Too Quickly
During the next correctly executed measurement or The support ring is not correctly positioned. when the device problem has been rectified, the values Fit the support ring correctly on the end stop. and current statistics appear again. Error messages © 2012 Proceq SA... -
Page 27: Maintenance
Unscrew the support ring U (Fig.67) Unscrew the secur- from the guide tube. ing screw A1 (Fig.68) of the support ring until the sup- port ring can be removed or unscrewed from the impact device. © 2012 Proceq SA Maintenance... -
Page 28: Accessories
2. Clean the guide tube (c) with the corresponding clean- PAROLINK3 can be used on the operating systems ing brush. Release or remove the support ring (a). WIN3X, WIN9.X, NT 4.0, WIN2000 and Windows XP. Accessories © 2012 Proceq SA... - Page 29 - PAROLINK3 also features an on-line help which is - The PAROLINK3 program is tri-lingual (German, opened with the F1 key. English and French). - The PAROLINK3 can upload the saved measured data from the PAROTESTER(1) and PAROTESTER2 to the © 2012 Proceq SA Accessories...
-
Page 30: Barcode Reader
- If a roll identification is larger than 20 characters, this is indicated by a «>», Fig. 70, in the status line. The read roll identification is fully visible in the roll number menu (Fig. 71) and also stored. Accessories © 2012 Proceq SA... - Page 31 The barcode reader is once more correctly 101.6 mm @ 76.2 mm programmed and ready for use. ON / OFF Program mode Operating temperature: -20 °C to 50 °C Moisture: 5% to 95 % relative air humidity (non-condensing) © 2012 Proceq SA Accessories...
-
Page 32: Test Block U
- Connect the mains power supply and the printer. is recommended as an accessory. - Switch the printer to the ON 2 position. This printer with mains power supply is available with 220 / 110 Volt from Proceq ( www.proceq.com ). Accessories © 2012 Proceq SA... -
Page 33: Other Important Information
No measurement is pos- • A calibrated test block type U is available as an acces- sible in this mode «memory = MEM». sory for periodical checks of the PAROTESTER2. © 2012 Proceq SA Important information... -
Page 34: Form Of Supply And Part Designation
- Impact device type U - Carrying strap - Cleaning brush - 6 batteries - Carrying case ( 520x370x120mm ) - Total weight ( 5.8kg ) Article no. 360 04 400 Fig. 76 Fig. 77 Form of supply © 2012 Proceq SA... - Page 35 Article no. 360 04 570 DPUH-245 AS-A03a including mains power supply 100–240V, printer cable. Firmware version 5.0 and older: Article no. 360 04 575 RS232 / USB adapter: Article no. 390 00 540 © 2012 Proceq SA Form of supply...
Need help?
Do you have a question about the PAROTESTER 2 and is the answer not in the manual?
Questions and answers