IDTECK Star 505R User Manual
Proximity & pin time & attendance access controller
Hide thumbs
Also See for Star 505R:
- User manual (48 pages) ,
- Quick installation manual (21 pages) ,
- Quick install manual (4 pages)
Table of Contents
Advertisement
Quick Links
Advertisement
Table of Contents

Related Manuals for IDTECK Star 505R


Summary of Contents for IDTECK Star 505R
- Page 1 User’s Manual Proximity & PIN Time & Attendance Access Controller...
-
Page 2: Table Of Contents
Table of Contents 1. Important Safety Instructions ................3 2. General........................ 3 3. Features ......................4 4. Specification....................... 4 5. Identifying Supplied Parts................. 5 6. Product Overview ....................6 7. Installation Checkpoint & Tips................9 8. Installation ......................12 9. Communications....................16 10. -
Page 3: Important Safety Instructions
If the product exhibits a distinct change in performance. 2. General The Star 505R is a highly advanced, intelligent single door controller with a dual 8bit microprocessor to meet the market requirement for a robust integrated solution for access control and time & attendance. -
Page 4: Features
By bundling the ultimate in high security access control and comprehensive employee management tools into a compact user friendly unit, the field proven Star 505R is the ideal solution for controlling entrances and ensuring complete employee accountability. -
Page 5: Identifying Supplied Parts
Power / Current DC 12V / Max.350mA External 505R / 1ea (26bit Wiegand, 4/8bit Burst for PIN) Reader IP505R Port SR505 1ea (34bit Wiegand, 4/8bit Burst for PIN) RS232 / RS422 / RS485 (Max.32ch) Communication TCP/IP (External LAN Converter Required) Baud Rate 9600bps (Default) / 4800bps, 19200bps and 38400bps (Selectable) -
Page 6: Product Overview
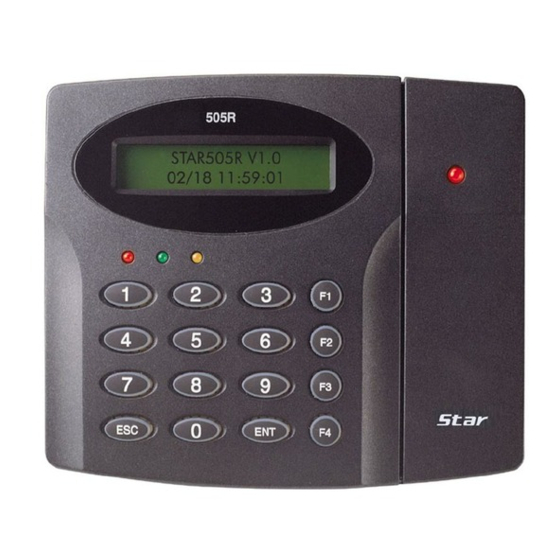
Anti-pass-back rule. The same user can not enter twice with the entry card without properly using the exit before. Input/Output The Star 505R has 4 built-in inputs and 4 outputs (2 relay outputs and 2 TTL outputs) which can be used to manipulate a wide variety of controls. Time Schedule Setup You can program 10 time schedules and apply one time schedule to each User. - Page 7 When the power is applied to 505R, the red LED is turned on. When the Relay #1 is operated, the green LED is turned on. When the Relay #2 is operated, the yellow LED is turned on. 16 key pad: You can operate Star 505R manually by using the key pad.
- Page 8 When a card is read, the card reading status LED turns on green. Backup Battery DIP Switch: Star 505R has a switch for the backup battery connection, which remains open circuit to prevent any current consumption of the backup battery.
-
Page 9: Installation Checkpoint & Tips
7. Installation Checkpoint & Tips Installing the Star 505R is an easy task. It can be installed with common hand tools and readily available communications wires. This section provides information about wiring, wire runs and other information to make the installation quick and easy. - Page 10 4 conductor, shielded Exit Button Sensor Input Belden #9514, 22 AWG Input -> 505R 8 conductor, shielded Door Lock, Alarm Device Belden #9409, 18AWG 300m ④ Lock (Alarm) -> 505R 2 conductor, unshielded RS232 Cable Belden #9829, 24 AWG ⑤ Converter ->...
- Page 11 If you do not find both earth ground and chassis ground, then connect one end of shield wire to power ground. (GND of Star 505R) Note that if the chassis ground is not properly connected to the earth and floated from the ground level, then grounding to the chassis ground will give the worst communication;...
-
Page 12: Installation
Star 505R has a switch for the backup battery connection, which remains open circuit to prevent any current consumption of the backup battery (Figure: Switch setting). Before the Star 505R operation, it needs to be connected so that the backup battery can retain the memory during power failure. - Page 13 8.3 SYSTEM INITIALIZATION Connect the cyan wire, pink wire and black wire (they are seen from the rear view) together and power on the unit. If you want hardware initialization, press enter key <1>. After initializing – switch main power OFF, separate the three wires (pink, cyan and black(GND)) and switch the main power ON again.
- Page 14 8.4.2 Using 2 screws, install wall mount to the wall. ※ CAUTION Before mounting the STAR 505R unit to the Wall Mount bracket, operational test of the unit should be completed, as the locking pins will lock the unit to the Wall Mount. Removing the unit from the Wall Mount bracket after they have been installed together may cause damages to the bracket and render its effectiveness.
- Page 15 Door Lock (Power Fail Secure) Connection (Relay #1) - Connect COM wire of Relay #1, the Gray wire with Red stripe to +12V. - Connect NO wire of Relay #1, the White wire with Red stripe to (+) wire of door lock device.
-
Page 16: Communications
9. Communications 9.1 RS232 COMMUNICATION PORT CONNECTION A 9-pin connector (Serial communication connector, female) is required to connect the 505R to a host computer via RS232 communication. Please follow the instructions. 1. Connect RS232-TX (Black wire with White stripe) wire of 505R to the pin #2(RX) of the 9-pin connector. - Page 17 To Star 505R To host PC a) Between 505R and CNP200 b) RS 422 port connection c) CNP200 setting Figure: RS-422 Communication between 505R and Host Computer 9.2.2 RS-422 CONNECTION (MULTIPLE 505R CONNECTIONS) RS422/RS232 converter is required to use RS422 communication between multiple 505R and a host computer.
- Page 18 Figure: RS-422 Communication between 505Rs and Host Computer 9.3 DIAL UP MODEM - Please read the Software manual. 9.4 TCP/IP CONVERTER (EXTERNAL VERSION) - Please read the Software manual.
-
Page 19: Basic Settings
10. Basic Settings 10.1 INITIALIZATION OF 505R Connect the cyan, pink and black wires (they are seen from the rear view) together and Power on the unit. If you want hardware initializing, press Enter key <1>. After initializing – Put the main power OFF and separate 3 wires (Pink, cyan and black(GND) ). Afterwards put main power ON again. - Page 20 24 hours system and day codes are 1 for Sunday, 2 for Monday, 3 for Tuesday, 4 for Wednesday, 5 for Thursday, 6 for Friday and 7 for Saturday. The Master ID for SR505 is a ten digit number (Default setting “0000000000”). “MASTER ID” + <ENT> STAR 505R [F1] Press <F1> Select [ 01/01...
- Page 21 RF cards or via keypad input, depending on the Reader 1 Mode setting. The Master ID for SR505 is a ten digit number (Default setting “0000000000”). “MASTER ID” + <ENT> STAR 505R [F1] Press <F3> then Select 01/20...
- Page 22 2. Registration by Keypad (Applicable if 2:Key is selected on SR505 or if Reader 1 Mode on 505R or IP505R is PIN Only.) 123456 [________] PW____ TS__ RD_ ID(6digits) + <ENT> PW____ TS__ RD_ ‘2’ No PW field on 505R or IP505R Password (4digits) + <ENT>...
-
Page 23: Operations
11. Operations 11.1 NORMAL OPERATION Power on When the power is applied to 505R, the Red LED is turned on. Registered card reading When a registered card (or PIN) is read, the Door (Relay #1) will open for 3 seconds (Default) with the Green LED on. - Page 24 ☞. To setup or to change the 505R settings, you have to enter the SETUP MENU first. To do so, press the <0> key eight times for Master ID (Default setting “00000000”) and <ENT> key from the Keypad. Now you can get into SETUP MENU. There are 4 main SETUP MENUS and you first get into [SETUP MENU F1].
- Page 25 key<4> or <6> SYSTEM INITIALIZE key<4> or <6> CARD ID CLEAR key<4> or <6> TIME SCHE CLEAR key<4> or <6> RF_PIN_INPUT ENABLE DISABLE (DEFAULT) key<4> or <6> SEARCHING KEY <4> or <6> EVENT MEMORY NOT USE USE (DEFAULT) key<4> or <6> DURESS MODE SET NOT USE (DEFAULT) key<4>...
- Page 26 12.1.1 READER 1 MODE SETTING READER 1 MODE <ENT> RF Only (default) key<4> or <6> RF+PASSWORD key<4> or <6> PIN (4~6 Digit) ☞. READER 1 MODE is set to RF ONLY operating mode. READER 1 MODE If you want to change the mode to RF+PASSWORD RF ONLY operating mode, press <ENT>...
- Page 27 ☞. Press <4> or <6> key for searching the APB mode. APB SETUP Press <ENT> key to select the mode. -> USE NOT USE: Anti-pass-back mode is not applied. USE: Anti-pass-back mode is separately applied. APB SETUP ☞. If you select All Clear, 505R will clear all APB flags and all ->All Clear users are not allowed Exit first.
- Page 28 ※ CAUTION: Before you clear the events, make sure EVENT CLEAR 1 - Yes, 0 - No that the stored events is not necessary to upload to the host PC otherwise you may lose important data. 12.1.7 MASTER ID CHANGE ☞.
- Page 29 ☞. This message appears while the system is being System initialized. After the initialization, 505R will return to the Initializing.. Setup menu. 12.1.9 CARD ID CLEAR ☞. When you want to delete all User IDs (Card IDs), you CARD ID CLEAR can clear all User IDs from the memory.
- Page 30 12.1.13 DURESS MODE SETTING <ENT> DURESS MODE SET <ENT> NOT USE(default) key<4> or <6> <ENT> DURESS P/W <ENT> ENTER NEW P/W (2digit + <ENT>) <ENT> ☞. You can select whether the DURESS mode is used for DURESS MODE SET READER1. Default setting is NOT USE. If you want to NOT USE setup Duress mode, press the <ENT>...
- Page 31 ☞. Select mode by pressing <4>,<6> key. After selecting FUNCTION KEY mode, press “ENT” to complete setting. -> USE NOT USE: The value matched with the Function key will not be changed until another function key is pressed. USE: User can see “OK’ under normal status and the value WAIT TIME matched with Function key will be shown on certain time when function key is pressed.
- Page 32 12.2 SETUP MENU F2 INDEX : 01 ~ 10 TIME SCHEDULE WEEKLY: HOL, SUN, MON,... SAT NO. : 01 ~ 05 key<4> or <6> INDEX : 01 ~ 10 HOLIDAY DEFINE NO. : 01 ~ 32 01: EXIT 02: DOOR CONTACT key<4>...
- Page 33 TIME SCHEDULE ☞. You may program time schedules to grant and restrict access for each user. There can be up to ten different schedules. A minimum of one schedule must be defined. If only one schedule is programmed the most common setting allows access for all users 24 hours / day.
- Page 34 ☞. With the <2> key and <8> key, select the Date HOL T/S: 01 #01 Registration Set Number (1~10), and with the <4> key 00:00 and <6> key, select the index for the days (1~32). Press <ENT> key and the cursor will blink. Enter the date, in form of the Month (1~12).
- Page 35 12.2.4 HOLIDAY INDEX SETTING ☞. Holiday Index is to link the Holiday Schedule (H/S) to Time HOLIDAY INDEX Schedule. You can setup one Holiday Index (01~10) to one of T/S Index (01~10) so that the Holiday Time Code in the T/S can be applied for the holidays in the H/S.
- Page 36 12.2.7 OUTPUT TIME UNIT SETTING ☞. This menu is to define time unit of 5 output ports. OUTPUT TIME SET 1sec: define time of output by second in the in/out define. 1sec 100 ms: define time of output by 0.1 second (100ms) in the in/out define.
- Page 37 12.3.1 CARD REGISTRATION ID REGISTRATION <ENT> REGISTRATION SELECT CARD or KEY ? CARD PRESENT CARD ERROR DISPLAY Invalid Card ID ENTER NEW ID Invalid T/S 1 Invalid T/S 2 Invalid RD Card ID Error ? INPUT PW, TS, RD PW, TS, RD Error ? ID REGISTRATION END ☞.
- Page 38 2) Keypad Registration ID [_______] Applicable if 2:Key is selected on SR505 or if Reader 1 Mode on 505R PW____TS__RD_ or IP505R is PIN Only. ☞. Please enter the 6-digit ID manually. (For SR505, the ID number is 10 digits.) ☞.
- Page 39 12.3.3 ID LIST ID LIST <ENT> LCD display: "MEMORY EXIST ID ? EMPTY" DISPLAY ID NUMBER, P/W, T/S DOOR_FLAG <ESC> SEARCHING ID (USE SEARCHING KEY) ID LIST ☞. If you want to see the list of registered User IDs, press the <ENT>...
- Page 40 12.3.5 ID COUNT EVENT MEMORY ID COUNT <ENT> ENTER NO. (4 ~ 5 digit) EMPTY ? ID COUNT VALID ? DISPLAY: EVENT MEMORY NOT EMPTY DISPLAY: INVALID COUNT DISPLAY: ID TOTAL COUNT REGISTERED ID COUNT < ENTER NO. ? WRONG !!! COMPLETE ☞.
- Page 41 12.4 SETUP MENU F4 DISPLAY CURRENT F/W VERSION VERSION key<4> or <6> SRAM TEST SRAM TEST key<4> or <6> OUTPUT TEST OUTPUT TEST key<4> or <6> LCD TEST LCD TEST SEARCHING KEY key<4> or <6> <4> or <6> KEYPAD TEST KEYPAD TEST key<4>...
- Page 42 12.4.2 SRAM TEST ☞. To test the SRAM memory, press <ENT> key. SRAM TEST ☞. If the SRAM has problems, LCD will show the memory Memory fail!! 00 block number with Memory fail message. In this case, testing... you have to contact technical support. Press any key to return to the setup menu.
- Page 43 12.4.4 LCD TEST ☞. Press <ENT> key to continue the test. LCD will display all TEST characters on the screen. Last Update ☞. When the test is done, the LCD will show “Last Update Press any key... Press any key”. Press any key to return to Setup menu. 12.4.5 KEYPAD TEST ☞.
- Page 44 12.4.8 COMMUNICATION TEST ☞. Before this communication test, connect the RS232-RX COMM TEST and RS232-TX wires together. Then press <ENT> key. ☞. This test is a loop test and 505R sends a character to TX data = 0 RS232-TX and check whether the RS232-RX receive the COMM fail character or not.
-
Page 45: Appendix
13. Appendix A. THE RELATION BETWEEN INPUT AND OUTPUT (DEFAULT) 1. The relation between Input and Output Index No Relay#1 Relay#2 TTL1 TTL2 BUZZER [1] Exit Button [2] Door Contact [3] AUX 1 [4] AUX 2 [5] Tamper S/W [6] Reader1 ID OK [7] Reader1 ID Error [8] Reader1 ID T/S Error [9] Reader1 APB Error... - Page 46 B. TROUBLE SHOOTING System operates abnormal. ☞ Of that user mistake, memory (SRAM) is damaged, or the system is defective of the Cause device. 1. Check BAT connection Switch(place template hole of reverse side). You have to push up the Switch, and system initialize before system installation. Solution gure: DIP SWITCH SETTING gure: DIP SWITCH LOCATION...
- Page 47 A valid card became unregistered after batch-downloading IDs from PC. ☞ Wrong procedure during download or a component defect. Cause 1. The card ID might be registered only to the controller and not registered in the PC. During the process of downloading IDs, 505R first erase the ID memory of the unit, therefore if the IDs from the PC didn’t contain the card ID, this can happen.
- Page 48 The reader seems to read cards, but the controller does not respond or does not ☞ respond properly, such as displaying wrong card numbers in the reader test mode. Reader defect, wiring error between the reader and the controller or the electric noises Cause 1.
- Page 49 - If RD is set as “1”, the door opens only when the card is read at Reader 1 but not at Reader2. If it is read at Reader 2, “ACCESS DOOR ERROR” message shows up. - If RD is set as “2”, only when the card is read at reader 2, the door opens but not at reader1.
-
Page 50: Fcc Registration Information
14. FCC Registration Information FCC REQUIREMENTS PART 15 Caution: Any changes or modifications in construction of this device which are not expressly approved by the manufacturer for compliance could void the user's authority to operate the equipment. NOTE: This device complies with Part 15 of the FCC Rules. Operation is subject to the following two conditions;... -
Page 51: Warranty Policy And Limitation Of Liability
4) to any losses, defects, or damages caused by lightning or other electrical discharge, natural disaster, misuse, accident or neglect. This Limited Warranty is in lieu of all other warranties, obligations, or liabilities on the part of IDTECK, and IDTECK DISCLAIMS ANY AND ALL WARRANTY, WHETHER EXPRESS OR IMPLIED, OF MERCHANTABILITY OR FITNESS FOR A PARTICULAR PURPOSE.IDTECK does not, and cannot,... - Page 52 RMA REQUEST FORM IDTECK accepts only on-line RMA requests on our Website (www.idteck.com). Please provide us with basic information in the below form so that we can understand your problems better. Send us back this form with your products after an RMA code is issued on our Website. This form is not compulsory.
-
Page 53: Template
16. Template... - Page 54 The specifications contained in this manual are subject to change without notice at any time. 5F, Ace Techno Tower B/D, 684-1, Deungchon-Dong, Gangseo-Gu, Seoul, 157-030, Korea Tel : +82-2-2659-0055 Fax : +82-2-2659-0086 E-mail : webmaster@idteck.com MAM505RHE5X Jan. 2008 Copyright ©2008 IDTECK Co., Ltd.
Need help?
Do you have a question about the Star 505R and is the answer not in the manual?
Questions and answers