Webasto SmartControl Operating Instructions Manual
Hide thumbs
Also See for SmartControl:
- Quick start manual ,
- Operating instructions manual (56 pages) ,
- Installation instructions manual (20 pages)

Subscribe to Our Youtube Channel
Related Manuals for Webasto SmartControl


Summary of Contents for Webasto SmartControl
- Page 1 Operating instructions SmartControl MultiControl (incl. Timer-Function) SmartControl MultiControl...
-
Page 2: Table Of Contents
Table of Content Introduction..............5 Purpose of the document ............... 5 Using this document ..............5 Use of symbols and highlighting ............. 5 Warranty and liability ..............6 Safety ................6 Intended use .................. 6 2.2 General safety information ............6 Overview ................7 Control element and menu structure .......... - Page 3 Settings ................21 General ..................21 9.2 Altitude correction (if available) .............21 9.3 Setting the quick start button default value ........21 9.3.1 Setting the quick start button for heating mode ..........22 9.3.2 Setting the quick start button for ventilation mode ...........23 https://webasto-russia.ru...
- Page 4 9.4 Setting the day of the week ............24 9.5 Setting the time ................24 9.6 Language settings ................ 25 Setting the temperature unit ............25 9.8 Setting brightness ................ 25 9.9 Setting screen timeout ..............26 9.10 Setting day/night illumination ............26 9.11 Displaying the system information ..........
-
Page 5: Introduction
Introduction So that you can enjoy the full comfort of using a Webasto heater, we recommend that you read the instruction manual carefully. Questions connected with the assembly and functioning of the device should be addressed to the seller or the installation workshop. -
Page 6: Warranty And Liability
Warranty and liability Webasto shall not assume liability for defects or damage that are the result that the installation and operating instructions as well as the instructions contained therein being disregarded. This liability exclusion particularly applies for: ■ improper use ■... -
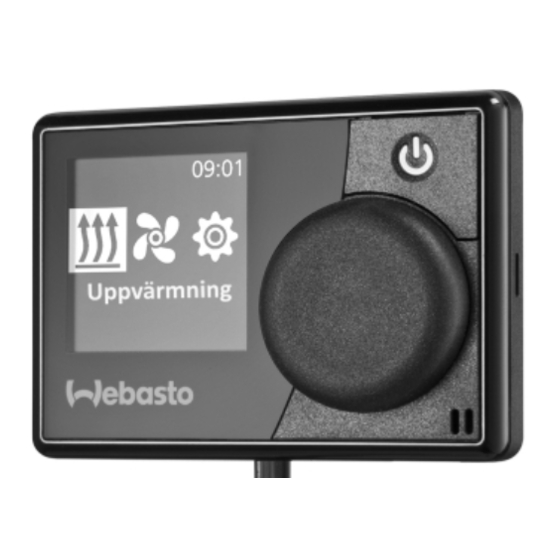
Page 7: Overview
Overview Control element and menu structure Heating Menu name Time Menu symbol Quick start button with status Activated time settings, ADR display*, display altitude correction* Control knob The following menu elements are available in the main menu: timer, heating, ventilation* and settings. *: Optional Symbols Symbol... -
Page 8: Buttons And Control
Symbol Description Symbol Description Deactivate timer Delete timer Delete all timers Active timer Quick start Day of the week Time Language Temperature unit Day/Night System information Error message Reset Service required To the left Attention Back To the right 12 hour format Symbol for confirmation Operating voltage too low Altitude correction selected... -
Page 9: Back-Function
(display and LED are switched off). Passive display mode If the heater is activated by another Webasto control element (e.g. Telestart or Thermo- call), the control element wakes up from sleep mode and the operation mode selected by the other control element is shown on the display. -
Page 10: Information Display
Display Operating mode Ventilation (ventilating mode must be supported by the installed heater) The passive mode can be deactivated by pressing quick start button . The heater is switched off. Heating and ventilation There is a possibility of combined display of ventilation and heating symbols depending on the connected heater. -
Page 11: Switching On The Heater By Means Of Quick Start Button
Switching on the heater by means of quick start button “Quick start” function enables heating or ventilation by simply pressing the button ( The operating mode can be adjusted to your personal preferences. ■ Instruction manual and description of the settings can be found in the chapter „9 Settings“... -
Page 12: Heating Mode
Heating mode Water heater Select “Heating” menu element in the main menu. Press the control knob. Heating Duration flickers in the display. Turn the control knob in order to choose the desired dura- Heating tion of an hour. By means of turning the control knob in clockwise direction one can select and activate maximum Duration duration. -
Page 13: Adjusting Temperature During Heating Mode
Heating temperature is shown in the display. Heating Turn the control knob in order to choose the desired temperature. Press the control knob in order to confirm selection. Temperature Heating starts functioning. Menu element "Heating" is shown in the display as well as the selected heating temperature. -
Page 14: Remaining Operation Time Of Water Heater
5.3.1 Remaining operation time of water heater The heater is in the heating mode. Heating Turn the control knob in order to choose duration of a minute. Duration Press the control knob in order to confirm selection. Heating starts functioning. Menu element "Heating" is shown in the display as well as initially set remaining operation time. -
Page 15: Setting Ventilation Through Main Menu
Fan speed 2 Fan speed 4 Setting ventilation through main menu “Ventilation” symbol has been selected in the main menu. Ventilation Press the control knob. Ventilation The set fan speed is shown in the display Level 2 Turn the control knob in order to choose the desired fan Ventilation speed. -
Page 16: Setting The Remaining Operation Time Of Fan During Ventilation Mode
Turn the control knob in order to choose fan speed. Press the control knob within 5 seconds in order to confirm selection. Setting the remaining operation time of fan during ventila- tion mode The heater is in the ventilating mode Turn the control knob in order to adjust the desired remain- ing operation time. -
Page 17: Timer: Setting The Time Setting
Timer: Setting the time setting Time and current day of week are set. The heater is switched off. “Timer” menu element has been selected in the main menu. Timers Press the control knob. Timers ”Add timer” message (if no timer has been saved yet) appears in the display. -
Page 18: Timer: Setting The Ventilation Mode
Only for air heaters: Timers Turn the control knob in order to choose the desired tem- perature. Temperature range: 5 - 35 °C, 41 - 95 °F Temperature All heaters: Mon 1 Press the control knob in order to confirm selection. The timer is saved and shown in the display (temperature display only for air heaters). -
Page 19: Deactivating, Editing Or Removing Timers
Press the control knob in order to activate the programmed Timers timer. “Activate” message appears in the display. Activate Press the control knob in order to confirm activation. Mon 1 Activated time setting is marked by white bars. “T” symbol appears in the main menu. Quick start button flashes blue when timer together with ventilation is active. -
Page 20: Delete All Timers
Delete all timers “Timer” symbol has been selected in the main menu. Timers Press the control knob. Mon 1 The stored timers appear in the display. (display of fan speed only for air heaters) Turn the control knob clockwise until “Delete all” message is Timers shown in the display. -
Page 21: Settings
Settings General Choose the menu element "Settings" Settings Press the control knob. Settings Turn control knob, choose the desired menu element. Quick start If altitude correction is available, this is shown as the first menu point. Altitude correction (if available) Altitude correction can be switched on when operating certain heaters at higher altitu- des (>1500 m). -
Page 22: Setting The Quick Start Button For Heating Mode
made or heating mode. Quick start can be changed as required from heating mode to ventilation mode or the reverse. 9.3.1 Setting the quick start button for heating mode The menu element "Settings" has been chosen. Settings Press the control knob in order to choose “Quick start” menu element. -
Page 23: Setting The Quick Start Button For Ventilation Mode
9.3.2 Setting the quick start button for ventilation mode The menu element "Settings" has been chosen. Settings Press the control knob in order to choose “Quick start” menu element. Quick start The current operating mode is displayed. Settings (example, heating mode is set) Turn the control knob in order to choose the desired “Ven- Settings tilation”... -
Page 24: Setting The Day Of The Week
Setting the day of the week The menu element "Settings" has been chosen. Settings Turn the control knob in order to choose the desired Day. Press the control knob in order to confirm selection. Weekday Turn the control knob in order to choose the desired ”Day”. Settings Press the control knob in order to confirm selection. -
Page 25: Language Settings
Language settings The menu element "Settings" has been chosen. Settings Turn the control knob in order to choose menu element “Language”. Press the control knob in order to confirm selection. Language Turn the control knob in order to choose the desired Settings language (example "English") English... -
Page 26: Setting Screen Timeout
Setting screen timeout The menu element "Settings" has been chosen. Settings Turn the control knob in order to choose menu element “Screen timeout”. Press the control knob in order to confirm selection. Screen timeout Turn the control knob in order to choose the desired time or Settings “Auto”... -
Page 27: Displaying The System Information
Turn the control knob in order to choose the desired hour Settings for end of day. Press the control knob in order to confirm selection. End of daytime Time of a minute for the end of the day flickers in the display. Setting the minutes for end of day is done in the same way as the hours for end of day. -
Page 28: Displaying Stored Error Information
Turn the control knob in order to switch between the names Settings of the heater and information regarding control element (the name of the control element, status of software and equipment). 9.12 Displaying stored error information If heaters and other connected components show malfunctioning then such error information codes) is saved and displayed here. -
Page 29: Performing Reset
9.13 Performing reset As for reset option, all settings are restored to factory settings (standard settings are configured by a service technician) except a day of a week and an hour. The menu element "Settings" has been chosen. Settings Turn the control knob in order to choose menu element “Reset”. -
Page 30: Examples Of Error Messages For Control Elements
13 Service and customer services Do you have any technical queries or a problem with your unit? National phone numbers of our representatives are provided on www.webasto.com. 14 Technical data Operating voltage range: 12 V to 24 V Permissible ambient temperature: ■... - Page 32 In multilingual versions the German language is binding. If a language is not available, please contact the Webasto Service Centre for this purpose (see the brochure with the service phone numbers of the respective subsidiaries). Webasto Thermo & Comfort SE...
Need help?
Do you have a question about the SmartControl and is the answer not in the manual?
Questions and answers