Webasto MultiControl, SmartControl Manual
- Operating instructions manual (56 pages) ,
- Installation instructions manual (20 pages) ,
- Quick start manual (7 pages)
Advertisement
- 1 Control Element and menu
- 2 Buttons and control
- 3 Back-function
- 4 Symbols
- 5 Switching on and off by quick start button
- 6 Switching on and off through the menu
- 7 Timer
- 8 Important Information on Operating and Installation Instructions
- 9 Intended use
- 10 Statutory regulations governing installation
- 11 Installation
- 12 Electrical Connections
- 13 Dimensions
- 14 Documents / Resources
Control Element and menu

- Submenu name
- Submenu symbol
- Activated time settings
- Time
- Quick start button
- Control knob
*: if installed
Buttons and control
| Button | Control and function |
 | Quick start button (5) with status display. |
 | Control knob (turn/push button) (6) for selection and confirmation of the selected functions. |
Back-function

Exit the selected menu with the "Back" function.
The settings are saved and the higher-level menu level is displayed.
Symbols
| Symbol | Description | Symbol | Symbol |
 | Timer menu (programme time setting) |  | Ventilation menu |
 | Heating-Normal |  | Settings menu |
 | Heating level Normal |  | Heating level Eco |
 | Heating level Boost |  | Fan speed (level 1-4) |
 | Add timer |  | Activate timer |
 | Deactivate timer |  | Delete timer |
 | Delete all timers |  | Active timer |
 | Quick start |  | Day of the week |
 | Time |  | Language |
 | Temperature unit |  | Day/Night |
 | System information |  | Error message |
 | Reset |  | Service indicator (service required) |
 | To the left |  | Attention |
 | Back |  | To the right |
 | 12 hour format |  | Symbol for confirmation |
 | Operating voltage too low |  | ADR display |
 | Altitude correction |
At temperatures below –20°C protective function of control element display is active. Display and background illumination are switched off, heating status is indicated by status of LED diode. The heater can be tuned on and off by quick start button without any limits.
Switching on and off by quick start button
"Quick start" function enables heating or ventilation by simply pressing the button. Operation time, temperature and heating mode can be preset in the settings in menu item "Setting the quick start".
Press quick start button (5).
![]()
Heating or ventilation starts functioning.
The quick start button (5) lights up when the heater is in operation:
- Green (Heating)
- Blue (Ventilation)
By pressing quick start button (5) heating or ventilation can be ended prematurely at any moment.
Switching on and off through the menu
Switching on the heating through the menu
Heating menu ![]() has been selected in the main menu.
has been selected in the main menu.
Press the control knob (6).
The heating level, required temperature and/or operation time must be set in accordance with the installed heater. Follow the instructions displayed in the menu.

 You can select the setting by turning the control knob. You confirm selection by pressing the control knob. You can select the setting by turning the control knob. You confirm selection by pressing the control knob. |
The heating starts functioning as soon as all the settings have been chosen.
| By pressing quick start button (4) heating can be ended prematurely at any moment. |
Setting ventilation through the main menu (optional)
Ventilation menu ![]() has been selected in the main menu.
has been selected in the main menu.
Press the control knob (6).
The fan speed, required temperature and/or operation time must be set in accordance with the installed heater. Follow the instructions displayed in the menu.
![]()
| You can select the setting by turning the control knob. You confirm selection by pressing the control knob. |
The ventilation starts functioning as soon as all the settings have been chosen.
| By pressing quick start button (5) during functioning, ventilation can be ended prematurely at any moment. |
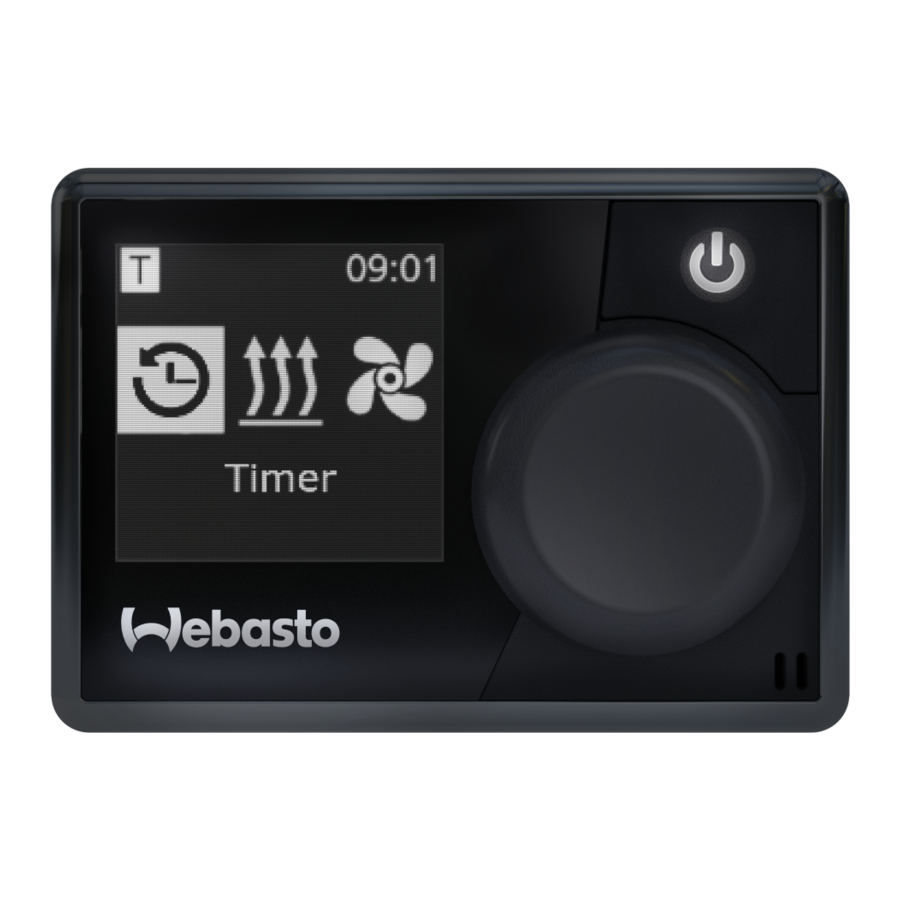
Timer
| The function is not available in ARD operation (hazardous substance transportation). |
Timer menu  has been selected in the main menu.
Press the control knob (6).
![]()
"Add timer" message (if no timer has been saved yet) appears in the display. |
Press the control knob in order to add new timer.
![]()
In order to programme the timer you should enter the desired day of the week and switch-on and switch-off time. Follow the instructions displayed in the menu.

As soon as settings are entered, the programmed timer is saved and shown in the display.

Press the control knob in order to activate the programmed timer.
![]()
"Activate" message appears in the display.

Press the control knob in order to confirm activation.
![]()

All programmed times can be deactivated, edited or removed. If the "Timer" symbol has been selected in the main menu, all saved timers appear in the display in chronological order. The following functions are at the disposal after selecting the desired timer: "activate", "deactivate", "edit" and "delete".
Important Information on Operating and Installation Instructions
|
This liability exclusion particularly applies for:
|
Intended use
The control element MultiControl | SmartControl is used to operate the Webasto water or air heaters for cabin and engine preheating.
The control element MultiControl | SmartControl is currently approved for connection to certain Webasto water or air heaters.
Statutory regulations governing installation
Regulations
Electromagnetic compatibility
Type-approval numbers for MultiControl | SmartControl
ECE R10 ![]() 04 7319 MultiControl | SmartControl
04 7319 MultiControl | SmartControl
 NOTE
NOTE
The provisions of these regulations are binding within the scope of EU Regulation 2018/858 and should also be observed in countries where there are no special regulations.

Failure to follow the installation instructions will result in the invalidation of the type approval for the heater and therefore invalidation of the general homologation of the vehicle.
NOTE
For vehicles with an EU type approval, an entry is not required in accordance with § 19 section 4 of appendix VIII b of StVZO. Country-specific registration regulations must be complied with.
Installation
| Detailed information can be found in the operating and installation instructions. The documents are stored on the DVD included in delivery. |
- Install and connect wiring harness, see Section „Electrical Connections".
- Connect and install MultiControl | SmartControl.
Electrical Connections
 Incorrect handling Cables damaged on sharp edges can cause short-circuits. Fit protectors on sharp edges. |
Connector designation

| Con. | Description | Remarks |
| 1 | W Bus / Low Switch / Diagnostics | The connection is configured differently depending on the heater selected. Please note that there is no W-bus on this line for heaters with analogue control. W-bus diagnostics are only possible with a W-bus heater connected or with a UniBox connected. |
| 2 | SAU1 switch output | max. switching current 500 mA |
| 3 | KL30 | Plus+ |
| 4 | KL31 | Earth- |
Dimensions

You will find more detailed operating instructions at www.webasto.com.
VBI Group
DK 6070 Christiansfeld
Tel. +45 74 56 13 26
www.vbi-group.eu ;
Facebook: @VBI.Group
Documents / Resources
References
Download manual
Here you can download full pdf version of manual, it may contain additional safety instructions, warranty information, FCC rules, etc.
Advertisement


Need help?
Do you have a question about the MultiControl and is the answer not in the manual?
Questions and answers