
Related Manuals for Advantech UNO-238


Summary of Contents for Advantech UNO-238
- Page 1 User Manual UNO-238 電腦 Intel® Whiskey Lake processor IoT Edge Computer, with 2x LAN, 2x COM, 4x USB, 1x DP, 1x HDMI, 1x GPIO, 1x Audio, 2x M.2 申請商: 研華股份有限公司 地址:台北市內湖區瑞光路 26 巷20 弄 1 號 電話:02-27927818...
- Page 2 No part of this manual may be reproduced, copied, translated or transmitted in any form or by any means without the prior written permission of Advantech Co., Ltd. Information provided in this manual is intended to be accurate and reliable. How- ever, Advantech Co., Ltd.
- Page 3 UNO23885N2402-T, UNO23885N2403-T, UNO23885N2404-T, UNO23885N2501-T, UNO23885N2502-T, UNO23885N2503-T, UNO23885N2504-T, UNO23885N2601-T, UNO23885N2602-T, UNO23885N2603-T, UNO23885N2604-T UNO-238-87N1AE UNO23887N2001-T, UNO23887N2002-T, UNO23887N2101-T, UNO23887N2102-T, UNO23887N2103-T, UNO23887N2104-T, UNO23887N2201-T, UNO23887N2202-T, UNO23887N2203-T, UNO23887N2204-T, UNO23887N2301-T, UNO23887N2302-T, UNO23887N2303-T, UNO23887N2304-T, UNO23887N2401-T, UNO23887N2402-T, UNO23887N2403-T, UNO23887N2404-T, UNO23887N2501-T, UNO23887N2502-T, UNO23887N2503-T, UNO23887N2504-T, UNO23887N2601-T, UNO23887N2602-T, UNO23887N2603-T, UNO23887N2604-T UNO-238 User Manual...
- Page 4 限用物質含有情況標示聲明書 Declaration of the Presence Condition of the Restricted Substances Marking 設備名稱:電腦 型號 (型式) :UNO-238 ( 系列型號請參見手冊載明型號) Equipment name Type designation (Type) 限用物質及其化學符號 Restricted substances and its chemical symbols 六價鉻 多溴聯苯 多溴二苯醚 單元 Unit 鎘 Hexavalent Polybrominat Polybrominated 鉛 Lead 汞...
- Page 5 Product Warranty (2 years) Advantech warrants the original purchaser that all of its products will be free from defects in materials and workmanship for two years from the date of purchase. This warranty does not apply to any products that have been repaired or altered by persons other than repair personnel authorized by Advantech, or products that have been subject to misuse, abuse, accident, or improper installation.
- Page 6 Technical Support and Assistance Visit the Advantech web site at support.advantech.com/ where you can find the latest information about the product. Contact your distributor, sales representative, or Advantech's customer service center for technical support if you need additional assistance. Please have the following information ready before you call: –...
- Page 7 This equipment is not suitable for use in locations where children are likely to be present. If the equipment is used in a manner not specified by the Advantech, the protec- tion provided by the equipment may be impaired. The equipment contains no user-serviceable parts. Do not open, Return to man- ufacturer for servicing.
- Page 8 Il s'agit d'un équipement de type ouvert et doit être installé dans un boîtier approprié ATTENTION: Danger d'explosion si la batterie est mal remplace. Remplacer unique- ment par le meme type ou equivalent recommandé par le fabricant. Jeter les piles usagées selon les instructions du fabricant. UNO-238 User Manual viii...
- Page 9 設備內部有液體流入; 設備曾暴露在過於潮濕的環境中使用; 設備無法正常工作,或您無法通過用戶手冊來使其正常工作; 設備跌落或者損壞; 設備有明顯的外觀破損。 請不要把設備放置在超出我們建議的溫度範圍的環境,即不要低於 -20 ℃ (-4 ℉)或高於 60 ℃ (140 ℉) ,否則可能會損壞設備。 注意:若電池更換不正確,將有爆炸危險。因此,只可以使用製造商推薦的同一 種或者同等型號的電池進行替換。請按照製造商的指示處理舊電池 根據 IEC 704‐1:1982 規定,操作員所在位置音量不可高於 70 分貝。 限制區域:請勿將設備安裝於限制區域使用。 免責聲明:請安全訓示符合 IEC 704‐1 要求。研華公司對其內容之準確性不承 擔任何法律責任。 消费者若使用电源适配器供电,则应购买配套使用获得 CCC 认证并满足标准要 求的电源适配器。 UNO-238 User Manual...
- Page 10 UNO-238 User Manual...
-
Page 11: Table Of Contents
Chapter Hardware Functionality.......5 Introduction ....................6 Figure 2.1 Key components locations of UNO-238 (Top Side)..6 Figure 2.2 Key components locations of UNO-238 (Bottom Side) Table 2.1: Key components, Connectors on Board..... 7 External I/O Connectors................7 Figure 2.3 Front I/O of UNO-238 ..........7 Figure 2.4 Right I/O of UNO-238 .......... - Page 12 A.4.2 M.2 E Key 2230 (CN16).............. 34 TPM 2.0 BIOS Setting................37 CPU Turbo mode BIOS Setting .............. 38 Serial Port 1 Configuration..............40 Serial Port 2 Configuration..............41 GPIO Configuration................. 43 A.10 CANBus Configuration ................44 UNO-238 User Manual...
-
Page 13: Chapter 1 Overview
Chapter Overview This chapter provides an overview of the UNO-238 specifications. Sections include: Introduction Safety precautions Accessories Hardware Specifications Dimensions... -
Page 14: Introduction
Advantech’s new UNO-200 series focuses on IT level applications which only require semi-industrial design and cost efficiency. New UNO-238 model aims to provide an optimized design with the 8th generation CPU Intel® Core™ U-Series processor. UNO-238 is IT-oriented, fanless, with IoT edge computing features and sufficient connectivity including 2 x LAN, 2 x RS- 232/ 422/485, 1 x GPIO, 4 x USB 3.2, 1 x DP 1.2, 1 x HDMI 1.4 and 1 x Audio. -
Page 15: Accessories
1 x Thermal grease for CPU (Advantech P/N: 2170000093-01) 1 x Earth-ground cable (Advantech P/N: 1703011001-11) 1 x Bracket for 3042/3052 LTE module (Advantech P/N: 1960098471N000) 2 x Screws for attaching 3042/3052 bracket (Advantech P/N: 1930001782) ... -
Page 16: I/O Interfaces
Shock Protection Operating, IEC 60068-2-27, 50G, half sine, 11ms Vibration Protection Operating, IEC 60068-2-64, 3Grms, random,5 ~ 500Hz, 1hr/axis 1.4.5 Certification Certification CE/FCC, CB/UL, CCC, BSMI Mechanical Specifications 1.5.1 Dimensions 162.00 107.00 150.00 Figure 1.1 UNO-238 Dimensions UNO-238 User Manual... -
Page 17: Chapter 2 Hardware Functionality
Chapter Hardware Functionality This chapter explains how to setup the UNO-238's hardware functions, including connecting peripherals and indicators. Sections include: Introduction External I/O Connector Internal I/O Connector LED Indicators Reset Buttons Antenna Hole... -
Page 18: Introduction
The following figure shows the locations of key components, internal and the external connectors on motherboard of UNO-238. CN35 CN30 CN10 CN29 CN15 CN11 CN23 CN22 CN37 Figure 2.1 Key components locations of UNO-238 (Top Side) CN19 CN16 CN20 Figure 2.2 Key components locations of UNO-238 (Bottom Side) UNO-238 User Manual... -
Page 19: External I/O Connectors
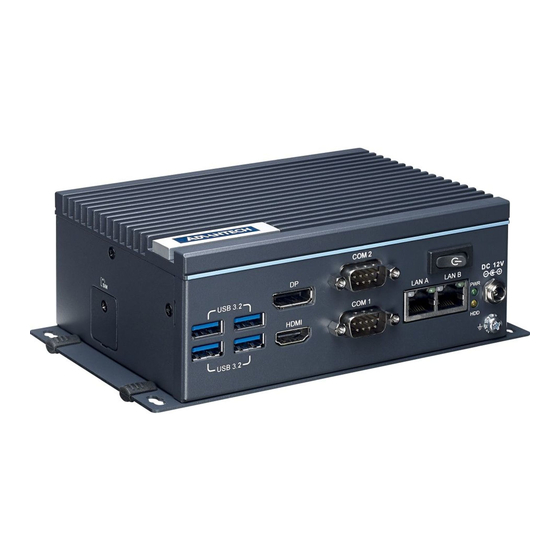
M.2 Key E Connector for Wi-Fi CN19 M.2 Key B Connector for Storage or LTE External I/O Connectors DC input USB3.2 DP1.2 Power button Chassis grounding RS-232/422/485 Rubber stopper HDMI 1.4 RJ45 LAN Figure 2.3 Front I/O of UNO-238 UNO-238 User Manual... -
Page 20: Power Connector
It can also be enabled/disabled in the BIOS menu as well. 2.2.4 DisplayPort Connector The UNO-238 provides 1 x DP 1.2 connector for a high resolution interface up to 4096 x 2160 @ 60Hz, It also supports DP++ that is compatible with passive adapters. UNO-238 User Manual... -
Page 21: Hdmi Connector
2.2.5 HDMI Connector The UNO-238 provides 1 x HDMI 1.4 connector for a high resolution interface up to 4096 x 2160 @30/24 Hz. 2.2.6 COM Connector The UNO-238 features 2 x RS232/422/485 ports. (COM2 are extend from CN10 function through cable) Table 2.2: COM Connector Pin Assignments... -
Page 22: Audio Connector
GPIO4 GPIO5 GPIO6 GPIO7 2.2.8 Audio Connector The UNO-238 features 1 x Audio connector extender from CN29 function through a cable for line out function. Table 2.4: Audio Connector Pin Assignments Signal Pin Definition LOUTL LOUTR Internal I/O Connector and Switch The following figure shows the locations of internal connectors and switches on the mother board of UNO-238. -
Page 23: Connector
2.3.1 M.2 Connector The UNO-238 provides 1 x M.2 B Key 2280/3042 connector and 1 x M.2 E Key 2230 connector. M.2 B key 2280 connector is for storage (supports SATA or NVMe PCIex2), shared with M.2 B Key 3042 connector is for LTE module (supports USB 2.0 only). -
Page 24: Nano Sim Slot
NVMe normal R/W, LED indicator will not light up) 2.4.2 Power button The UNO-238 features 1 x power button extend from CN8 function through cable. Press the power button to activate the hardware power on and shut down function. 2.4.3... -
Page 25: Chapter 3 Initial Setup
Chapter Initial Setup This chapter explains how to Initial- ize the UNO-238. Sections include: Chassis Grounding Connecting Power Storage Installation (Optional) -
Page 26: Chassis Grounding
12Vdc, 4.5A and Tmax 60 degree C, if you need further assistance, please contact Advantech for further information. M.2 Storage Installation (optional) UNO-238 supports 32GB eMMC 5.1 onboard and also support to install 1 x M.2 B Key 2280 (SATA or NVMe PCIex2), shared with expansion. The following steps demonstrate the installation. - Page 27 Install the M.2 B Key 2280 module and fix it with M3x6 screws Paste thermal pad for M.2 B Key 2280 module Restore and fix screws for back cover UNO-238 User Manual...
-
Page 28: Lte/5G Module Installation (Optional)
M.2 LTE/5G Module Installation (Optional) UNO-238 support to install 1 x M.2 B Key 3042 LTE or 3052 5G module shared with storage. The following steps demonstrates the installation. Remove 4 screws from back cover of UNO-238 Install the specific bracket onto the main board and fix it with two M2.5X4 screws. - Page 29 3042 or 3052 modules installation. Install the M.2 B Key 3042 or 3052 module and fix it with M3x6 screws Pierce the antenna hole on the side with a device and break the hole. UNO-238 User Manual...
- Page 30 Assemble the antenna hole and arrange the wire to connect to the board Restore and fix screws for back cover and lock the external antenna. UNO-238 User Manual...
-
Page 31: Wifi Module Installation (Optional)
M.2 WiFi Module Installation (Optional) UNO-238 supports 1 x M.2 E Key 2230 WiFi module. The following steps demonstrate the installation. Remove 4 screws from back cover of UNO-238 Install the M.2 E Key 2230 module and fix it with M3x6 screws... - Page 32 Assemble the antenna hole and arrange the wire to connect to the board Restore and fix screws for back cover and lock the external antenna. Note! Wireless Module, Antenna cable, and Antenna are optional. Please contact Advantech for further information. UNO-238 User Manual...
-
Page 33: Sim Card Installation
SIM Card Installation Remove SIM COVER Insert the SIM Card Replace and lock the SIM Card UNO-238 User Manual... -
Page 34: Ddr And Cpu Thermal Grease Installation
DDR and CPU Thermal grease Installation Remove the 4 M3x4 screws pre-locked on the side and then remove the top cover. Apply thermal grease on the aluminum part of the top cover. UNO-238 User Manual... - Page 35 Install lower level DDR. Paste thermal pad for lower level DDR. UNO-238 User Manual...
- Page 36 Install upper level DDR and fix M3x4 screws to restore top cover. Note! If you only need to install one DDR, please install the upper level DDR directly. Remove 4 screws from the back cover. UNO-238 User Manual...
- Page 37 Fix 4 M3x6 screws to the motherboard in order. (Torque=5kgf). Restore and fix screws for the back cover. UNO-238 User Manual...
-
Page 38: Din-Rail Installation Mounting
Din-Rail Installation Mounting 3.8.1 Din-Rail Installation Note! 1 x Din-Rail kit (Advantech P/N: 1960018849T100) 3 x screws (recommended to use M3x4L ) for attaching Din-Rail kit (Advantech P/N: 1930008390) 3.8.2 Wall Mount Note! It is recommended to use M4x6L screws *4pcs. -
Page 39: Stand Mount
BIOS setup screen, then, press the "Del" key during the Power On Self Test (POST) process to enter the BIOS setup screen, otherwise the system will continue the POST process. (Please refer to User Manual- Appendix for more settings) UNO-238 User Manual... - Page 40 UNO-238 User Manual...
-
Page 41: Appendix A System Settings/Pin Assignments
Appendix System Settings/Pin Assignments... -
Page 42: Lan: Ethernet Connector (Cn11)
LAN: Ethernet Connector (CN11) Signal Pin Definition LAN1_MDIO+ LAN1_MDIO- LAN1_MDI1+ LAN1_MDI1- LAN1CONN LAN1_GND LAN1_MDI2+ LAN1_MDI2- LAN1 MDI3+ LAN1_MDI3- LAN1_ACT# LAN1_A_ACT# LAN1_A_LINK100# LAN1_A_LINK1000# USB 3.2 Connector (CN22,CN23) Signal Pin Definition USB1_P- USB1_P+ USB1_SSRX- USB1_SSRX+ USB1_SSTX- USB1_SSTX+ UNO-238 User Manual... -
Page 43: Hdmi + Dp Connector (Cn15)
TMDS Data1 Shield TMND Data1- TMDS Data0+ TMDS Data0 Shield TMDS Data0- TMDS Clock+ TMDS Clock Shield TMDS Clock- Reserved DDC/CEC/HEC Ground +5V Power (max 50mA) Hot Plug Detect Signal Pin Definition DP_TX0+ DP_TX0- DP_TX1+ DP_TX1- DP_TX2+ DP_TX2- UNO-238 User Manual... -
Page 44: M.2 Connector
DP_TX3+ DP_TX3- DP_AUX_EN# DP_AUX+ DP1_AUX- DDP2_DP_HPD +V3.3_DP M.2 Connector A.4.1 M.2 B Key 2280/3042/3052 (CN17) Signal Pin Definition (Key B) M.2_CONFIG_3 +V3.3_M.2 +V3.3_M.2 UNO-238 User Manual... - Page 45 USB7_P+ WWAN_DISABLE# USB7_KEYB_P- B Key NC M.2_CONFIG_0 PCIE_A_PCH_TXN2 PCIE_A_PCH_TXP2 PCIE_KEY-M_RX7- UIM_A_RESET PCIE_KEY-M_RX7+ UIM_A_CLK UIM_A_DATA PCIE_A_PCH_TXN1 +VUIM_A_PWR PCIE_A_PCH_TXP1 MPCIE_MSATA_RX+ MPCIE_MSATA_RX- MPCIE_MSATA_TX- MPCIE_MSATA_TX+ CLK2_M2MB_A_PCIE_REQ# CK_100M_A_MKEY_N M.2_PCIE_WAKE# UNO-238 User Manual...
-
Page 46: E Key 2230 (Cn16)
CK_100M_A_MKEY_P SIM_KEYB_DET M.2_RESET#_R PCH_SUSCLK_R_MKEY M2_SSD_PEDET +V3.3_M.2 +V3.3_M.2 +V3.3_M.2 A.4.2 M.2 E Key 2230 (CN16) UNO-238 User Manual... - Page 47 Signal Pin Definition (Key E) +V3.3SB_M.2_E USB6 Z P+ +V3.3SB_M.2_E USB6_Z_P- E Key NC PCIE_M2_Z_TX7+ PCIE_M2_Z_TX7- PCIE_M2_RX7+ PCIE_M2_RX7- UNO-238 User Manual...
- Page 48 CLK_M2E_Z_PCIE+ CLK_M2E_Z_PCIE- SUSCLK_Z_EKEY PLTRST_BUFFER# PCIE_A_CLKREQ2# BT_DISABLE# PCIE_WAKE# WIFI_DISABLE# I2C0_KEYE_DAT I2C0_KEYE_CLK +V3.3SB_M.2_E +V3.3SB_M.2_E UNO-238 User Manual...
-
Page 49: Tpm 2.0 Bios Setting
The UNO-238 systems support TPM2.0 functionality. This can be enabled or dis- abled in the BIOS menu by following the instructions provided below Power on the UNO-238 system and press “Delete” to enter the BIOS configura- tion menu. On the “Advanced” tab, select the “Trusted Computing” item. -
Page 50: Cpu Turbo Mode Bios Setting
CPU Turbo mode BIOS Setting The UNO-238 systems support CPU Turbo mode. This can be enabled or disabled in the BIOS menu by following the instructions provided below Power on the UNO-238 system and press “Delete” to enter the BIOS configura- tion menu. - Page 51 UNO-238 User Manual...
-
Page 52: Serial Port 1 Configuration
Serial Port 1 Configuration The UNO-238 systems support Serial port 1 RS-232/RS-422/RS-485 mode. Power on the UNO-238 system and press “Delete” to enter the BIOS configura- tion menu. On the “Advanced” tab, select the “Serial Port 1 Configuration”. Choose “RS-232 mode / RS-422 mode / RS-485 mode” to COM Port Mode... -
Page 53: Serial Port 2 Configuration
Serial Port 2 Configuration The UNO-238 systems support Serial port 2 RS-232/RS-422/RS-485 mode. Power on the UNO-238 system and press “Delete” to enter the BIOS configura- tion menu. On the “Advanced” tab, select the “Serial Port 1 Configuration”. Choose “RS-232 mode / RS-422 mode / RS-485 mode” to COM Port Mode. - Page 54 UNO-238 User Manual...
-
Page 55: Gpio Configuration
GPIO Configuration The UNO-238 systems support GPIO 0~7. Power on the UNO-238 system and press “Delete” to enter the BIOS configura- tion menu. On the “Advanced” tab, select the “GPIO Configuration”. Choose “Input / Output” to GPIO 0~7. UNO-238 User Manual... -
Page 56: Canbus Configuration
A.10 CANBus Configuration The UNO-238 systems support CANBus (Optional). Power on the UNO-238 system and press “Delete” to enter the BIOS configura- tion menu. On the “Advanced” tab, select the “iManager Configuration”. Select “ACPI Report Method Configuration” Select “ACPI Report Method Control”, choose “Custom”... - Page 57 UNO-238 User Manual...
- Page 58 UNO-238 User Manual...
- Page 59 UNO-238 User Manual...
- Page 60 No part of this publication may be reproduced in any form or by any means, electronic, photocopying, recording or otherwise, without prior written permis- sion of the publisher. All brand and product names are trademarks or registered trademarks of their respective companies. © Advantech Co., Ltd. 2021...
Need help?
Do you have a question about the UNO-238 and is the answer not in the manual?
Questions and answers