
Related Manuals for Advantech UNO-2372G


Summary of Contents for Advantech UNO-2372G
- Page 1 User Manual UNO-2372G 電腦 ® ® Intel Atom™/Celeron Small- Sized Automation Computer with 2 x GbE, 2 x mPCIe, 1 x HDMI, 1 x DP, and 4 x COM...
- Page 2 The documentation and the software included with this product are copyrighted 2018 by Advantech Co., Ltd. All rights are reserved. Advantech Co., Ltd. reserves the right to improve the products described in this manual at any time without notice. No part of this manual may be reproduced, copied, translated, or transmitted in any form or by any means without the prior written permission of Advantech Co., Ltd.
- Page 3 限用物質含有情況標示聲明書 Declaration of the Presence Condition of the Restricted Substances Marking 設備名稱 : 電腦 型號 ( 型式 ): Equipment name Type designation UNO-2372G ( 系列型號請參見次頁說明書 ) (Type) 限用物質及其化學符號 Restricted substances and its chemical symbols 鉛 汞 鎘 六價鉻 多溴聯苯 多溴二苯醚...
- Page 4 Note 2: “○” indicates that the percentage content of the restricted substance does not exceed the percentage of reference value of presence. 備考 3.“ - ” 係指該項限用物質為排除項目。 Note 3: The “−” indicates that the restricted substance corresponds to the exemption. UNO-2372G User Manual...
- Page 5 UNO2372GE0221809-T, UNO2372GE0221810-T, UNO2372GE0221901-T, UNO2372GE0221902-T, UNO2372GE0221903-T, UNO2372GE0221904-T, UNO2372GE0221905-T, UNO2372GE0221906-T, UNO2372GE0221907-T, UNO2372GE0221908-T, UNO2372GE0221909-T, UNO2372GE0221910-T, UNO2372GE0222001-T, UNO2372GE0222002-T, UNO2372GE0222003-T, UNO2372GE0222004-T, UNO2372GE0222005-T, UNO2372GE0222006-T, UNO2372GE0222007-T, UNO2372GE0222008-T, UNO2372GE0222009-T, UNO2372GE0222010-T, UNO2372GE0222101-T, UNO2372GE0222102-T, UNO2372GE0222103-T, UNO2372GE0222104-T, UNO2372GE0222105-T, UNO2372GE0222106-T, UNO2372GE0222107-T, UNO2372GE0222108-T, UNO2372GE0222109-T, UNO2372GE0222110-T, UNO2372GE0222201-T, UNO2372GE0222202-T, UNO2372GE0222203-T, UNO2372GE0222204-T, UNO2372GE0222205-T, UNO2372GE0222206-T, UNO2372GE0222207-T, UNO-2372G User Manual...
- Page 6 UNO2372GJ0222004-T, UNO2372GJ0222005-T, UNO2372GJ0222006-T, UNO2372GJ0222007-T, UNO2372GJ0222008-T, UNO2372GJ0222009-T, UNO2372GJ0222010-T, UNO2372GJ0222101-T, UNO2372GJ0222102-T, UNO2372GJ0222103-T, UNO2372GJ0222104-T, UNO2372GJ0222105-T, UNO2372GJ0222106-T, UNO2372GJ0222107-T, UNO2372GJ0222108-T, UNO2372GJ0222109-T, UNO2372GJ0222110-T, UNO2372GJ0222201-T, UNO2372GJ0222202-T, UNO2372GJ0222203-T, UNO2372GJ0222204-T, UNO2372GJ0222205-T, UNO2372GJ0222206-T, UNO2372GJ0222207-T, UNO2372GJ0222208-T, UNO2372GJ0222209-T, UNO2372GJ0222210-T, UNO2372GJ0222301-T, UNO2372GJ0222302-T, UNO2372GJ0222303-T, UNO2372GJ0222304-T, UNO2372GJ0222305-T, UNO2372GJ0222306-T, UNO2372GJ0222307-T, UNO2372GJ0222308-T, UNO2372GJ0222309-T, UNO2372GJ0222310-T UNO-2372G User Manual...
- Page 7 Product Warranty (2 years) Advantech warrants the original purchaser that each of its products will be free from defects in materials and workmanship for two years from the date of purchase. This warranty does not apply to any products that have been repaired or altered by persons other than repair personnel authorized by Advantech, or products that have been subject to misuse, abuse, accident, or improper installation.
- Page 8 警告使用者 這是甲類測試產品,在居住的環境中使用時,可能會造成射頻干擾,在這種情況下, 使用者會被要求採取某些適當的對策。 Technical Support and Assistance Visit the Advantech website at www.advantech.com/support to obtain the latest product information. Contact your distributor, sales representative, or Advantech's customer service center for technical support if you need additional assistance. Please have the following information ready before you call: –...
- Page 9 In accordance with IEC 704-1:1982 specifications, the sound pressure level at the operator's position does not exceed 70 dB (A). DISCLAIMER: These instructions are provided according to the IEC 704-1. Advan- tech disclaims all responsibility for the accuracy of any statements contained herein. UNO-2372G User Manual...
- Page 10 – 電源線或插頭損壞; – 設備內部有液體流入; – 設備曾暴露在過度潮濕環境中使用; – 設備無法正常工作,或您無法透過用戶手冊來正常工作; – 設備摔落或損壞; – 設備有明顯外觀損; 請勿將設備放置在超出建議溫度範圍的環境,即不要低於 -20 ℃ (-4 ℉)或高 於 60 ℃ (140 ℉) ,否則可能會造成設備損壞。 注意:若電池更換不正確,將有爆炸危險。因此,只可以使用製造商推薦的同一 種或者同等型號的電池進行替換。請按照製造商的指示處理舊電池。 根據 IEC 704‐1:1982 規定,操作員所在位置音量不可高於 70 分貝。 限制區域:請勿將設備安裝於限制區域使用。 免責聲明:請安全訓示符合 IEC 704‐1 要求。研華公司對其內容之準確性不承 擔任何法律責任。 UNO-2372G User Manual...
-
Page 11: Table Of Contents
Introduction ....................6 Figure 2.1 Front panel of the UNO-2372G single-stack model..6 Figure 2.2 Rear panel of the UNO-2372G single-stack model ..6 Figure 2.3 Front panel of the UNO-2372G double-stack model .. 6 Figure 2.4 Rear panel of the UNO-2372G double-stack model... 6 Serial Communication Ports.............. - Page 12 A.12 TPM2.0 BIOS Settings................29 UNO-2372G User Manual...
-
Page 13: Chapter 1 Overview
Chapter Overview This chapter provides an overview of the UNO-2372G specifications. Introduction Safety Precautions Accessories Hardware Specifications... -
Page 14: Introduction
The UNO-2372G is equipped with optimized I/O and an optional second expansion stack that supports Advan- tech’s iDoor technology. -
Page 15: Accessories
Display: 1 x DP with 2560 x 1440 resolution @60 Hz and 1 x HDMI with 1920 x 1080 resolution @ 60 Hz – Hardware Security: TPM2.0 (UNO-2372G-J series only) Because UNO-2372G features a modularized design, Advantech offers both single- and double-stack models. * Single stack: UNO-2372G-E021AE/UNO-2372G-J021AE * Double stack: UNO-2372G-E022AE/UNO-2372G-J022AE The double-stack model combines a single-stack model with an extension kit for iDoor technology. - Page 16 UNO-2372G User Manual...
-
Page 17: Chapter 2 Hardware Functionality
Chapter Hardware Functionality This chapter explains how to setup the UNO-2372G’s hardware functions, including connecting peripherals ands setting switches and indicators. Introduction UNO-2372G Interface LAN/Ethernet Connector Power Connector USB Connector RTC Battery Power Button/Power Manage- ment ... -
Page 18: Introduction
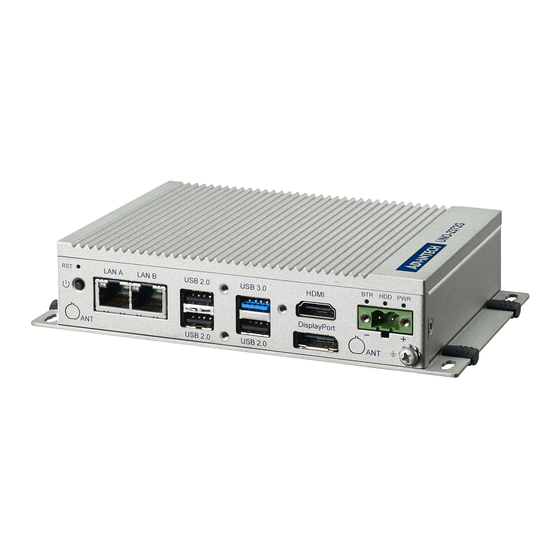
Introduction The UNO-2372G connectors are shown in Figures 2.1, 2.2, and 2.3. Additionally, a description of each peripheral is provided in the following sections. Figure 2.1 Front panel of the UNO-2372G single-stack model Figure 2.2 Rear panel of the UNO-2372G single-stack model Figure 2.3 Front panel of the UNO-2372G double-stack model... -
Page 19: Serial Communication Ports
Furthermore, the UNO-2372G also features four USB ports that comply with USB EHCI, Rev. 3.0, specifications. (Refer to Appendix A.5 for pin assignments.) RTC Battery The UNO-2372G is equipped with an RTC battery to ensure that the system clock and BIOS settings are retained after power disconnections. Type: BR2032 ... -
Page 20: Pci Express Mini Card Socket
PCI Express Mini Card Socket The UNO-2372G supports two full-size PCI Express mini card sockets. The MINI1 interface is provided to support various extension modules, such as Wi-Fi, 3G, and LTE modules, for diverse applications. The UNO-2372G double-stack model also supports the integration of iDoor modules (e.g., DI/O, COM, industrial fieldbus, etc.) -
Page 21: Chapter 3 Initial Setup
Chapter Initial Setup This chapter explains how to con- figure the UNO-2372G system. Chassis Grounding Connecting Power Opening/Closing the Rear Cover Installing a Hard Disk Installing a Second Stack Exten- sion Kit... -
Page 22: Chassis Grounding
Chassis Grounding UNO-2372G provides excellent EMI protection and a stable grounding base, and fea- tures an easy-to-connect chassis grounding point. Figure 3.1 Chassis grounding connection Connecting Power This product is intended to be supplied by an approved power adapter or DC power source rated 10 ~ 36 V , 4A, and TMAX 60 °C. - Page 23 Slide the rear cover to the left to open the cover. Closing the rear cover: Align the guide pillars of the device with the brackets of the rear cover. Then slide the rear cover to the right to position in place. UNO-2372G User Manual...
-
Page 24: Installing A Hard Disk
Affix the rear cover in position using two screws. Then reattach the four rubber feet. Installing a Hard Disk Follow the steps outlined below to install a hard disk into the UNO-2372G. Single-stack model: Disconnect the power cord. Unscrew and remove the rear cover. - Page 25 Connect a SATA cable to the HDD and motherboard. Then close the rear cover. UNO-2372G User Manual...
- Page 26 Double-stack model: Disconnect the power cord. Remove the rubber feet of the rear cover. Unscrew and remove the rear cover. UNO-2372G User Manual...
- Page 27 Remove the screws to detach the second stack from the first stack. UNO-2372G User Manual...
- Page 28 Remove the screws to detach the HDD bracket from the second stack. Affix the HDD to the HDD bracket. Then affix the HDD bracket back onto the second stack using the screws provided. Connect a SATA cable to the HDD and motherboard. UNO-2372G User Manual...
- Page 29 Affix the second stack to the first stack using the screws provided. Replace the rear cover and affix in place using the two screws. Then replace the four rubber feet. UNO-2372G User Manual...
-
Page 30: Installing A Second Stack Extension Kit (Uno-2372G-Ekae)
Installing a Second Stack Extension Kit (UNO- 2372G-EKAE) Remove the rear cover. Affix the second stack extension kit onto the first stack using four screws. Replace the rear cover and affix in place using two screws. Then replace the four rubber feet. UNO-2372G User Manual... -
Page 31: Appendix A System Settings/Pin Assignments
Appendix System Settings/Pin Assignments... -
Page 32: Cn10 Internal Gpio Pin Header
CN10 Internal GPIO Pin Header Table A.1: CN10 Internal GPIO Pin Header Signal +5 V GPI0 GPO0 GPI1 GPO1 GPI2 GPO2 GPI3 GPO3 UNO-2372G User Manual... -
Page 33: Board Connectors And Switches
Board Connectors and Switches The UNO-2372G board features several connectors and jumpers. The following sec- tions explain how to configure the UNO-2372G hardware. Figure A.1 shows the locations of the UNO-2372G connectors and switches. Figure A.1 Connector and jumper locations (front) Table A.2: Connectors and Jumpers... -
Page 34: Power Connector (Pwr)
Signal Name ML_Lane 0 (p) ML_Lane 0 (n) ML_Lane 1 (p) ML_Lane 1 (n) ML_Lane 2 (p) ML_Lane2 (2) ML_Lane 3 (p) ML_Lane 3 (n) CONFIG1 CONFIG2 AUX CH (p) AUX CH (n) Hot plug Return DP_PWR UNO-2372G User Manual... -
Page 35: Usb 3.0
TMDS data2 shield TMDS data2- TMDS data1+ TMDS data1 shield TMDS data1- TMDS data0+ TMDS data0 shield TMDS data0- TMDS clock+ TMDS clock shield TMDS clock- Reserved DDC/CEC/HEC ground +5 V power (max. 50 mA) Hot plug detect UNO-2372G User Manual... -
Page 36: Com1/Com2/Com3/Com4 Rs232/422/485 Connector
COM1/COM2/COM3/COM4 RS232/422/485 Connector RS232 RS422 RS485 UNO-2372G User Manual... -
Page 37: Mini Pcie Slot (Mini Pcie)
* +3.3 V aux was suspend power with power out to device +3.3 V/1.1A * +3.3 V was core power * +1.5 V was core power with power out to device +1.5 V/0.5A UNO-2372G User Manual... -
Page 38: Lan Rj45 Connector
1000BASE-T: In MDI and in MDI-X configuration, MDI[2]+/- corresponds to BI_DC+/- and MDI[3]+/- corre- MDI2- sponds to BI_DD+/-. 100BASE-TX: Unused MDI3+ 10BASE-T: Unused MDI3- Left LED Right LED 10 Link 100 Link 1000 Link Active Orange Green Green UNO-2372G User Manual... -
Page 39: Screw Type And Quantity For Mount Module
The default setting for the serial port is RS-232. This can be changed to RS-422 or RS-485 modes by following the instructions provided below. Power on the UNO-2372G system and press “Delete” to enter the BIOS config- uration menu. On the “Advanced” tab, select the “IT8768E Super IO Configuration” option. - Page 40 Select the serial port (e.g., select the “Serial Port 1 Configuration” option). Select “COM1 mode” and choose from RS232, RS422, or RS485 modes. UNO-2372G User Manual...
- Page 41 The UNO-2372G systems support TPM2.0 functionality. This can be enabled or dis- abled in the BIOS menu by following the instructions provided below. Power on the UNO-2372G system and press “Delete” to enter the BIOS config- uration menu. On the “Advanced” tab, select the “Trusted Computing” item.
- Page 42 UNO-2372G User Manual...
- Page 43 UNO-2372G User Manual...
- Page 44 No part of this publication may be reproduced in any form or by any means, such as electronically, by photocopying, recording, or otherwise, without prior written permission from the publisher. All brand and product names are trademarks or registered trademarks of their respective companies. © Advantech Co., Ltd. 2018...
Need help?
Do you have a question about the UNO-2372G and is the answer not in the manual?
Questions and answers