Advantech UNO-1372G User Manual
Embedded automation
computer with intel atom quad-core processor, 3 x gbe, 2 x mpcie, 1 msata, 2xcom, 8xdio, 3xusb, hdmi/vga
Hide thumbs
Also See for UNO-1372G:
- User manual (38 pages) ,
- User manual (40 pages) ,
- Startup manual (12 pages)

Related Manuals for Advantech UNO-1372G


Summary of Contents for Advantech UNO-1372G
- Page 1 User Manual UNO-1372G Embedded Automation ® Computer with Intel Atom Quad-Core Processor, 3 x GbE, 2 x mPCIe, 1 mSATA, 2xCOM, 8xDIO, 3xUSB, HDMI/VGA...
- Page 2 No part of this manual may be reproduced, copied, translated or transmitted in any form or by any means without the prior written permission of Advantech Co., Ltd. Information provided in this manual is intended to be accurate and reliable. How- ever, Advantech Co., Ltd.
- Page 3 Because of Advantech’s high quality-control standards and rigorous testing, most of our customers never need to use our repair service. If an Advantech product is defec- tive, it will be repaired or replaced at no charge during the warranty period. For out- of-warranty repairs, you will be billed according to the cost of replacement materials, service time and freight.
- Page 4 Technical Support and Assistance Visit the Advantech web site at support.advantech.com/ where you can find the latest information about the product. Contact your distributor, sales representative, or Advantech's customer service center for technical support if you need additional assistance. Please have the following information ready before you call: –...
- Page 5 The sound pressure level at the operator's position according to IEC 704-1:1982 is no more than 70 dB (A). DISCLAIMER: This set of instructions is given according to IEC 704-1. Advantech disclaims all responsibility for the accuracy of any statements contained herein.
- Page 6 UNO-1372G User Manual...
-
Page 7: Table Of Contents
Safety Precautions..................2 Accessories....................3 Chapter Hardware Functionality ...... 5 Introduction ....................6 Figure 2.1 Front of UNO-1372G ..........6 Figure 2.2 Top of UNO-1372G ............ 7 2.1.1 System Hardware ................. 7 Serial Interface (COM1~COM2) ............... 8 2.2.1 RS-232 Interface (COM 1)............8 2.2.2... - Page 8 Power Connector (PWR) ................ 26 Table A.5: Power connector pin assignments ......26 USB Connector ..................26 Table A.6: USB 2.0 Connector Pin Assignments....... 26 HDMI Display Connector ................ 27 Table A.7: HDMI Adaptor Cable Pin Assignment ...... 27 UNO-1372G User Manual viii...
-
Page 9: Chapter 1 Overview
Chapter Overview This chapter provides an overview of the products specifications. Sections include: Introduction Safety precautions Accessories... -
Page 10: Introduction
The UNO-1372G includes Intel's latest Intel Atom technology and provides multiple interfaces including up to two serial ports, three GbE LAN and three USB ports. The UNO-1372G supports two display types, HDMI and VGA for various high resolu- tion requirements. -
Page 11: Accessories
6 x PCS screws for mPCIe slot 4 x PCS screws for wall mounting bracket 3 x PCS screws for DIN-Rail Bracket Driver DVD Warranty card If anything is missing or damaged, contact your distributor or sales representative immediately. UNO-1372G User Manual... - Page 12 UNO-1372G User Manual...
-
Page 13: Chapter 2 Hardware Functionality
Chapter Hardware Functionality This chapter shows how to setup the product’s hardware functions, including connecting peripherals, setting switches and indicators. Sections include: Introduction Serial Interface LAN / Ethernet Connector Power Connector USB Connector Display Connector ... -
Page 14: Introduction
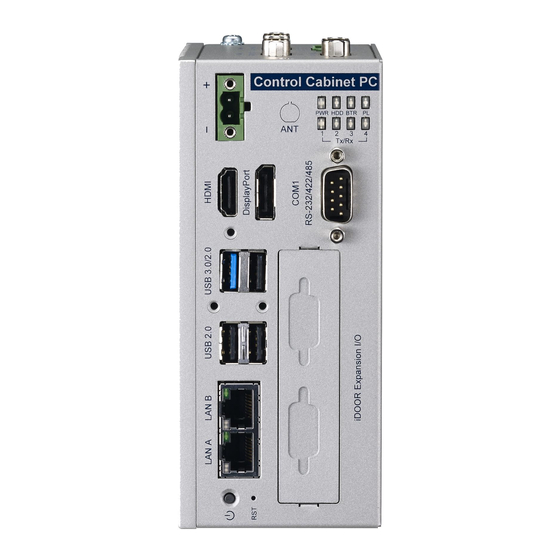
Introduction The following figures show the connectors on the product. The following sections give you information about each peripheral. Figure 2.1 Front of UNO-1372G UNO-1372G User Manual... -
Page 15: System Hardware
Figure 2.2 Top of UNO-1372G 2.1.1 System Hardware CPU: Intel Atom E3845 1.91GHz, 2MB L2 Cache Memory: – 4G DDR3L SDRAM built-in, – Transcend/AQD-SD3L4GN16-SG 4GB Storage: One drive bay for SATA 2.5" HDD (Compatible with 9.5mm high HDDs) ... -
Page 16: Serial Interface (Com1~Com2)
USB EHCI, Rev. 2.0 compliant. The USB interface can be disabled in the system BIOS setup. Refer to Appendix A for its pin assignment. Display Connector The UNO-1372G provides a HDMI and VGA controller for a high resolution interface. It supports up to full HD resolution for two independent display. ... -
Page 17: Rtc Battery
ACPI (Advanced Configuration and Power Interface). As well as power on/off, it supports multiple suspend modes, such as Power on Suspend (S1), Suspend to RAM (S3), Suspend to Disk (S4). Reset Button Press the “Reset” button to activate the hardware reset function. UNO-1372G User Manual... -
Page 18: Pci Express Mini Card Socket
3G, WiFi or other wireless functions. 2.13 Dual Power Input In the power connector, there is a secondary power input that helps users plug-in a second power source to prevent main power source failure. UNO-1372G User Manual... -
Page 19: Audio Jack
Overvoltage Protection 30 V ESD Protection 4KV (Contact), 8KV (Air) Opto-Isolator Response 50 μs Digital Output Channels 4 Output Voltage: 5~30V Output Capability Sink: 24 mA max./channel Opto-Isolator Response 50 μs UNO-1372G User Manual... -
Page 20: Figure 2.4 Wet Contact Wiring
Figure 2.4 Wet Contact Wiring Figure 2.5 Dry Contact Wiring UNO-1372G User Manual... -
Page 21: Chapter 3 Initial Setup
Chapter Initial Setup This chapter introduces how to initialize the UNO-1372G. Sections include: Chassis Grounding Inserting a mSATA Installing a wireless LAN card and Antenna Installing iDoor expansion kit Installing a Hard Disk Connecting Power... -
Page 22: Chassis Grounding
Chassis Grounding The UNO-1372G provides good EMI protection and a stable grounding base. There is an easy-to-connect chassis grounding point to use. Figure 3.1 Chassis Grounding Connection Please note that the system ground and chassis ground are separated. Inserting a mSATA Remove the power cord. -
Page 23: Installing A Wireless Lan Card And Antenna (Optional)
Installing a Wireless LAN Card and Antenna (optional) Contact Advantech to prepare the following optional kit: Rear Panel for Antenna The internal cable: 1750006043 (15cm) Wireless Module (PCI Express mini card) One of the suggested module is EWM-W151H01E which is a verified Wireless IEEE 802.11b/g/n module... - Page 24 Install the internal cable 1750006043 (15cm) on the top panel. Plug the Wireless module onto the PCI Express mini card socket Connect the internal cable with the module. Screw back the left cover. Assemble the antenna on the SMA connector. UNO-1372G User Manual...
-
Page 25: Installing A Hard Disk
Installing a Hard Disk The procedure for installing a hard disk into the UNO-1372G is below. Follow these steps carefully. Note the system is not compatible with +12V HDD. Use an HDD with lower power input. Remove the power cord. -
Page 26: Bios Setup
Press “F2” in the boot-up screen to enter the BIOS setup utility. Follow the instruc- tions on the screen to do the necessary settings. Note that you can try to “Restore Defaults” from the BIOS Setup manual if the UNO- 1372G does not work properly. UNO-1372G User Manual... -
Page 27: Din Rail Kit Assembly
Din Rail Kit Assembly The UNO-1372G supports Din-Rail and wall mounting. The assembly instructions are below. b. horizontal Din-Rail a. vertical Din-Rail c. wall mount (left side) d. wall mount (back side) UNO-1372G User Manual... -
Page 28: Connecting Power
Connecting Power Connect the UNO-1372G to a 9~36 V power source. The power source can either be from a power adapter or an in-house power source. UNO-1372G User Manual... -
Page 29: System Settings And Pin Assignments
Appendix System Settings and Pin Assignments... -
Page 30: System I/O Address And Interrupt Assignment
Interrupt from controller 2 (cascade) IRQ 3 COM 2 IRQ 4 COM 1 IRQ 8 Real-time clock IRQ 9 Microsoft ACPI-Compliant System IRQ 16 IRQ 17 IRQ 18 USB and graphics IRQ 19 HD audio and SATA IRQ 7 Watchdog UNO-1372G User Manual... -
Page 31: Board Connectors And Jumpers
Switch to 4: disable function of mini PCIe slot 1 Switch to 3: disable function of mini PCIe slot 2 Switch to 1 and 2: enable function of mini PCIe slot 1 and 2 (default setting) UNO-1372G User Manual... - Page 32 20 VDC @ 5.64 mA 30 VDC @ 8.91 mA Digital output Channels:3 – Output Voltage: 5 ~ 30 VDC – Output Capability Sink: 24 mA max./channel JP1: 1-2: control DO3 (default setting) 2-3: control PL LED UNO-1372G User Manual...
-
Page 33: Rs-232 Standard Serial Port (Com1)
RS-232 Standard Serial Port (COM1) Table A.3: RS-232 Serial Port Pin Assignments Pin Name RS-422/485 Serial Port (COM2) Table A.4: RS-422/485 Serial Port Pin Assignments RS-422 RS-485 Data- Data+ UNO-1372G User Manual... -
Page 34: Power Connector (Pwr)
1 V1+ 9~36 V Input 1 2 V2+ 9~36 V Input 2 3 V- Power Ground 4 GND Chassis Ground USB Connector Table A.6: USB 2.0 Connector Pin Assignments Signal Name Cable Color DATA- White DATA+ Green Black UNO-1372G User Manual... -
Page 35: Hdmi Display Connector
TMDS Data2 Shield TMDS Data2- TMDS Data1+ TMDS Data1 Shield TMDS Data1- TMDS Data0+ TMDS Data0 Shield TMDS Data0- TMDS Clock+ TMDS Clock Shield TMDS Clock- Reserved DDC/CEC/HEC Ground +5 V Power (max 50 mA) Hot Plug Detect UNO-1372G User Manual... - Page 36 No part of this publication may be reproduced in any form or by any means, electronic, photocopying, recording or otherwise, without prior written permis- sion of the publisher. All brand and product names are trademarks or registered trademarks of their respective companies. © Advantech Co., Ltd. 2015...
Need help?
Do you have a question about the UNO-1372G and is the answer not in the manual?
Questions and answers