Steelcase FrameOne Manual
Loop legs used with universal worksurfaces mounted to answer, montage, tethered or table applications
Hide thumbs
Also See for FrameOne:
- Manual (63 pages) ,
- Assembly instructions (3 pages) ,
- Manual (8 pages)
Advertisement
Quick Links
®
CLOSED LOOP LEG
- TABLE
OPEN LOOP LEG
- TABLE
If you have a problem, question, or request, call
your local dealer, or Steelcase Line 1 at
888.STEELCASE (888.783.3522)
for immediate action by people who want to help you.
(Outside the U.S.A., Canada, Mexico, Puerto Rico,
and the U.S. Virgin Islands, call: 1.616.247.2500)
Or visit our website: www.steelcase.com
©
2012 Steelcase Inc.
Grand Rapids, MI 49501
U.S.A.
Printed in U.S.A.
FrameOne
™
Mounted to Answer
OPEN LOOP LEG - LH
OPEN LOOP LEG - RH
HALF LOOP LEG - LH
HALF LOOP LEG - RH
Loop Legs used with Universal Worksurfaces
, Montage
, Tethered or Table Applications
®
®
CLOSED LOOP LEG - RH
OPEN LOOP LEG
- TETHERED
CLOSED LOOP LEG - LH
CLOSED LOOP LEG
- TETHERED
939500590 Rev F
6mm Hex
Page 1 of 8
Advertisement

Subscribe to Our Youtube Channel
Related Manuals for Steelcase FrameOne


Summary of Contents for Steelcase FrameOne
- Page 1 CLOSED LOOP LEG If you have a problem, question, or request, call HALF LOOP LEG - LH - TETHERED your local dealer, or Steelcase Line 1 at 888.STEELCASE (888.783.3522) OPEN LOOP LEG for immediate action by people who want to help you.
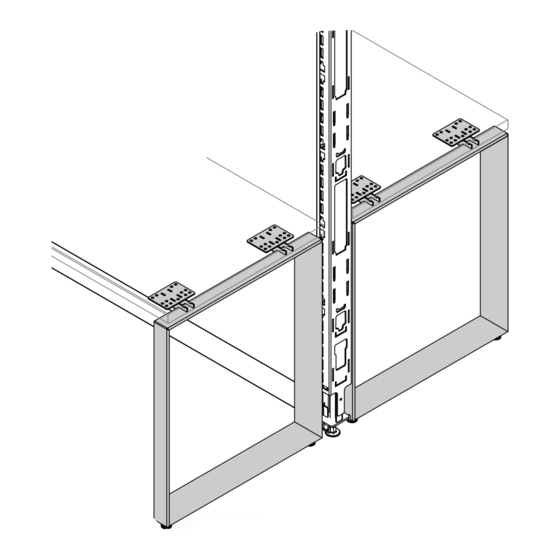
- Page 2 ® MOUNTING HOLES USED DEPEND ON THE INSTALLATION For Panel-Mounted Open and Closed Loop Legs ANSWER NOTE: The panel must be level prior to assembling the leg to the panel. MONTAGE Z-shaped hook brackets are used to ANSWER RH INSTALLATION SHOWN connect the leg to the panel.
- Page 3 ® Adjusting Leg Angles (Optional) To adjust leg angle, insert shim from either side of mounting plate. A maximum of 2 shims are allowed per mounting plate. Page 3 of 8 939500590 Rev F...
- Page 4 ® For Panel-Mounted Open and Closed Loop Legs (cont.) Install the plastic covers in the four (4) places, per leg, as shown. Place the worksurface flush with the front face of the leg (4a). Flush the edge of the leg with the side of the worksurface (4b).
- Page 5 ® For Tethered Open and Closed Loop Legs Install the plastic covers in the two (2) places, per leg, as shown. Place the worksurface flush with the front face of the leg (2a). Flush the edge of the leg with the side of the worksurface (2b). Install twenty-six (26) #10-10 x 1”...
- Page 6 ® For Table Open and Closed Loop Legs For each table leg: Install the plastic covers in the two (2) places, per leg, as shown. Place the worksurface flush with the front face of the leg (2a). Flush the edge of the leg with the side of the worksurface (2b). Install twenty-eight (28) #10-10 x 1”...
- Page 7 ® For Half Loop Legs Install the mounting bracket on the RH INSTALLATION SHOWN half loop leg with the provided M10 flat head screw with 6mm hex drive (1a). Tighten securely. NOTE: Torque not to exceed 10 ft-lbs. Make sure the spring clip on the mounting bracket has been rotated to the position shown (1b).
-
Page 8: Crush Hazard
® For Half Loop Legs (cont.) Rotate the safety clip into the slot in the panel. Install the plastic covers in the two (2) RH INSTALLATION SHOWN places, per leg, as shown. Place the worksurface flush with the front face of the leg (5a). Flush the edge of the leg with the side of the worksurface (5b).
Need help?
Do you have a question about the FrameOne and is the answer not in the manual?
Questions and answers