
Related Manuals for Mile Marker 75 Series


Summary of Contents for Mile Marker 75 Series
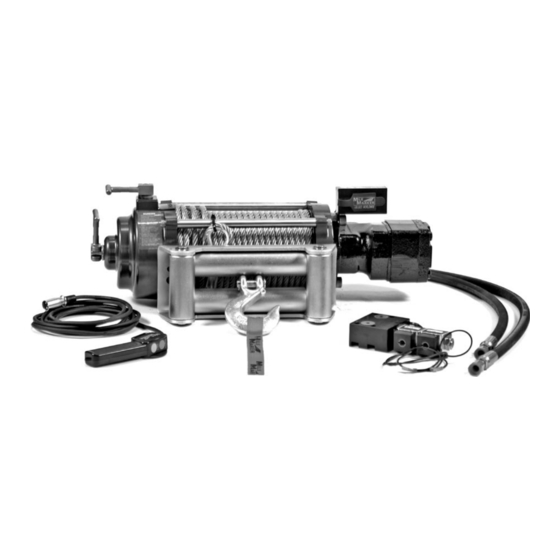
- Page 1 75 Series Winch Instructions Hydraulic Winch & P.T.O. System Smooth Power Reversible Mounting No Battery Drain 12 or 24 volt ABUSED WORLD WIDE...
- Page 2 L. 93-80036 Circuit Breaker 24v 15amp M. 90-50067 90º for valve N. 90-50060 Male to female for valve 90º O. 90-50091 Straight Fitting P. 35-50300 75 Series Valve Q. 19-51202 R. 93-50027 9ft red wire S. 88-50060 Hose 60” (not shown) T.
- Page 3 ATTACHING VALVE ASSEMBLY TO WINCH MOTOR. (SEE FIGURE 1) Rotate winch onto its front so that smooth machined area on the winch motor is facing up. Remove rubber plugs from holes in the side of the winch motor. Remove the 2 Motor square-cut 0-rings from rubber plugs and re-seat at the lips of the holes from which they were removed in the motor.
-
Page 4: Mounting Winch
This may allow the winch to be mount- ed easier on some winch mounts or for other applications. The motor on Mile Marker 2-speed winches may also be rotated in 90º increments if needed. This may allow easier installation on some winch mounts. - Page 5 NOT SURE? Which one is the high pressure hose? The hose with heavy duty crimped on fittings. The low pressure return lines from the steering box or hydroboost both end up at the pump reservoir will have hose clamps or some- thing similar.
-
Page 6: Connecting The Hoses
CONNECTING THE HOSES There will be two JIC -6 hoses provided in the kit. One is “S”/60” and the other is “T”/78”. Connect the 78” hose from the power steering pump or hydroboost to the “P” port on the black solenoid block. Connect the 60” hose from the “T”... - Page 7 FIGURE 4 WHEN DONE Check Fluid Level. Replace lost fluid in system until full. To purge air, start engine, run for two seconds and shut off engine. Check fluid level again. Add fluid until full. Do this until system stays full. Run truck for three minutes or until fluid looses aeration.
-
Page 8: Preparation For Use
MILE MARKER TWO-SPEED WINCH OPERATION A. GENERAL The vehicle’s steering pump is used to power the winch. The engine must be running while operating the winch, as the engine turns the power steering pump which pumps fluid to rotate the winch. The winch will have full pull- ing capabilities at an engine idle. - Page 9 E. OPERATION OF HIGH GEAR 1. Turn top lever to “FREE.” Turn side lever to “HIGH” (lock high gear). MILE MARKER HYDRAULIC 2-SPEED WINCH LEVER POSITIONS (figure 5) View 1 View 2 View 4 View 3 WARNING •DO NOT shift levers with load on winch cable! •DO NOT move shift levers when powering winch in or out!
-
Page 10: General Operation
•The Mile Marker winch is a 2-Speed unit: low speed for vehicle recovery winching and high speed for line retrieval. - Page 11 WINCHING TIPS AND USE OF A SNATCH BLOCK •Use OEM tow hooks, recovery eyes or a clevis mount for attachment of a tow strap or winch cable. Warning: Never use a ball and /or ball mount as an anchor point for tow strap or winch cable. Severe personal injury or death could occur.
-
Page 12: Safety Tips
SAFETY TIPS •NEVER DISENGAGE LOW GEAR CLUTCH LEVER WHEN THERE IS A LOAD ON THE WINCH. To manually lock the winch to hold a load, engage BOTH HIGH and LOW GEARS. First, engage low gear. After low gear is engaged, engage high gear. - Page 13 USE OF A PULLEY BLOCK OR SNATCH BLOCK Figure 9: Vehicle self-recovery using the pulley block attached to the anchor point for direct pull. In this instance the vehicle becomes the “load” and the actual pulling power on the vehicle will be double at half winch rope speed.
- Page 14 A frayed cable with broken strands should be replaced immediately. Always replace the cable with a Mile Marker recommended replacement part. Any substitution must be IDENTI- CAL in strength, quality, lay and stranding. Never hook the cable back onto itself. Hooking the cable back onto itself creates an unacceptable strain, breaking individual strands which in turn weakens the entire cable.
- Page 15 (Exclusion from this warranty are cables, the finish, and any condition Mile Marker determines to have been caused by misuse, abnormal use.) The Mile Marker hydraulic motor has a five (5) year warranty. The owner will be responsible for removing the winch and returning it to Mile Marker freight prepaid. Mile Marker will repair or replace any or all winch parts it determines to be defective after inspection.
Need help?
Do you have a question about the 75 Series and is the answer not in the manual?
Questions and answers