Table of Contents
Advertisement
Quick Links
Advertisement
Table of Contents

Related Manuals for Mile Marker SEC18


Summary of Contents for Mile Marker SEC18
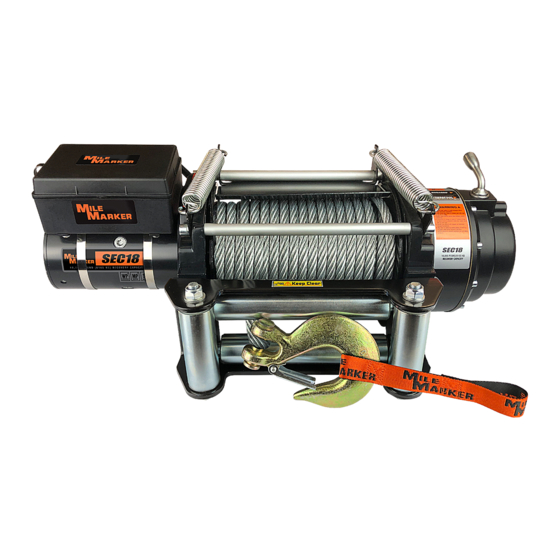
- Page 1 Installation & Operator’s Manual SEC18 77-50280W 18,000 lbs.
-
Page 2: Safety Warnings
HOIST LEARN TO USE YOUR MILE MARKER WINCH: After winch has been installed, take some time and practice using it so you will be familiar with ALL OPERATIONS. Periodically check the winch installation to ensure that all bolts are tight. To ensure proper operation, carefully inspect winch for any damaged parts before operating. - Page 3 PRECAUTIONS Keeps hands and body away from roller fairlead (steel cable intake slot) when operating. Secure vehicle in position before using winch. Do not exceed winch load weight capacity. Be certain winch is properly bolted to a structure (or vehicle) that can hold the winch load. Always use proper couplings when connecting winch steel cable hook to load.
-
Page 4: Installation
INSTALLATION NOTE: Depending on your knowledge of electrical wiring, you may wish to have this winch installed by a qualified technician 1. Select a site to mount your winch mounting frame (not included) and winch CAUTION: Choose a mounting site that will withstand the pulling force of the winch Depending on mounting site, steel reinforcement plates (not included) may be required Depending on mounting site, additional bracing (not included) may be needed and can be welded on before installing winch 2. - Page 5 Before wiring, match the color of the motor terminals and power cable Connect the three short cables (red, black, yellow) to the color-coded terminals on the motor Connect the red long cable from the solenoid to the POSITIVE battery terminal and the long black cable to the NEGATIVE battery terminal Connect the other end of both to the motor Connect thin black wire (ground wire) from the solenoid assembly to the motor Remove socket cover on the solenoid and inset the plug of the remote control...
-
Page 6: Winch Operation
WINCH OPERATION 1. Disengage the clutch by moving the clutch handle to the disengaged position 2. Grab assembly hook with hand strap and pull cable NOTE: Always leave at least 5 turns of cable on the drum. Review safety warnings on page 1. 3. -
Page 7: Winching Tips & Techniques
Safety Tips DO NOT DISENGAGE CLUTCH LEVER WHEN THERE IS A LOAD ON THE WINCH. Mile Marker electric winches utilize an automatic load holding brake, therefore no adjustment to clutch is needed to maintain load. - Page 8 Self Recovery 1. Always attempt to get the steel cable as straight as possible to the direction of the vehicle. It is acceptable to start a pull at an angle if it is obvious that the vehicle will turn towards the hook anchoring point. Turning the steering wheel will assist the process. It is recommended that the driver is in the vehicle.
-
Page 9: Winch Maintenance
The cable should be replaced immediately if there are any evident signs of fraying, burrs, or broken strands. Replace the cable with a Mile Marker recommended replacement part and make sure the cable is rated to sustain any load the winch is capable of pulling. -
Page 10: Troubleshooting
TROUBLESHOOTING Symptom Possible Cause Suggested Remedy Safety switch is OFF Turn safety switch ON Switch assembly not connected Insert switch assembly firmly to the connector properly Loose battery cable Tighten nuts on cable connectors Tap solenoid to free contact, applying 12 volts - Connection to coil terminal directly. - Page 11 PARTS BREAKDOWN & ASSEMBLY ITEM PART# DESCRIPTION ITEM PART# DESCRIPTION 77-502080W-01 Solenoid Assembly 77-502080W-25 Screw 77-502080W-02 Solenoid Bracket 77-502080W-26 77-502080W-03 Hose Clamps 77-502080W-27 Locating Pin 77-502080W-04 Washer 6 77-502080W-28 Spring 77-502080W-05 Spring Washer 77-502080W-29 Clutch Handle 77-502080W-06 Screw M6 x 16 77-502080W-30 O Seal Ring 77-502080W-07...
-
Page 12: Warranty
Mile Marker freight prepaid unless a determination is made that replacement parts can be sent out which will remedy the problem. Mile Marker will repair or replace any or all winch parts, which after inspection determines to be defective.
Need help?
Do you have a question about the SEC18 and is the answer not in the manual?
Questions and answers