Table of Contents
Advertisement
Quick Links
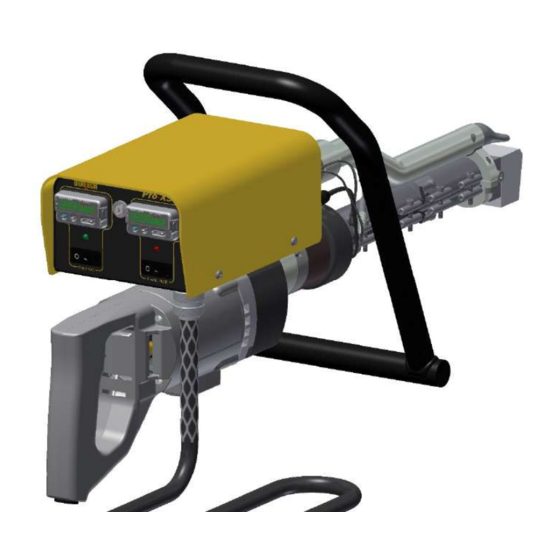
Model: Pro-X5
TM
Part Number: 600-0105/X5/A
High Output Thermoplastic Extrusion Welder
Operator's Manual
Revision: A
Scope of Manual: This manual contains procedures for safety, general unpacking,
installation, setup and operation of your DEMTECH Services, Inc. Pro-X5
Extrusion Welder.
TM
DEMTECH Services, Inc.
Ship to address: 6414 Capitol Avenue
Diamond Springs, CA 95619 U.S.A.
Advertisement
Table of Contents

Related Manuals for Demtech Pro-X5 600-0105/X5/A


Summary of Contents for Demtech Pro-X5 600-0105/X5/A
- Page 1 High Output Thermoplastic Extrusion Welder Operator’s Manual Revision: A Scope of Manual: This manual contains procedures for safety, general unpacking, installation, setup and operation of your DEMTECH Services, Inc. Pro-X5 Extrusion Welder. DEMTECH Services, Inc. Ship to address: 6414 Capitol Avenue...
- Page 2 Rev. A: January 2015 This page is intentionally without content. Pro-X5 Operator’s Manual 600-Manual_Pro-X5 RA.docx...
- Page 3 Use of this firmware and/or software does not authorize de-compiling, disassembling or reverse engineering to gain access to the program code. DEMTECH Services, Inc. does not authorize any copying, changing, or other use of this firmware and/or software.
-
Page 4: Table Of Contents
Rev. A: January 2015 Table of Contents Safety Precautions ......................vi General Safety & Maintenance Information ..............1 1.1. Intended Use ......................1 1.2. Maintenance ......................2 General Product Data ......................3 Operating Environment ......................3 ... - Page 5 Rev. A: January 2015 Welder Wiring Diagram......................18 Service/Spare Parts ID ......................20 10.1. 600-0105/X5/A, Assembly, Pro-X5 Extrusion Welder (Parts ID) ......21 10.2. 600-0105/X5/A, Assembly, Pro-X5 Extrusion Welder (Parts List) ....22 10.3. 600-100/X5/A, Assembly, Controller, Pro-X5 (Parts ID) ........23 ...
-
Page 6: Safety Precautions
Rev. A: January 2015 Safety Precautions Safety precautions for operating personnel and equipment: WARNING 1: Operating personnel should perform only the procedures described and recommended in this manual. Only qualified service personnel familiar with electrical shock hazards and mechanical entanglement hazards present inside the equipment should perform disassembly or corrective maintenance of the equipment. -
Page 7: General Safety & Maintenance Information
Rev. A: January 2015 1. General Safety & Maintenance Information The DEMTECH Services, Inc. Pro-X5 Thermoplastic Extrusion Welder, hereinafter referred to as the Pro-X5 or welder, is a high temperature and voltage piece of equipment. Always disconnect the power source before performing any service and/or maintenance procedures on the welder. -
Page 8: Maintenance
Before removing or installing spare parts or performing any other repair operations to the welder consult DEMTECH Services, Inc. or your authorized DEMTECH service center for advice on proper procedures. This will help insure a safe and successful outcome. Always make sure all screw connections are tight before attempting to operate the welder after maintenance and/or repair procedures have been performed. -
Page 9: General Product Data
DEMTECH Services, Inc. strives to make our welders easy to use and built to last. Just like all other DEMTECH Services, Inc. products, even a first time user will be productive in minutes. -
Page 10: Site Preparation
Rev. A: January 2015 4. Site Preparation Before proceeding with the unpacking and installation instructions in the following section(s), make sure the work site is prepared and ready to use the Pro-X5. You should have an adequate power source capable of providing clean Alternating Current (AC) power at 220-240 Volts at the welder rated current. -
Page 11: Unpacking And Preparation
Please notify DEMTECH Services, Inc. or your authorized DEMTECH distributor where the product was purchased in the event of any shipping damage. c. Make note of the orientation of the equipment and any packing foam inserts inside the shipping case to facilitate storage of the welder after use. - Page 12 If the welder does not power-up as described, please contact DEMTECH Services, Inc. or your authorized DEMTECH service center. Turn all three rocker switches to the “O” (OFF) position and disconnect the AC power cord.
- Page 13 Rev. A: January 2015 Figure 5.1 Figure 5.2 600-Manual_Pro-X5 RA.docx Pro-X5 Operator’s Manual Page 7...
-
Page 14: Generator Recommendations
Rev. A: January 2015 Electrical Extension Cords The Pro-X5 is capable of welding along very long seams. This ability may warrant the use of electrical extension cords. It is imperative to take into account the length and wire gauge of any extension cord used, as these factors will ultimately determine the actual operating voltage of the welder. -
Page 15: Welder Controls
Rev. A: January 2015 6. Welder Controls The Pro-X5 utilizes two temperature controllers located on the main control panel. The left controller operates the Pre-Heat temperature and the right controller operates the Plastic Heat (Barrel/molten rod) temperature (see Figure 6.1). Figure 6.1 600-Manual_Pro-X5 RA.docx Pro-X5 Operator’s Manual... -
Page 16: Recommended Temperature Settings
These factors make it impractical to create a chart that can universally cover all these varying conditions: Therefore, we recommend contacting DEMTECH Services, Inc. or your authorized DEMTECH distributor where the product was purchased to receive guidance for appropriate settings. -
Page 17: Welder Set-Up And Operation
Rev. A: January 2015 7. Welder Set-Up and Operation The initial set-up of the Pro-X5 is by far the most critical aspect for proper operation of the welder. Proper set-up not only leads to quality welding results, but also minimizes wear and tear on the welder itself. - Page 18 Rev. A: January 2015 Adjust the grip handle to the best position for the welding to be performed (see Figure 7.1). Loosen the handle by gripping the round knob and turning counter-clockwise. This will loosen the handle clamp. Position the handle within its 45° swing and tighten the handle by turning the round knob clockwise.
-
Page 19: Start A Weld
Rev. A: January 2015 7.2. Start a weld Once the welder has stabilized at the operating temperature, insert the end of the welding rod into the feed port while simultaneously powering the drill motor (see Figure 7.2). Once the welding rod has been started, it will continue to self-feed as you weld. The welder drill motor should only be operated when welding rod is being continuously fed into the welder and should never be run dry. -
Page 20: During A Weld
Rev. A: January 2015 7.3. During a Weld Keep the welding rod being fed into the welder clean and dry. Foreign material such as dust, dirt, sand and water droplets introduced into the feed port can cause premature wear to the welder. -
Page 21: Shut-Down Procedure
Rev. A: January 2015 7.6. Shut-Down Procedure When all welding operations are complete, perform the following procedure to shut-down the Pro-X5 and ready it for storage. 1. Start the drive motor to cause one or two inches of extrudate to be pumped out of the Teflon Shoe exit orifice. -
Page 22: Changing The Teflon Shoe Assembly
Do not perform service unless you are qualified and trained to do so. a. Using a 5mm hex Allen wrench, loosen the two socket head cap Screws, DEMTECH part number 605-018, located on opposite sides of the Teflon Shoe Assembly (see Figure 7.4). - Page 23 Rev. A: January 2015 b. Remove the Teflon Shoe Assembly from the Nozzle, DEMTECH part number 600-20/X4. Due to melted plastic material buildup, removal of the Shoe may require strong twisting motion clockwise and counterclockwise and significant pulling force to remove (see Figure 7.5).
-
Page 24: Factory Servicing
Carefully pack the Pro-X5 in the reusable portable shipping/storage case provided with the welder for return to DEMTECH Services, Inc. or to your authorized DEMTECH distributor where the product was purchased. Unless previous arrangements are made, shipping charges and insurance are the customer's responsibility. - Page 25 Rev. A: January 2015 Diagram 9.1 600-Manual_Pro-X5 RA.docx Pro-X5 Operator’s Manual Page 19...
-
Page 26: Service/Spare Parts Id
The item number is the upper digit in the item identification balloon. The lower digit in the balloon is the quantity used per assembly. Next, refer to the accompanying parts list to identify the corresponding DEMTECH part number. The diagrams and parts lists provided in this manual are as follows: 10.1. -
Page 27: 600-0105/X5/A, Assembly, Pro-X5 Extrusion Welder (Parts Id)
Rev. A: January 2015 10.1. 600-0105/X5/A, Assembly, Pro-X5 Extrusion Welder (Parts ID) Page 21 Pro-X5 Operator’s Manual 600-Manual_Pro-X5 RA.docx... -
Page 28: 600-0105/X5/A, Assembly, Pro-X5 Extrusion Welder (Parts List)
Rev. A: January 2015 STOCK SCREW, SET, M6 X 1.0 X 6mm LONG, CUP POINT, 18-8 STAINLESS STEEL STOCK SCREW, M6 X 1 X 14mm LONG, SOCKET HEAD CAP, 18-8 STAINLESS STEEL STOCK SCREW, M5 X 0.8 X 12mm LONG, FLAT HEAD PHILLIPS, 18-8 STAINLESS STEEL STOCK SCREW, M5 X 0.8 X 8mm LONG, BUTTON HEAD... -
Page 29: 600-100/X5/A, Assembly, Controller, Pro-X5 (Parts Id)
Rev. A: January 2015 10.3. 600-100/X5/A, Assembly, Controller, Pro-X5 (Parts ID) Page 23 Pro-X5 Operator’s Manual 600-Manual_Pro-X5 RA.docx... -
Page 30: 600-100/X5/A, Assembly, Controller, Pro-X5 (Parts List)
Rev. A: January 2015 605-E011 LED, HIGH INTENSITY, 5mm, 15 DEGREE VIEWING ANGLE, WHITE 605-E010 POWER SUPPLY, DUAL OUTPUT, +5VDC @ 3.5A / +24VDC @ 1.5A 605-E009 SWITCH, POWER/BREAKER, DPST, ON/OFF, 15A @ 240 VAC, WHITE OPAQUE 605-E007 CONTACT, 4mm DIA, DUAL CRIMP 605-E004 BLOWER, MINIATURE RADIAL, 70.2mm X 74.6mm X 47.5mm, 24 VDC 605-082... -
Page 31: 600-Barrel/X5/A, Assembly, Barrel Complete, Pro-X5 (Parts Id)
Rev. A: January 2015 10.5. 600-BARREL/X5/A, Assembly, Barrel Complete, Pro-X5 (Parts ID) Page 25 Pro-X5 Operator’s Manual 600-Manual_Pro-X5 RA.docx... -
Page 32: 600-Barrel/X5/A, Assembly, Barrel Complete, Pro-X5 (Parts List)
Rev. A: January 2015 600-D20 BEARING, THRUST 600-31/X5 CLAMP, BARREL 600-23/X4 ASSEMBLY, THERMOCOUPLE 600-20/X4 NOZZLE, BARREL OUTPUT, X4 600-03EX/A ASSEMBLY, HEAT BAND, PRO-X, W/ PLUG 600-02H-SC SCREW, M5 X 0.8 X 90mm LONG, SOCKET HEAD CAP, BLACK-OXIDE CLASS 12.9 ALLOY STEEL 600-02H MOUNT, BARREL/ DRIVE MOTOR 600-02F... -
Page 33: 600-Drill/X5/A, Assembly, Drill Motor Complete, Pro-X5 (Parts Id)
Rev. A: January 2015 10.7. 600-DRILL/X5/A, Assembly, Drill Motor Complete, Pro-X5 (Parts ID) Page 27 Pro-X5 Operator’s Manual 600-Manual_Pro-X5 RA.docx... -
Page 34: 600-Drill/X5/A, Assembly, Drill Motor Complete, Pro-X5 (Parts List)
Rev. A: January 2015 STOCK WASHER, .328" ID X .482" OD X .020" THICK, COPPER STOCK SCREW, M8 X 1.25 X 10mm LONG, BUTTON HEAD CAP, 18-8 STAINLESS STEEL 600-OIL OIL, GEAR, 75W90, 5 OZ. VOLUME 600-D100A/X5/A ASSEMBLY, GEAR BOX COMPLETE, W/ ARMATURE 600-D24.1EX SCREW, GEAR HOUSING... -
Page 35: 600-D08/X5/A, Assembly, Motor Housing Complete, Pro-X5 (Parts Id)
Rev. A: January 2015 10.9. 600-D08/X5/A, Assembly, Motor Housing Complete, Pro-X5 (Parts ID) Page 29 Pro-X5 Operator’s Manual 600-Manual_Pro-X5 RA.docx... -
Page 36: 600-D08/X5/A, Assy, Motor Housing Complete, Pro-X5 (Parts List)
Rev. A: January 2015 STOCK SCREW, #10 X 3/4" LONG, PAN HEAD PHILLIPS, HIGH-LOW, ZINC PLATED STEEL STOCK SCREW, #10 X 1/2" LONG, PAN HEAD PHILLIPS, HIGH-LOW, ZINC PLATED STEEL STOCK SCREW, #10 X 3/8" LONG, PAN HEAD PHILLIPS, HIGH-LOW, ZINC PLATED STEEL 600-D30 PLUG, "D"... -
Page 37: 600-D100/X4/A, Assembly, Gear Box Complete, W/O Armature (Parts Id)
Rev. A: January 2015 10.11. 600-D100/X4/A, Assembly, Gear Box Complete, w/o Armature (Parts ID) Page 31 Pro-X5 Operator’s Manual 600-Manual_Pro-X5 RA.docx... -
Page 38: 600-D100/X4/A, Assy, Gear Box Complete, W/O Armature (Parts List)
Rev. A: January 2015 STOCK SCREW, M4 X .7 X 20mm LONG, SOCKET HEAD CAP, 18-8 STAINLESS STEEL STOCK PIN, DOWEL, 1/8" OD X 1/2" LONG, 18-8 STAINLESS STEEL 600-D31K KEY, LARGE GEAR TO OUTPUT SHAFT 600-D31EX KEY, OUTPUT SHAFT TO EXTRUSION SCREW 600-D30/S/X4 SEAL, OUTPUT SHAFT, GEAR BOX, PRO-X4 600-D30.0... -
Page 39: 600-D100A/X5/A, Assembly, Gear Box Complete, W/ Armature (Parts Id)
Rev. A: January 2015 10.13. 600-D100A/X5/A, Assembly, Gear Box Complete, w/ Armature (Parts ID) Page 33 Pro-X5 Operator’s Manual 600-Manual_Pro-X5 RA.docx... -
Page 40: 600-D100A/X5/A, Assy, Gear Box Complete, W/ Armature (P/L)
Rev. A: January 2015 600-D100/X4/A ASSEMBLY, GEAR BOX COMPLETE, W/O ARMATURE 600-D02/X5/A ASSEMBLY, MOTOR ARMATURE, PRO-X5 ITEM PART NUMBER DESCRIPTION PARTS LIST 10.14. 600-D100A/X5/A, Assy, Gear Box Complete, w/ Armature (P/L) 600-Manual_Pro-X5 RA.docx Pro-X5 Operator’s Manual Page 34... -
Page 41: Product Warranty
DEMTECH Services, Inc.'s option, a service representative may be dispatched to the equipment location. As an additional protection, DEMTECH Services, Inc. warrants that for a period of 90 days from the date of shipment to the original buyer, pending prior authorization from DEMTECH Services, Inc., there will be no charge for service related shipping of parts and/or equipment or for authorized travel of a service representative to the equipment location.
Need help?
Do you have a question about the Pro-X5 600-0105/X5/A and is the answer not in the manual?
Questions and answers