
Related Manuals for Denkovi smartDEN IP-Maxi


Summary of Contents for Denkovi smartDEN IP-Maxi
- Page 1 ® smartDEN IP-Maxi User Manual 09 Mar 2018 smartDEN IP-Maxi Web enabled IP Controller User Manual Date: 09 March 2018 For firmware version: v1.24 / March 2018 - 1 -...
- Page 2 Apple, Mac, Mac OS, Mac OS logo are either trademarks or registered trademarks of Apple Computer Inc. in the United States and/or other countries. smartDEN is registered trademark of Denkovi Assembly Electronics LTD in European Union. Other product names and company names described in this document are trademarks or registered trademarks.
-
Page 3: Table Of Contents
® smartDEN IP-Maxi User Manual 09 Mar 2018 Content Features ......................4 Application examples ..................6 Technical parameters ..................14 Connectors, ports and led indicators ..............17 Installation ......................18 Default settings ....................30 Web access ...................... 33 HTTP XML/JSON operation ................53 SNMP ....................... -
Page 4: Features
09 Mar 2018 1. Features smartDEN IP-Maxi is an Ethernet module (IP controller) that can be used in a wide range of remote monitoring, control, measurement and data-acquisition applications. Thank to its multi-channel design (8 digital inputs, 4 analog inputs, 4 temperature inputs, 8 SPDT relays and 2 analog outputs) this device can perform simultaneously a variety of measurement and control functions. - Page 5 ® smartDEN IP-Maxi User Manual 09 Mar 2018 Real time clock (can sync up with network time servers); Power Supply: Supply voltage: 12V DC or 24V DC (selectable during purchase); Additional source voltage 12V DC or 24V DC provided to power input sensors;...
-
Page 6: Application Examples
IP-Maxi User Manual 09 Mar 2018 2. Application examples The following examples show some basic applications of smartDEN IP-Maxi. The examples are only conceptual and additional equipment/connections can be required in actual implementations. 2.1. Electrical appliances remote control applications smartDEN IP-Maxi can be used to control remotely electrical appliances (Fig. - Page 7 09 Mar 2018 2.2. Monitoring and logging applications smartDEN IP-Maxi can be used to build monitoring and logging systems. Up to 8 various kinds of sensors for temperature, humidity, distance, light etc. can be connected to the Analog Inputs of the device (Fig. 2.2). Provided SNMP and HTTP/XML/JSON APIs allow for easy integration with third-party applications.
- Page 8 09 Mar 2018 2.3. Standalone applications with sensors and electrical devices Once configured, smartDEN IP-Maxi can be used in standalone control applications. For example, the events from Digital Inputs or threshold conditions of single/differential Analog Inputs can be configured to control various devices connected to Relay outputs (Fig.
- Page 9 IP-Maxi User Manual 09 Mar 2018 2.4. Events counter smartDEN IP-Maxi provides 8 x 32-bit Counters (from 0 up to 2 -1) attached to the Digital Inputs that can be used to count various events - for example detect when a person enters in a shop through the door (Fig.
- Page 10 ® smartDEN IP-Maxi User Manual 09 Mar 2018 2.5. Web based thermo-regulator Each Relay can be set to work in Regulator mode where it can be controlled only from an Analog Input. The controller can be configured to switch different Relays upon the value of single/differential Analog Input (one input can control many Relays).
- Page 11 IP-Maxi User Manual 09 Mar 2018 Another possible application for smartDEN IP-Maxi is differential thermo-regulator very useful in cases when solar hot water panel must be monitored and controlled based on two temperature sensors values. The first sensor monitors the temperature of the panel water and the second monitors the temperature from the boiler water.
- Page 12 IP-Maxi User Manual 09 Mar 2018 2.6. Home automation smartDEN IP-Maxi can be used in a variety of home automation tasks: Climate: heating, ventilation and air conditioning; Lighting: switching On/Off the electric lights in the house; Shading: opening and closing the blinds and curtains;...
- Page 13 Start and stop the irrigation depending on humidity level by applying a control loop including a humidity or rain sensor and solenoid valve controlled by a Relay. Figure 2.8. smartDEN IP-Maxi can be used in home irrigation systems - 13 -...
-
Page 14: Technical Parameters
® smartDEN IP-Maxi User Manual 09 Mar 2018 3. Technical parameters Table 3.1. Physical parameters Parameter Value Size (L / W / H), mm 210 x 85 x 58 Weight, g Operating temperature, °C 0 to 70 Table 3.2. System parameters... - Page 15 ® smartDEN IP-Maxi User Manual 09 Mar 2018 Table 3.5. Analog inputs Parameter Value Analog inputs number Analog inputs full scale voltage range, V DC 0 up to 10 Analog inputs absolute maximum non- destructive voltage, V DC Analog inputs resolution, bits ∼10...
- Page 16 ® smartDEN IP-Maxi User Manual 09 Mar 2018 Table 3.9. Network/protocols Parameter Value Network parameters IP/Mask/Default gateway MAC lock (protection) DHCP ICMP SNMP SNMPv2c SMTP traps format SNMPv2 Web server for configuration/access Secure HTTP/XML/JSON access - 16 -...
-
Page 17: Connectors, Ports And Led Indicators
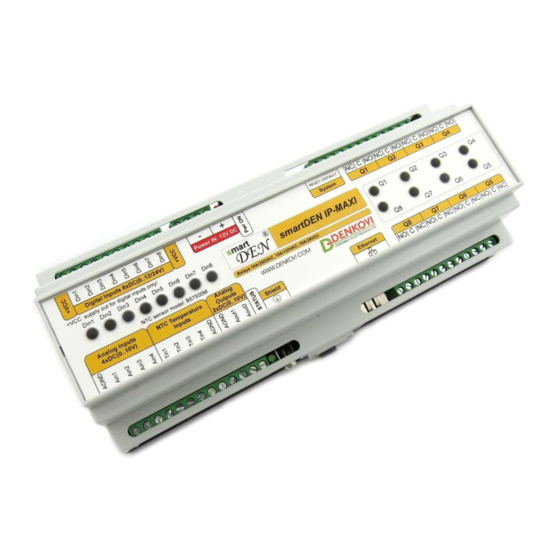
® smartDEN IP-Maxi User Manual 09 Mar 2018 4. Connectors, ports and led indicators A picture with the smartDEN IP-Maxi connectors, ports and led indicators is shown in Fig. 4.1. Figure 4.1. Device overview - 17 -... -
Page 18: Installation
5.1. Box mounting smartDEN IP-Maxi can be mounted to a standard (35 mm by 7.55 mm) DIN rail (Fig. 5.1). Attach the module to the DIN rail by hooking the hook on the back of the enclosure to the DIN rail and then snap the bottom hook into place. - Page 19 09 Mar 2018 5.2. Power supply smartDEN IP-Maxi must be powered with 12V DC stabilized and filtered voltage. After power on, the power led must be on and STATUS indicator must start blinking in 5 seconds which means the module is running normally (Fig. 5.2).
- Page 20 ® smartDEN IP-Maxi User Manual 09 Mar 2018 5.3. Connecting inputs Fig. 5.3 shows the typical connection of dry contact sensors, switches, buttons, door sensors etc. to the Digital Inputs. Fuse: 0.5A 12V+ Fuse: 1.5A Figure 5.3. Connecting SPST NO output (dry contact) sensors, switches, buttons, door sensors etc.
- Page 21 ® smartDEN IP-Maxi User Manual 09 Mar 2018 When connecting sensors with PNP output they can be powered from the additional internal 12V DC power source (Fig. 5.4). Sensor1 PNP OUT Sensor2 PNP OUT Sensor8 PNP OUT Fuse: 0.5A 12V+ Fuse: 1.5A...
- Page 22 ® smartDEN IP-Maxi User Manual 09 Mar 2018 Sensors with 0-20 mA output can be connected to the Analog Inputs as shown in Fig. 5.5. AGND Resistors: 470R, 0.250 Watts 0†20mA 0†20mA 0†20mA 12V+ Fuse: 1.5A Figure 5.5. Connecting 0-20 mA output sensors to the Analog Inputs...
- Page 23 ® smartDEN IP-Maxi User Manual 09 Mar 2018 Fig. 5.6 shows the connection of analog sensors with output from 0 up to 10V DC to the Analog Inputs. Sensor1 Sensor2 AGND 12V+ Fuse: 1.5A Figure 5.6. Connecting analog sensors with output from 0 up to 10V DC to the...
- Page 24 ® smartDEN IP-Maxi User Manual 09 Mar 2018 NTC thermistors type B57500M can be connected to the Temperature Inputs (Fig. 5.7). Rt°1 Rt°2 Rt°4 12V+ Fuse: 1.5A Rt°1 - Rt°4: B57500M Figure 5.7. Connecting NTC sensors type B57500M to the Temperature Inputs...
- Page 25 ® smartDEN IP-Maxi User Manual 09 Mar 2018 Below is shown example connection how to control load with relays (lamp). Figure 5.8. Connecting lamp to relay - 25 -...
- Page 26 Figure 5.9. Controlling led lights with analog outputs 5.4. Network connection smartDEN IP-Maxi supports AUTO-MDIX so either "crossover" or "straight- through" network cable can be used (Fig. 5.8, 5.9). Figure 5.10. Direct connection of smartDEN IP-Maxi to a computer - 26 -...
- Page 27 ® smartDEN IP-Maxi User Manual 09 Mar 2018 Figure 5.11. Connecting smartDEN IP-Maxi to a wireless router 5.5. Communication setup smartDEN IP-Maxi ships with the following default parameters: IP address: 192.168.1.100 Subnet mask: 255.255.255.0 Gateway: 192.168.1.1 Web password: admin Initially it is recommended to connect the module directly to the computer.
- Page 28 The next step is to modify the IPv4 properties (Fig. 5.12). Figure 5.13. IPv4 properties section Set the IP address of your PC to be in the same network as smartDEN IP-Maxi (Fig. 5.13). Figure 5.14. Set the IP address Finally, in the address bar of your Web-browser enter the IP address of the smartDEN IP-Maxi and press Enter, or select „Go‟...
- Page 29 If the network settings are O‟K, the login page should appear (Fig. 5.15). Figure 5.16. Login page smartDEN IP-Maxi modules connected locally can be easily scanned and found via the Denkovi Finder tool as well (Fig. 5.16). Figure 5.17. Denkovi Finder utility...
-
Page 30: Default Settings
IP-Maxi User Manual 09 Mar 2018 6. Default settings 6.1. Table with default settings The smartDEN IP-Maxi module is shipped with default (factory) settings shown in Table 6.1. The default settings can be reloaded, if necessary (see point 6.2). - Page 31 ® smartDEN IP-Maxi User Manual 09 Mar 2018 Multiple Access Enabled Enable SNMP Enabled SNMP Port Read-only Community1 public SNMP Agent Read-only Community2 read Read-write Community1 private Read-write Community2 write Enable Disabled Trap Receiver IP Address 0.0.0.0 SNMP Traps Trap Receiver Port...
- Page 32 ® smartDEN IP-Maxi User Manual 09 Mar 2018 Use Filter Description AOUT<n>, where <n> = 1..2 Analog Outputs Units 6.2. Steps for loading the default settings When necessary, the factory (default settings) may be applied so the module parameters will be returned back to those pointed out in of the current document.
-
Page 33: Web Access
7. Web access Figure 7.1. Web access To access the setup pages, start a web browser (Internet Explorer, Chrome, Mozilla Firefox or similar), and enter the smartDEN IP-Maxi IP address, for example: http://192.168.1.100 Figure 7.2. Open the device in a browser Note: You will need to have JavaScript enabled in your browser. - Page 34 ® smartDEN IP-Maxi User Manual 09 Mar 2018 current firmware version/build date and provides a link to the documentation page (Fig. 7.4). Note: The default password is admin (passwords are case sensitive). Note: When the password is entered, it is transmitted across the network in encrypted form, so eavesdropping on the data transmission will not reveal the password.
- Page 35 ® smartDEN IP-Maxi User Manual 09 Mar 2018 7.3. General settings General settings page is show in Fig. 7.6. Figure 7.6. General settings Device Name - the name of the module (max 15 symbols). Every module can have different name in your network so they can be distinguished;...
- Page 36 Enabled, the Network page must be saved and smartDEN IP-Maxi must be rebooted before obtaining an IP address; IP address - this is the IP address of the smartDEN IP-Maxi. It has to be manually assigned only if DHCP is disabled. With DHCP enabled, this field displays the currently assigned address;...
- Page 37 ® smartDEN IP-Maxi User Manual 09 Mar 2018 7.5. Date/Time Settings This page lets you adjust the date/time and set the SNTP Simple Network Time Protocol) server for auto synchronization (Fig. 7.8). Figure 7.8. Date/Time settings Date (dd/mm/yyyy) - the current date in specified format;...
- Page 38 Note: If there is no traffic between the Web-browser/HTTP client and the smartDEN IP-Maxi for time, specified by Session Timeout parameter, the session "times out" and a new login is required. Note: When Encrypt Password mode is enabled, the Multiple Access option is not taken into account, so at any given moment, only one user can be logged-in.
- Page 39 192.168.1.255. 7.7. SNMP Agent These settings let you configure the SNMPv2c (Simple Network Management Protocol) access parameters to the smartDEN IP-Maxi (Fig. 7.10). Figure 7.10. SNMP agent configuration Enable SNMP - this option enables or disables SNMP access; SNMP Port - UDP port number the SNMP agent receives requests on (default port is 161);...
- Page 40 You have to reboot the device for these settings to apply. 7.8. SNMP Traps smartDEN IP-Maxi can be configured to send SNMPv2 trap notifications triggered by Digital/Analog Input conditions (Fig. 7.11). Figure 7.11. SNMP Trap settings Enable Trap - enables or disables sending of traps to the server;...
- Page 41 ® smartDEN IP-Maxi User Manual 09 Mar 2018 7.9. Digital Inputs Digital Inputs settings page is shown in Fig. 7.12. Figure 7.12. Digital Inputs settings Description - identification string of the input (max. 7 chars); This description will appear in XML/JSON files, as well as in the Monitoring &...
- Page 42 ® smartDEN IP-Maxi User Manual 09 Mar 2018 Figure 7.13. SNMP Trap Value="0 (Off)", Trap Sending="Edge Triggered" Figure 7.14. SNMP Trap Value="0 (Off)", Trap Sending="Level Triggered" o 1 (On) – the Counter is incremented on the rising edge (0 -> 1). With SNMP Trap enabled and Trap Sending="Edge Triggered"...
- Page 43 ® smartDEN IP-Maxi User Manual 09 Mar 2018 Figure 7.16. SNMP Trap Value="1 (On)", Trap Sending="Level Triggered" o 2 (Both) – Counter update takes place on each Digital Input state change (both falling and rising edges). With SNMP Trap enabled and Trap Sending="Edge Triggered"...
- Page 44 ® smartDEN IP-Maxi User Manual 09 Mar 2018 Inputs/Counters 1, 2 and 3 These counters are implemented in software but not in hardware. Due to this there are some considerations which must be taken in mind when working with them: ...
- Page 45 ® smartDEN IP-Maxi User Manual 09 Mar 2018 7.10. Analog Inputs Analog Inputs settings page is shown in Fig. 7.19. Input 1 to Input 4 are used to measure voltage in range 0-10VDC. Input 5 to Input 8 are used to measure temperature from 10K NTC sensors B57500M (with range temperature range -55°C/-...
- Page 46 ® smartDEN IP-Maxi User Manual 09 Mar 2018 o For Input 5 to Input 8 range is from -70.0 to +300.0 degF or -55.0 to +150.0 degC; SNMP Trap - determines if the Analog Input will send SNMP trap notifications or not;...
- Page 47 ® smartDEN IP-Maxi User Manual 09 Mar 2018 following way: ������ − ������ �������������������������� = ������ + . ���������������� 1024 7.11. Relays Settings Relays settings page is shown in Fig. 7.22. Figure 7.22. Relays settings Description - identification string of the relay (max 7 chars);...
- Page 48 ® smartDEN IP-Maxi User Manual 09 Mar 2018 o Normal(DI=0) - a falling edge (1 -> 0) of the Digital Input switches the Relay Off; o Normal(DI=1) - a rising edge (0 -> 1) of the Digital Input switches the Relay o Inverse(DI=0) - a falling edge (1 ->...
- Page 49 ® smartDEN IP-Maxi User Manual 09 Mar 2018 Figure 7.24. Inverse mode: AI Threshold 1 < AI Threshold 2 Pulse, ms (x100) – if set to non-zero, the Relay operates in pulse mode. The pulse duration is set in tenths of second (for example value of 20 means 2 seconds).
- Page 50 ® smartDEN IP-Maxi User Manual 09 Mar 2018 7.13. Monitoring & Control This page is used to monitor the states of the Digital and Analog Inputs as well as to switch On/Off the Relays and set the values of Analog Outputs (Fig. 7.26).
- Page 51 ® smartDEN IP-Maxi User Manual 09 Mar 2018 Figure 7.27. Week Schedule page Relays - select a group of Relays that should be switched; State - define the state (On/Off) for the selected group of relays; Hour - time the group of relays will be switched at;...
- Page 52 ® smartDEN IP-Maxi User Manual 09 Mar 2018 Figure 7.28. Log off 7.16. Reboot Figure 7.21. Reboot - 52 -...
-
Page 53: Http Xml/Json Operation
Web-browser. The custom application acts as a HTTP client, sending HTTP GET requests to the smartDEN IP-Maxi (Fig. 8.1). As a reply the smartDEN IP-Maxi returns data as either JSON or XML file for parsing and/or processing by the custom application. - Page 54 Retrieving current state in XML format 8.1.3. After successful login the custom application can obtain the smartDEN IP-Maxi current state by request to the current_state.xml page. The reply contains a page in XML format (Fig. 8.2).
- Page 55 ® smartDEN IP-Maxi User Manual 09 Mar 2018 Figure 8.2. file with current values 8.2. JSON access JSON login (encrypted password) 8.2.1. The encrypted login sequence is similar to those for the XML access: - 55 -...
- Page 56 ® smartDEN IP-Maxi User Manual 09 Mar 2018 Step 1: Request http://192.168.1.100/current_state.json Reply (login required): "CurrentState": { "LoginKey": "65156" } Step 2: Request (password is sent as a parameter) http://192.168.1.100/current_state.json?pw=28237099263eabfd88626124a822c64c Reply (password is O’K, login accepted): "CurrentState": { "DigitalInput": [ {"Name": "DIn1", "Value": "1"},...
- Page 57 ® smartDEN IP-Maxi User Manual 09 Mar 2018 Figure 8.3. JSON file with current values 8.3. Multiple XML/JSON access With Multiple Access option selected (see 7.6) the password should be passed as a non-encrypted parameter with each request: - 57 -...
- Page 58 Multiple Access is not allowed when Encrypt Password option is enabled. 8.4. Parameters After a login the custom application can also control the smartDEN IP-Maxi by sending parameters (name/value pairs) with the HTTP GET request. Valid parameters and values are shown in Table 8.1.
-
Page 59: Snmp
9.1. SNMP Agent smartDEN IP-Maxi supports SNMPv2c protocol - operations get, get-next, get- bulk, set. The provided SNMP commands are described in the smartDEN IP-Maxi file. Most of the parameters can be read/configured by SNMP. Two community strings are used: Read-only for reading and Read-write for setting new values of the parameters. - Page 60 ® smartDEN IP-Maxi User Manual 09 Mar 2018 Table 9.4. Relays Start OID End OID Description Access Syntax 8.2.3.1.2.0 8.2.3.1.2.7 Relay Description DisplayString (SIZE(0..7)) 8.2.3.1.3.0 8.2.3.1.3.7 Relay Working Mode Integer {Multiple(0),Regulator(1)} Relay ← Digital Input No 8.2.3.1.4.0 8.2.3.1.4.7 Integer (0..8) Relay ←...
- Page 61 ® smartDEN IP-Maxi User Manual 09 Mar 2018 Week Schedule 9.1.5. Table 9.8. Week Schedule Start Date Description Access Syntax x.8.5.1.0 Week Schedule Start Date DisplayString Table 9.9. Week Schedule Rows Start OID End OID Description Access Syntax 8.5.2.1.2.0 8.5.2.1.2.29...
-
Page 62: Security Considerations
09 Mar 2018 Security considerations The smartDEN IP-Maxi runs a special firmware and do not use a general-purpose operating system. There are no extraneous IP services found on general-purpose operating systems (e.g. Telnet, FTP, Finger, etc.) that can be particularly vulnerable. -
Page 63: Mechanical Drawing
® smartDEN IP-Maxi User Manual 09 Mar 2018 11. Mechanical drawing Device dimensions Figure 11.1. - 63 -...
Need help?
Do you have a question about the smartDEN IP-Maxi and is the answer not in the manual?
Questions and answers