
Related Manuals for Edgetech STARMUX IV


Summary of Contents for Edgetech STARMUX IV
- Page 1 STARMUX IV U S E R H A R D W A R E M A N U A L 0023786_REV_A November 2020 EdgeTech 4 Little Brook Road West Wareham, MA 02576 Tel: (508) 291-0057 Fax: (508) 291-2491 www.EdgeTech.com...
- Page 2 The information, figures, and specifications in this manual are proprietary. They are issued in strict confidence on condition that they not be copied, reprinted, or disclosed to a third party, either wholly or in part, without the prior written consent of EdgeTech. Any reproduction of EdgeTech supplied software or file sharing is strictly prohibited.
-
Page 3: Attention - Read This First
ATTENTION – READ THIS FIRST! All personnel involved with the installation, operation, or maintenance of the equipment described in this manual should read and understand the warnings and cautions provided below. CAUTION! This equipment contains devices that are extremely sensitive to static electricity. -
Page 4: Hardware Variations And Compatibility
HARDWARE VARIATIONS AND COMPATIBILITY The Starmux IV contains both standard and proprietary hardware. At times, EdgeTech may change the standard components due to their availability or performance improvements. Although the component manufacturers and their models and styles may change from unit to unit, replacement parts will generally be interchangeable. -
Page 5: About This Document
Purpose of this Manual The purpose of this manual is to provide the user with information on the setup and use of EdgeTech's Starmux IV. Although this manual encompasses the latest operational features of the Starmux IV, some features may be periodically upgraded. -
Page 6: Warranty Statement
All equipment manufactured by EdgeTech is warranted against defective components and workmanship for a period of one year after shipment. Warranty repair will be done by EdgeTech free of charge. Shipping costs are to be borne by the customer. Malfunction due to improper use is not covered in the warranty, and EdgeTech disclaims any liability for consequential damage resulting from defects in the equipment's performance. -
Page 7: Software Service Overview
EdgeTech provides software services free of charge. This software agreement does not address customer- specified modifications or enhancements. These services may be ordered separately. Furthermore, EdgeTech software upgrades are meant for the sole use of EdgeTech customers. Any reproduction of EdgeTech-supplied software or file sharing is strictly prohibited. -
Page 8: Returned Material Authorization
USTOMER ERVICE correspondences as well. All returned materials must be shipped prepaid. Freight collect shipments will not be accepted. EdgeTech will pay freight charges on materials going back to the customer after being evaluated and/or repaired. CAUTION! If your product is a portable topside, never attempt to ship it in the 6U case alone. - Page 9 4. Small items can be shipped prepaid directly to EdgeTech by FedEx, DHL, UPS, Airborne, etc. 5. If the equipment is the property of EdgeTech (formerly EG&G Marine Instruments Division), please insure for full value. 6. Fax one invoice, packing list, and a copy of the airway bill to EdgeTech upon shipment.
-
Page 10: Customer Service
CUSTOMER SERVICE Customer service personnel at EdgeTech are always eager to hear from users about our products. Your feedback is welcome and is a valuable source of information which we use to continually improve these products. We encourage you to contact EdgeTech Customer Service to offer any suggestions or to request... -
Page 11: Company Background
USBL positioning systems, and bathymetric systems—that have become standards in the industry. EdgeTech has also consistently anticipated and responded to future needs through an active research and development program. Current efforts are focused on the application of cutting-edge CHIRP and acoustic... -
Page 12: Table Of Contents
3.3 Starmux IV Control, Indicator, and Connection Configurations ........... 3-4 3.3.1 Starmux IV Controls, Indicators, and Connections ..............3-5 3.3.2 Starmux IV and EdgeTech 2U Computer Controls, Indicators, and Connections ....3-7 3.3.3 Starmux IV Connection and Feature Functionality by System ..........3-10 3.4 Connecting the System Components .................. - Page 13 3.4.2 Connecting and Attaching the Tow Cable to the Towfish ............ 3-13 3.4.3 Connecting the Tow Cable to the Starmux IV ..............3-13 3.4.4 Connecting a FSK Trigger ...................... 3-13 3.4.5 Connecting a 1PPS Trigger ....................3-14 3.5 Activating the Unit ........................3-14 4.0: MAINTENANCE ........................
-
Page 14: List Of Figures
Figure 2-1: Starmux IV ICD (Click Image for Embedded .pdf) ..............2-3 Figure 2-2: Starmux IV in 6U Case ICD ....................... 2-3 Figure 3-1: Starmux IV Front and Back Panel Controls, Indicators and Connections ........ 3-5 Figure 3-2: Labeled Front Panels of Starmux IV with EdgeTech Computer ..........3-7 Figure 3-3: Labeled Rear Picture of Starmux IV and EdgeTech Computer .......... - Page 15 LIST OF TABLES Table 2-1: Starmux IV Configuration Specifications ................... 2-2 Table 3-1: Starmux IV Front and Back Panel Controls, Indicators and Connection Descriptions ....3-6 Table 3-2: Starmux IV Controls, Indicators, and Connections Descriptions ..........3-9 Table 3-3: Starmux IV Port, Connector and Feature Functionality By System ........3-10 Table 3-4: Reserved IP Numbers By System and Component (Do Not Assign These) ......
-
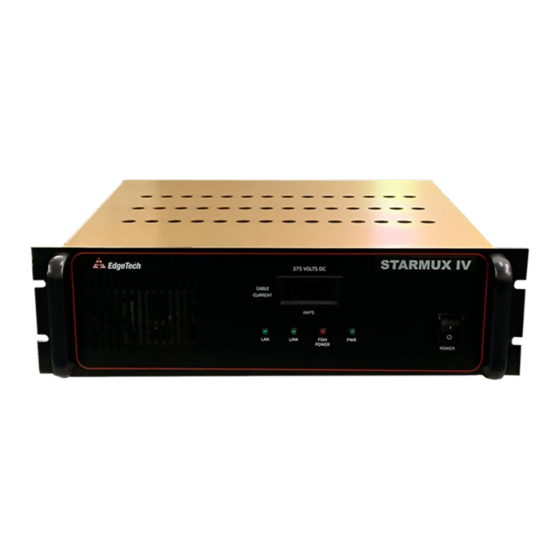
Page 16: Overview
EdgeTech's Discover application installed on it. The Starmux IV features a modern digital current display, four status indicator lights, and connectors for supporting survey devices and triggers. It can be bought independently, combined with an EdgeTech Computer in a rugged 6U case, or as a component of an EdgeTech towfish system. -
Page 17: Specifications
2.0: SPECIFICATIONS Starmux IV Digital Link Rack Mount (Starmux IV DL and 2U Computer in 6U Case) Size 13.2 cm (5.2 in.) high 76.2 cm (30 in.) high 48.2 cm (19 in.) wide 76.2 cm (30 in.) wide 50.5.2 cm (20 in.) deep 64.9 cm (23.37 in.) deep... -
Page 18: Mechanical Drawings
2.1 Mechanical Drawings Figure 2-1: Starmux IV ICD (Click Image for Embedded .pdf) Figure 2-2: Starmux IV in 6U Case ICD... -
Page 19: Setup And Activation
Discover software manuals. 3.1 Unpacking and Inspecting Carefully unpack the Starmux IV and check the packing list to ensure that all items are present. If any items are missing, report it to . Likewise, if any items have been damaged during... -
Page 20: Starmux Iv Controls, Indicators, And Connections
NAV Input for Network Broadcast Telemetry/Subsea Serial Ports Fuses Power Switch 1PPS Connection Grounding Sea Cable Connector FSK Sync Optional Trigger Connectors Line VAC Network Ethernet Ports Connector Connector Figure 3-1: Starmux IV Front and Back Panel Controls, Indicators and Connections... -
Page 21: Table 3-1: Starmux Iv Front And Back Panel Controls, Indicators And Connection Descriptions
RIGGER 1PPS Connector instructions. Trigger Connectors (2) Optional digital ports are provided for triggers. Serial Com Ports (6) Serial ports for external device connections. Table 3-1: Starmux IV Front and Back Panel Controls, Indicators and Connection Descriptions Starmux IV 0023786_REV_A... -
Page 22: Starmux Iv And Edgetech 2U Computer Controls, Indicators, And Connections
3.3.2 Starmux IV and EdgeTech 2U Computer Controls, Indicators, and Connections The Starmux IV and EdgeTech 2U computer are mounted in a rugged 6U case. Components can be removed and rack-mounted if desired. Descriptions of Starmux IV and 2U Computer controls, indicators, and connections are found below. -
Page 23: Figure 3-3: Labeled Rear Picture Of Starmux Iv And Edgetech Computer
PC COM-1 Connectors Connector PC USB Connectors Figure 3-3: Labeled Rear Picture of Starmux IV and EdgeTech Computer FRONT PANEL STARMUX IV Rocker switch. Turns the Starmux Digital Link on or off. The rear line PC COM-3 Starmux IV Power Switch power switch needs to be turned on for this switch to function. -
Page 24: Table 3-2: Starmux Iv Controls, Indicators, And Connections Descriptions
DB-9 female connector. RS-232 serial port that connects to the COM-1 NAV Connector navigation system when the Starmux IV is not used. COM-3 Connector DB-9 female connector. General-purpose RS-232 serial port. Table 3-2: Starmux IV Controls, Indicators, and Connections Descriptions... -
Page 25: Starmux Iv Connection And Feature Functionality By System
3.3.3 Starmux IV Connection and Feature Functionality by System Starmux IV port, connection, and feature functionality vary by the type of EdgeTech system it is connected to. Detailed product manuals with detailed feature information can be found on the EBSITE and a reference table is provided below to see what features are currently enabled with standard systems. -
Page 26: Figure 3-4: Starmux Iv And Optional Edgetech Computer Ethernet Port Connections
Ethernet Port of EdgeTech Computer Figure 3-4: Starmux IV and Optional EdgeTech Computer Ethernet Port Connections NOTE: If an optional EdgeTech computer is purchased, the ethernet cable must be plugged into the right side ethernet port on the computer and... -
Page 27: Figure 3-5: Windows Manual Ip Properties Window
3-12 A data connection between the computer and Starmux IV digital link is configured by setting the network interface card IPv4 address on the computer. If you have purchased the Starmux IV with an EdgeTech computer, this will preconfigured. If you are connecting... -
Page 28: Connecting And Attaching The Tow Cable To The Towfish
Always connect the tow cable to the towfish first. The tow cable connector is connected to the Sea Cable Connector on the rear panel of the Starmux IV. Sea Cable Connector Figure 3-6: Starmux IV Rear Panel Tow Cable Connector 3.4.4 Connecting a FSK Trigger... -
Page 29: Connecting A 1Pps Trigger
3.4.5 Connecting a 1PPS Trigger The Starmux IV comes standard with a 1PPS (1 Pulse Per Second) Trigger BNC connector. A Pulse Per Second (PPS) signal is a feature of many GPS units to provide an accurate timing signal to synchronize various devices to a precise, common clock. - Page 30 1. Turn on the computer and launch the Discover application. 2. Turn on the line power switch on the back panel of the Starmux IV Digital Link. This switch can be left in the on position at all times if desired.
-
Page 31: Maintenance
The Starmux IV is rigidly built and therefore requires little maintenance. Occasionally cleaning the cooling fan vents on the Starmux IV and computer by blowing the dust out with canned air may prevent overheating after years of dust buildup and extend the unit's life. Beyond this, no maintenance is required. -
Page 32: Troubleshooting
The POWER switch in the front Verify that both POWER or rear of the unit is not turned switches are on. Verify that the Starmux IV is connected to AC power. Check No AC power. the AC power source. Verify that the fuse is good. -
Page 33: Table 5-1: Starmux Iv Troubleshooting Guide
192.9.0.101 with "Port" set to 1700. Verify the tow vehicle using a different digital link. Verify the The tow vehicle is faulty. digital link with a different tow vehicle. Table 5-1: Starmux IV Troubleshooting Guide Starmux IV 0023786_REV_A...
Need help?
Do you have a question about the STARMUX IV and is the answer not in the manual?
Questions and answers