oventrop R-Tronic RT B Operating Instructions Manual
Valves, controls + systems with mote 320 wireless actuator
Hide thumbs
Also See for R-Tronic RT B:
- Installation and operating instructions manual (88 pages) ,
- Instruction manual (12 pages) ,
- Operating instructions manual (56 pages)

Subscribe to Our Youtube Channel
Related Manuals for oventrop R-Tronic RT B


Summary of Contents for oventrop R-Tronic RT B
- Page 1 Valves, controls + systems R-Tronic RT B R-Tronic RTF B R-Tronic RTFC K with mote 320 wireless actuator Operating instructions...
-
Page 2: Table Of Contents
Contents R-Tronic with mote 320 Contents Page General information ............5 Validity of the operating instruction ............5 Type plate ................... 5 Extent of supply ..................5 1.3.1 Extent of supply of the R-Tronic wireless thermostat ......5 1.3.2 Extent of supply of the mote 320 wireless actuator ......6 Contact .................... - Page 3 R-Tronic with mote 320 Contents 7.3 Wall attachment of the fixing plate and flush-mounted power pack 19 Installation with mains adaptor and table stand .......20 Installation of the mote 320 wireless actuator ........21 Commissioning ..............22 Menu structure .................. 22 Initial commissioning ................22 8.2.1 Establishment of the radio connection between the R-Tronic wireless thermostat and the mote 320 wireless actuator .......22 8.2.2 Teaching in of further mote 320 wireless actuators ......23 8.2.3 Calibration run ..................23...
- Page 4 Contents R-Tronic with mote 320 Room climate ..................30 Information ..................31 Malfunctions ..............32 10.1 Teach in and calibration process failed ..........32 10.2 Error messages of the R-Tronic wireless thermostat ......32 10.3 Colour codes of the info LEDs at the mote 320 wireless actuator ...33 Removal ................34 Disposal................34 115068283#EN-V01.05.2020...
-
Page 5: General Information
German. Validity of the operating instruction The operating instructions are valid for the R-Tronic RT B, R-Tronic RTF B, R-Tronic RTFC K wireless thermostat in combination with the mote 320 wireless actuator (connection thread M30 x 1.5 or squeeze connection; to be ordered separately). -
Page 6: Extent Of Supply Of The Mote 320 Wireless Actuator
GERMANY www.oventrop.com Technical services Phone: +49 (0) 29 62 82-234 Declaration of conformity Oventrop GmbH & Co. KG hereby declares that this product complies with the basic requirements and other relevant provisions of the EU Directives concerned. The declaration of conformity can be obtained from the manufacturer. Symbols used Highlights important information and further explanations. -
Page 7: Safety-Related Information
Operating safety is only guaranteed if the product is used correctly. Depending on the model, the following functions are available: • The R-Tronic RT B wireless thermostat shows you the room temperature and and offers you the possibility to control the room temperature. •... -
Page 8: Availability Of The Operating Instructions
Safety-related information R-Tronic with mote 320 2.3.2 Availability of the operating instructions Any person working on the product has to read and apply these operating instructions and all other valid documents (e.g. accessory manuals). The operating instructions must be available at the installation location of the product. f Hand these operating instructions and all other relevant documents (e.g. accessory manuals) over to the user. -
Page 9: Technical Description
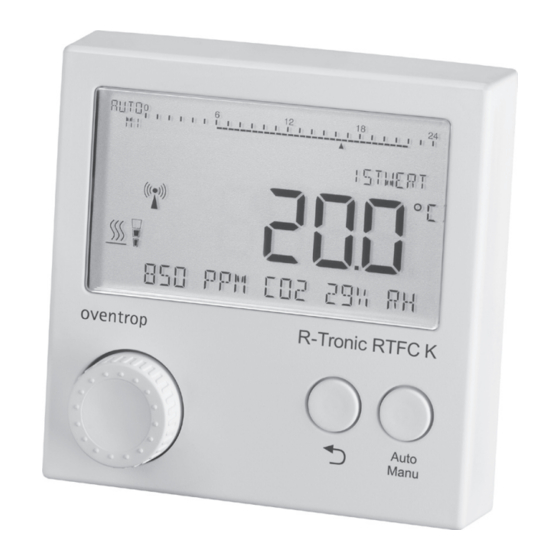
R-Tronic with mote 320 Technical description Technical description Construction of the R-Tronic wireless thermostat XXxxxxXXXXXXXXXXXXXXXXXXX Auto Manu Illust. 1: Overview of the R-Tronic wireless thermostat Display of the operating mode, time profile, day of the week and time Text line for notes Auto/Manu button Back button Menu button 115068283#EN-V01.05.2020... - Page 10 Technical description R-Tronic with mote 320 The following symbols appear on the display of the R-Tronic wireless ther- mostat: Battery status (fully charged, low, empty) Menu lock active At least 1 slave is taught in Heating mode Power supply via flush-mounted power pack or mains adaptor Warning symbol for notes and error messages Heating Window open Recommendation for room ventilation...
-
Page 11: Construction Of The Mote 320 Wireless Actuator
R-Tronic with mote 320 Technical description Construction of the mote 320 wireless actuator Illust. 2: Overview of the mote 320 wireless actuator The wireless thermostat has to be ordered separately. Type plate Aktor ID Casing cover 115068283#EN-V01.05.2020... -
Page 12: Functional Description
Technical description R-Tronic with mote 320 Info LED Release tab Antenna Info LED Battery case Teach in/calibration button Functional description The R-Tronic wireless thermostat in combination with the mote 320 wireless actuator serves the radio controlled temperature control of rooms or zones in a room. -
Page 13: Menu Structure
R-Tronic with mote 320 Technical description Menu structure Main Menu Room Climate Information Functions Settings Time Profile Temperatures CO2 Alert Programme Limitation Boost Installation Version Threshold Selection Teach in / Profile On / Off Min/Max Vacation Setting Diagnosis Teach out / / Day / Night / Delete slave Individual Profile... - Page 14 Technical description R-Tronic with mote 320 The boost function is only available if at least one wireless actuator has been taught in. Only the R-Tronic RTF and R-Tronic RTFC K wireless thermostats feature the air humidity function. Only the R-Tronic RTFC K wireless thermostat features the CO function.
-
Page 15: Technical Data Of The R-Tronic Wireless Thermostat
R-Tronic with mote 320 Technical description Technical data of the R-Tronic wireless thermostat Radio frequency 868.3 MHz Transmission power max. 10 mW Radio range within the Depending on materials and interference building sources Transmission interval 150 seconds Operation mode Type 1 (EN 60730-1) Protection IP20 (EN 60529) Protection class... -
Page 16: Technical Data Of The Mote 320 Wireless Actuator
Operating elements R-Tronic with mote 320 Casing ABS (ASA), traffic white similar to RAL 9016 Casing dimensions 85 x 85 x 35 mm (W x H x D) 3.5.1 Technical data of the mote 320 wireless actuator Radio frequency 868.3 MHz Transmission power max. 10 mW Radio range within the Depending on materials and interference building sources... -
Page 17: Accessories And Spare Parts
The following items are available as accessories: Designation Item no. Flush-mounted power pack with wall bracket 1150692 (for R-Tronic RT B and R-Tronic RTF B wireless thermostat) Mains adaptor with table stand (for R-Tronic 1150694 RT B and R-Tronic RTF B wireless thermostat) Window contact... -
Page 18: Installation
Installation R-Tronic with mote 320 Chemical Do not store together with solvents, chemicals, influences acids, fuels or similar substances Installation Installation location • The R-Tronic wireless thermostat should be installed at a location in the room where a good circulation of air is guaranteed. •... -
Page 19: Wall Attachment Of The Fixing Plate And Flush-Mounted Power Pack
R-Tronic with mote 320 Installation Illust. 4: Wall attachment of the fixing plate 3. Insert the R-Tronic wireless thermostat into the fixing plat from above. f The R-Tronic wireless thermostat is now ready for the teach in process (see section 8.2.1 on page 22). Wall attachment of the fixing plate and flush-mounted power pack DANGER Danger of electric shock when connecting the flush-mounted... -
Page 20: Installation With Mains Adaptor And Table Stand
Installation R-Tronic with mote 320 pack and the 230 Volt connection in the flush socket. 2. Screw the fixing plate to the flush socket. 3. Switch on the electrical circuit. 4. Insert the R-Tronic into the fixing plate from above. Illust. 5: Wall attachment of the fixing plate and flush-mounted power pack f The R-Tronic wireless thermostat is now ready for the teach in process (see section 8.2.1 on page 22). -
Page 21: Installation Of The Mote 320 Wireless Actuator
Risk of scalding on a hot radiator During the installation process, hot water may flow through the radia- tor as the radiator valve is open. f If necessary, wear safety gloves during installation. The mote 320 wireless actuator fits integrated valve sets and thermo- static valves with connection thread M 30 x 1.5. Oventrop offers an adapter set (item no.: 1011445) for the connection thread M 30 x 1. The mote 320 wireless actuator with squeeze connection fits without adapter to integrated distributors as well as RA valves and VHS fittings of the company Danfoss. 1. Remove the casing cover of the wireless actuator. To do this, press in the two release tabs and pull off the cover at the same time. -
Page 22: Commissioning
Commissioning R-Tronic with mote 320 Commissioning Menu structure To access the menu, proceed as follows: 1. Press and hold the menu button for at least 1 second to access the MAIN MENU. The MAIN MENU includes the following main areas: TEMPERA- TURES , TIME PROFILE, FUNCTIONS, SETTINGS, ROOM CLIMATE and INFORMATION. -
Page 23: Teaching In Of Further Mote 320 Wireless Actuators
R-Tronic with mote 320 Commissioning f The radio connection between the R-Tronic and the wireless actuator is established. 8.2.2 Teaching in of further mote 320 wireless actuators After having taught in the first mote 320 wireless actuator successfully, the message SUCCESSFUL is displayed for a few seconds. After that the message TEACH IN appears again. If you confirm this message by pressing the menu button, you have to option to teach in further wireless actuators. - Page 24 Commissioning R-Tronic with mote 320 Illust. 6: Position of the teach in button on the back of the window contact Teach in button 115068283#EN-V01.05.2020...
-
Page 25: Installation Of The Window Contact
R-Tronic with mote 320 Commissioning 8.2.5 Installation of the window contact Illust. 7: Overview of the window contact Wireless sensor module Notch on the wireless sensor module Magnet Notch on the magnet 115068283#EN-V01.05.2020... -
Page 26: Operation
Operation R-Tronic with mote 320 1. Pull off the adhesive tape from the back of the wireless sensor module. 2. Align the sensor module so that the notch points inwards towards the window and attach it onto the frame. To also detect the tilting movement of the window, the sensor should be mounted in the upper quarter of the frame. -
Page 27: Heating Profile On
R-Tronic with mote 320 Operation 9.2.1 Heating profile ON When the R-Tronic is put into operation, a default profile is always effective, which regulates the room temperature constantly to 20 °C (continuous heating mode = PROFILE ON). The R-Tronic display signalises the activation of this default profile with a continuous line below the time bar over the full 24-hour scale (display additionally shows MANU): Illust. 8: Default heating profile 9.2.2 Heating profile OFF If you do not wish continuous heating to a fixed temperature, switch off the... -
Page 28: Individual Profiles
Operation R-Tronic with mote 320 9.2.4 Individual profiles Individual profiles can be defined by you. To select an individual profile, proceed as follows: 1. Go to the MAIN MENU (see section 8.1 on page 22). 2. Select the menu option TIME PROFILE. 3. Select the menu option PROGRAMME SELECTION. 4. Select the menu option INDIVIDUAL PROFILE To create an individual profile, proceed as follows: 1. Go to the MAIN MENU (see section 8.1 on page 22). 2. Select the menu option TIME PROFILE. 3. -
Page 29: Vacation
R-Tronic with mote 320 Operation heating phase the message BOOST ACTIVE disappears. 9.3.2 Vacation You can use the vacation mode if you are not at home for several days or weeks and want to define a lower setback temperature for a room in order to save energy. 1. Go to the MAIN MENU (see section 8.1 on page 22). 2. Select the menu option FUNCTIONS. 3. Select the menu option VACATION. 4. Select the menu option PROGRAMMING. 5. Set the period of your absence and the desired setback temperature. 6. Confirm your entry with ACTIVATE. X The vacation mode is activated. You can cancel the vacation mode at any time (for example because you returned earlier). -
Page 30: Menu Lock
Operation R-Tronic with mote 320 9.4.2 Menu lock When the menu lock is active, it is no longer possible to access the main menu (see section8.1 on page 22). When the menu lock is active, you can still change the set valve with the help of the menu button and switch between the time profiles with the help of the Auto/Manu button. To release the menu lock, press and hold the (+) and (-) buttons for at least 3 seconds. 9.4.3 Display of the actual value / humidity The R-Tronic RTF B and R-Tronic RTFC K permanently measure the humidity in the room and show it as percentage value in the text line of the display. -
Page 31: Information
R-Tronic with mote 320 Operation measures the proportion of carbon dioxide (CO2) in the room air and it is dis- played if it rises above a previously defined level. In humans, excessive CO2 levels have a negative effect on the ability to concentrate and lead to fatigue. The R-Tronic RTFC K displays the CO2 values in PPM units. A PPM value of e.g. -
Page 32: Malfunctions
Malfunctions R-Tronic with mote 320 Malfunctions 10.1 Teach in and calibration process failed If the teach in process has failed, the LEDs of the mote 320 wireless actuator flash red three times (see separate operating instructions of the wireless actuator). This can have the following reasons: • The radio connection is disturbed or the radio range is limited, e.g. due to unfavourable spatial conditions. -
Page 33: Colour Codes Of The Info Leds At The Mote 320 Wireless Actuator
R-Tronic with mote 320 Malfunctions MOTOR BLOCKED Stem (motor operated) of the mote 320 actuator blocked. MOTOR DEFECT Drive motor defective. POWER SUPPLY DEFECT Temporary poor power supply. TIME PROFILE INVALID Incorrect programming of individual time profile. RADIO DISTURBANCE Radio communication disturbed. ENOCEAN ERROR Possible error at installed wireless module. -
Page 34: Removal
Removal R-Tronic with mote 320 Red running Calibration hat not (yet) been carried out Removal Before removing the mote 320 wireless actuator, press the teach in/calibra- tion button of the wireless actuator for at last 2 seconds so that the stem is retracted. The LEDs start flashing green (fast) 5 times. Unscrew the wireless actuator from the valve. Disposal Directive 2012/19/UE WEEE: Waste electrical and electronic components (WEEE) must... - Page 35 R-Tronic with mote 320 115068283#EN-V01.05.2020...
- Page 36 OVENTROP GmbH & Co. KG Paul-Oventrop-Straße 1 59939 Olsberg GERMANY www.oventrop.com 115068283#EN V01.05.2020...
Need help?
Do you have a question about the R-Tronic RT B and is the answer not in the manual?
Questions and answers