Table of Contents
Advertisement
Quick Links
Advertisement
Table of Contents

Subscribe to Our Youtube Channel
Related Manuals for Nustep TRANSITT


Summary of Contents for Nustep TRANSITT
- Page 1 Real-time Biofeedback System...
-
Page 3: Table Of Contents
Table of Contents Introduction ........................................ 4 Safety Instructions ....................................5 Installation and Placement ..................................7 AC Adapter Use ......................................8 TRANSITT™ Features ....................................9 StrideLock® ........................................10 Making Adjustments ..................................11 Exercise Positions ..................................13 Getting Started ..................................14 Admin Controls ..................................21 Console Operation and Navigation ............................23 TRANSITT™... -
Page 4: Introduction
NuStep designed and developed TRANSITT based on scientific research and with years of feedback from health care providers and fitness experts working with clients in a variety of settings. -
Page 5: Safety Instructions
Important Safety Instructions CAUTION WARNING This is the safety CAUTION indicates a WARNING indicates a alert symbol. It is potentially hazardous potentially hazardous used to call attention situation, which if not situation, which, if to instructions avoided, may result not avoided, could concerning personal in minor or moderate result in death or... - Page 6 Important Safety Instructions CAUTION CAUTION See your physician before presence of children and/or pets. beginning any exercise program. The heart rate, watts, calories, Supervision is required for users user weight, and force with a disability or medical measurement displays are not condition.
-
Page 7: Installation And Placement
To ensure safe and effective operation of your Use proper lifting Transitt, place on a flat, stable surface. Adjust technique. leveler feet as required. The minimum amount of required free space around the equipment is 24 inches (61 cm) for the sides, and 12 inches (30 cm) for the front and rear. -
Page 8: Ac Adapter Use
The Transitt is powered by an AC adapter. Use the adapter provided with the equipment. The AC adapter may be plugged into the front or rear jacks of the Transitt. Plug the adapter into an appropriate power outlet. Ensure power cable is routed in a manner that prevents tripping hazards and prevents damage to the adapter. -
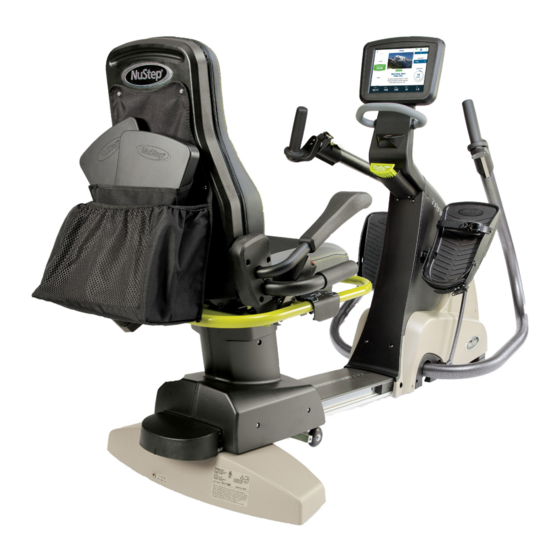
Page 9: Transitt™ Features
Feature Overview Console Grab Ring StrideLock Upper Arm Armrest Arm Lock Lever Accessory Seat Swivel Release Lever Seat Recline Lever Leveler Feet Seat Release Lever Foot Pedals... -
Page 10: Stridelock
StrideLock® The StrideLock feature allows users to lock the Transitt’s arm handles and foot pedals. Locking the arms and pedals stabilizes the product and makes it easier for users to get on and off the Transitt. NOTE: The StrideLock is engaged (locked) for all the isometric programs on the TRANSITT. -
Page 11: Making Adjustments
Making Adjustments Adjusting Seat Distance 1. Place feet on pedals. 2. Lift the front green lever to unlock seat. 3. Using feet, slide seat forward or backward to adjust distance. 4. Check that knee has a slight bend when leg is nearly fully extended. 5. - Page 12 Making Adjustments Adjust Arm Handle Length 1. Pull the green release lever up on the arm handle to unlock. 2. Slide handle in or out to adjust length. 3. Check that elbow is slightly bent when arm is fully extended (for many people this may be the same number as their seat position).
-
Page 13: Exercise Positions
TRANSITT icon Dynamic Exercise Dynamic stepping exercises on the TRANSITT use the same physical set up. After adjusting arm handles and seat distance, there should be a slight bend in the exerciser's knees and elbows at nearly full extension when performing dynamic stepping exercises. -
Page 14: Getting Started
Getting Started Start Up 1. Press the power button located on the back of the console to turn the TRANSITT on or off. Power button 2. Once TRANSITT powers up, the initialization screen opens. Press Tap to Initialize to begin the initialization process. - Page 15 Getting Started Shut Down 1. Tap on the Log Out button in the lower right-hand corner of the screen. Log Out 2. Press the power button on the back of the console to turn off. Creating User Accounts New exercisers can create a user account and log in. With user accounts, exercisers can save their settings and store last used settings.
- Page 16 Getting Started 4. Enter the exerciser’s first and last name, email address and a password (the email and password are case sensitive). NOTE: If the exerciser does not have an email address, they will log in as a Guest (see page 19).
- Page 17 Getting Started Part 2. Fingerprint Log-In Enroll Using the fingerprint log in feature is optional. If an exerciser declines to use this feature, they will be required to enter their email and password each time they log in. To enroll: 1.
- Page 18 Getting Started 1. Tap Continue to finish. The Main Menu screen opens. Logging In Once the exerciser has an account, they can log in either by entering their email address and password on the log-in screen or by placing their finger on the fingerprint scanner (if this was set up during the enrollment process).
- Page 19 Getting Started Guest Exerciser An exerciser without an account can log on to TRANSITT as a guest. Settings and data are not saved for subsequent sessions. 1. Tap on the Guest tab. Guest 2. Place both feet on the pedals. The system will calculate the exerciser’s weight.
- Page 20 Getting Started When a guest exerciser’s session times out, they will press Continue to return to their session.
-
Page 21: Admin Controls
This application should be accessed and administered by assigned users only. 1. From the Main Menu, tap on the Admin Controls icon to open. Serial Number – serial number of TRANSITT unit. The serial number can also be found on the back of the unit (see Warranty section). - Page 22 Admin Controls Zero Weight Scale – Use when the exerciser weight readout does not register zero when there is NO weight on any part of the system. Sensor Health Panel – Use for system diagnostics. Pedal Position – Displays pedal positions. Enroll Instructor –...
-
Page 23: Console Operation And Navigation
Console Operation and Navigation Main Menu After logging in, the Main Menu opens and displays program options. The options are organized by Exercise Type and Body Region. Exercise Type Body Region Admin User Logout Controls Weight Main Menu screen Exercise Type Use to select the type of exercise/training. - Page 24 Console Operation and Navigation Program Menus 1. To select a program from the Main Menu, e.g., Cardio, tap on the Cardio icon. The Cardio exercise menu opens: Balanced Power icon 2. To select a program from the menu, e.g., Balanced Power, tap on the icon to open that program.
- Page 25 Program name – Identifies which TRANSITT program is in use. Reset – Clears the exerciser’s results to start over. Transitt icon – Provides instructions for physical set up on the Transitt. It also provides current and previous position settings relevant to that program.
- Page 26 Console Operation and Navigation Program Dashboard The Program Dashboard displays bar graphs and data in real-time to provide visual feed- back related to the exerciser’s performance during the exercise session. Metric Bars The Metric Bar, located at the bottom of the screen, displays functions, settings and exercise metrics relevant to the selected Dynamic or Isometric exercise program.
- Page 27 Console Operation and Navigation Exercise Metric Displays Tap the center metric display fields to open an expanded list of metric options. Select the metric that will display during exercise. Options include: Elevation, Kcal, Miles, ROM (range of movement), Steps, SPM (steps per minute) and Watts. Load Level Tap the Load field to set the resistance of the dynamic exercise.
-
Page 28: Transitt™ Programs
TRANSITT™ Programs The TRANSITT features 12 dynamic and isometric exercise and training programs. Isometric Dynamic Dynamic Isometric Dynamic Dynamic Isometric Isometric Isometric Dynamic Isometric Isometric & Dynamic... -
Page 29: Ankle Control
Ankle Control Main Purpose To train motor control and movement of the foot and ankle using real-time visual biofeedback. Activity Description Isometric - Exerciser shifts the center-of- pressure applied by the foot to the pedal to cross target boundary lines. Quick Facts Exercise Type Body Region... - Page 30 Ankle Control adjacent to the left pedal. Right pedal position is 0.0 2. Lock the arm handles and foot pedals in place by pressing down and releasing the StrideLock lever. It will be in the UP position. StrideLock lever in the UP position.
- Page 31 Ankle Control Rest arms at sides or on arm rests Legs are nearly straight at full extension Program Setup Part 1. Adjust Boundary Lines Boundary lines can be adjusted to accommodate foot size along with the comfort, goals, limitations and needs of the exerciser. 1.
- Page 32 Ankle Control NOTE: (Optional) Boundary line adjustments can be customized in several ways: a. To adjust the bottom boundary line, shift the pressure applied by the foot on the pedal towards the heel (dorsiflexing). Then, drag the bottom boundary line to the desired target position relative to the ball. b.
- Page 33 3. To complete a rep, move the center-of-pressure pressure indicator to cross both the horizontal target boundary lines, or both the vertical target boundary lines. NOTE: This program can also be used to work combined movement of the ankle by crossing the boundary lines diagonally. Related TRANSITT™ program:...
-
Page 34: Balanced Power
Balanced Power Main Purpose To identify work imbalances between the left and right limbs and to encourage symmetrical use of the left and right limbs during exercise. Activity Description Dynamic - exerciser steps using arms and/ or legs and tries to achieve, or improve, balance in the power output between opposing limbs. - Page 35 Balanced Power 1. Unlock the arm handles and foot pedals by pressing down on the green StrideLock lever. It will be in the DOWN position. StrideLock lever in the DOWN position 2. Place NuStability foot pads on the pedals and attach foot straps. NuStability Attach foot pads...
- Page 36 Balanced Power 4. Adjust handles so elbows have a slight bend when the handle is at its furthest point. Elbow with slight bend Program Setup Part 1. Set Initial Load Level The Load option sets the resistance of the dynamic exercise. The load levels range from 1 to 15 in increments of 0.5 and can be changed at any time.
- Page 37 Balanced Power Part 2. Set timer type There are two possible timer settings: Count Up and Count Down. 3. Tap on the Timer button to switch between the options. Timer 4. Select timer option. a. Select Count Up to track the time of all dynamic stepping for the entire exercise session.
- Page 38 Balanced Power 6. Select the metric to display. Using the Program 1. Begin stepping using arms and/or legs. The goal is to work the left and the right arms equally and the left and the right legs equally. NOTE: It is not necessarily desirable to have the arms and the legs contribute equally.
- Page 39 Balanced Power NOTE: Since this program collects and stores balance information while the exerciser uses other dynamic stepping programs, it can be used to identify imbalances over the duration of the entire exercise session. 4. Use the Goal indicator as a visual target for using left and right limbs equally. NOTE: The default goal tolerance setting is 10%.
- Page 40 All dynamic stepping exercises will be used to calculate the L vs R of Total Exercise. This allows the exerciser to use other dynamic stepping programs while continuing to monitor the power contributions of the left and right limbs. Related TRANSITT™ programs:...
-
Page 41: Climbing
Climbing Main Purpose To build cardiovascular endurance and for strength training. Activity Description Dynamic – exerciser steps to reach elevation milestones. Quick Facts Exercise Type Body Region Common Use Cases • Cardio fitness • Muscle strength • Endurance • Long-term management of chronic conditions Navigate to the Program 1. - Page 42 Climbing Physical Set Up Positions may vary depending on the exerciser’s goals or limitations or the trainer’s discretion. The information regarding positioning is suggested as a starting point. 1. Unlock the arm handles and foot pedals by pressing down on the green StrideLock lever.
- Page 43 Climbing 4. Adjust handles so elbows have a slight bend when arm is nearly fully extended. Elbow with slight bend Program Setup Part 1. Set Initial Load Level The Load option sets the resistance of the dynamic exercise. The load levels range from 1 to 15 in increments of 0.5 and can be changed at any time.
- Page 44 Climbing 4. Select timer option. a. Select Count Up to track the time of all dynamic stepping for the entire session. b. Select Count Down to set the timer for a defined period of time. Part 3. Change Exercise Metric Displays On the Metric Bar, there are options to display three different exercise metrics.
- Page 45 NOTE: The total elevation is displayed on the left side of the screen. a. Today – includes all stepping completed during that day’s exercise session, i.e., the stepping completed in other TRANSITT programs contributes to the overall elevation gained for that day.
-
Page 46: Controlled Leg Force Test
Controlled Leg Force Test Main Purpose To obtain repeatable and objective measures of the isometric force production of the right and left legs. Activity Description Isometric – Exerciser applies push or pull force to the pedals with a controlled effort to reach a target. - Page 47 Controlled Leg Force Test 2. Lock the arm handles and foot pedals by pressing down and releasing the green StrideLock lever. It will be in the UP position. StrideLock lever in the UP position Program Setup PART 1. Select Test Mode 1.
- Page 48 Controlled Leg Force Test b. For the Pull test, position the seat so that the legs are nearly straight and attach foot straps. Rest arms at sides or on arm rests Attach foot straps Legs are nearly straight NOTE: Adjust as needed if any position increases joint pain. 3.
- Page 49 Controlled Leg Force Test Using the Program 1. Apply a push or pull force to the pedals with a controlled effort. The goal is to move the blue bar graphs up to the green target bands. NOTE: This is not a timed test so the exerciser can make multiple attempts to push or pull the force band up to the target band.
- Page 50 Press and hold the green target band for the left or the right leg, then slide to the desired level. This sets the goals for the individual legs. c. Tap on the Target box and enter the desired value from the numeric keypad that opens. Press Continue. Green target band Target Scale Related TRANSITT™ programs...
-
Page 51: Force Goals
Force Goals Main Purpose For strength and muscle endurance training of the arms and legs. Activity Description Dynamic – exerciser steps using either push or pull force to reach a force goal. Quick Facts Exercise Type Body Region Common Use Cases •... - Page 52 Force Goals StrideLock lever in the DOWN position 2. Adjust seat so knees have a slight bend when pedals are at their furthest point. Knee with slight bend 3. Adjust handles so elbows have a slight bend when the handles are at their furthest point.
- Page 53 Force Goals Program Setup PART 1. Select Mode The program can be used for training of the arms or legs, in either push or pull modes. 1. Tap Push or Pull to select the training mode. 2. Tap Arms or Legs to select the body region to work. a.
- Page 54 Force Goals PART 2. Set Goal Target The green target band represents the force goal the exerciser is trying to reach. 3. Set the goal target using one of the following ways. a. Tap on the scale between the two bar graphs and slide to the desired level. This sets the goal for both limbs.
- Page 55 Force Goals PART 4. Set Timer Type There are two possible timer settings: Count Up or Count Down. 6. Tap on the Timer option to switch between the timer types. Timer 7. Select timer option. a. Select Count Up to track the time of all stepping for the entire session. b.
- Page 56 Force Goals 9. Tap on the desired metric to display. Using the Program 1. Begin stepping. The goal is to push the black Max Force line above the green Goal band for the selected limb and mode. 2. Watch the blue bar graphs for real-time feedback on the amount of power being produced by each limb while stepping.
- Page 57 Force Goals Related TRANSITT™ programs...
-
Page 58: Intensity & Duration
Intensity & Duration Main Purpose To monitor exercise intensity or range of limb movement and to provide feedback on the quality of exercise performed. Activity Description Dynamic – stepping, within a variety of selectable intensity parameters, towards a time goal. Quick Facts Exercise Type Body Region... - Page 59 Intensity & Duration 1. Unlock the arm handles and foot pedals by pressing down on the green StrideLock lever. It will be in the DOWN position. StrideLock lever in the DOWN position 2. Place NuStability foot pads on the pedals (optional). NuStability pads optional 3.
- Page 60 Intensity & Duration 4. Adjust handles so elbows have a slight bend when the handle are at their furthest points. Elbow with slight bend Program Setup PART 1. Select Intensity Parameter This selection changes how the exercise intensity is displayed on the graphs. There are nine parameter options.
- Page 61 Intensity & Duration PART 2. Set Exercise Time Goal A time goal can be set when the goal is to maintain a specific intensity or range of movement for set duration of time. The default exercise time is 5 minutes. NOTE: The Intensity &...
- Page 62 Intensity & Duration 6. Use the up/down arrows to set initial resistance. PART 4. Set Timer Type There are two possible timer settings: Count Up and Count Down. NOTE: The Count Up and Count Down time options are independent of the Intensity &...
- Page 63 Intensity & Duration Select metric to display. Using the Program 1. Begin stepping. Watch the bar graphs for real-time feedback on the amount of power (Watts) produced by the arms and legs over time. NOTE: The exerciser can use the feedback to adjust the intensity of their exercise to meet their specific goals, needs or limitations.
- Page 64 All dynamic stepping exercise is tracked and stored together during each exercise session. The exerciser can open the Intensity & Duration program and view the intensity data for the exercise that has been completed in other programs. Related TRANSITT™ programs:...
-
Page 65: Iso Arm Strength
Iso Arm Strength Main Purpose For highly controlled isometric strength, muscle activation and endurance training of the arms. Activity Description Isometric – Push or pull locked handles for a selected number of reps and sets to reach goal. Quick Facts Exercise Type Body Region Common Use Cases... - Page 66 Iso Arm Strength 5. Adjust the right and left handles to the desired length. Optimal arm position depends on desired training goal. 6. Move right and left pedals so that they are adjacent. NOTE: The right pedal position is shown as 0.0 on the screen. Right pedal position is 0.0 7.
- Page 67 Iso Arm Strength 3. In the Number of Sets and Number of Reps sections, tap on the up/down arrows to define the number of sets and reps required to complete the exercise. 4. In the Rep Hold Time section, tap on the up/down arrows to adjust how long the exerciser needs to hold at, or above, the goal band in a single rep.
- Page 68 Iso Arm Strength Using the Program 1. Apply push or pull force to the handles with a controlled effort. The goal is to move the blue active force bars up to the green target bands. 2. Hold the blue active force bar at, or over, the green target band for the set hold time.
- Page 69 The handles can be offset by changing the length of one handle or the pedal position to address the limitations, needs and goals of the exerciser. • Isometric strengthening is frequently used by individuals with painful or very weak muscles and/or joints. Related TRANSITT™ programs: Arms mode Arms mode...
-
Page 70: Isometric Leg Endurance Test
Isometric Leg Endurance Test Main Purpose This test provides objective, controlled and repeatable measures of isometric muscle endurance for the left and right legs. Activity Description Isometric – Exerciser holds an isometric contraction of the lower extremities until fatigue. Quick Facts Exercise Type Body Region Common Use Cases... - Page 71 Isometric Leg Endurance Test Right pedal position is 0.0 2. Lock the handles and pedals, by pressing down and releasing the StrideLock lever. It will be in the UP position. StrideLock lever in the UP position. 3. Position seat so that knees are bent. NOTE: Adjust as needed if this position increases joint pain.
- Page 72 Isometric Leg Endurance Test 1. The exerciser is weighed to determine the target force for the threshold test. NOTE: The target is set at 0.625 x body weight for each leg. 2. Select leg to test. The program allows for testing one or both legs. Tap Continue. 3.
- Page 73 Isometric Leg Endurance Test Using the Program Endurance Test 1. Push the legs with a controlled effort. The goal is to move the blue force bars up to the green target bands. 2. Hold the blue force bar inside of the green goal bar for as long as possible. NOTE: Each leg is tested independently.
- Page 74 Isometric Leg Endurance Test 5. If desired, tap Redo Test to perform the test again. Related TRANSITT™ programs:...
-
Page 75: Iso Leg Strength
Iso Leg Strength Main Purpose For highly controlled isometric strength, muscle activation and endurance training of the legs. Activity Description Isometric - Apply a push or pull force to locked pedals for a selected number of reps and sets to reach specified goal. Quick Facts Exercise Type Body Region... - Page 76 Iso Leg Strength Physical Setup Positions for this training will vary depending on the exerciser’s goals or limitations or the trainer’s discretion. The information regarding positioning is suggested as a starting point. 5. Move the left and right pedals to an adjacent position. NOTE: The right pedal position is shown as 0.0 on the screen when it’s adjacent to the left.
- Page 77 Iso Leg Strength 9. For Pull training, fasten the foot straps. Attach foot straps for Pull training Program Setup PART 1. Set up screen 1. Sit with feet on the pedals and legs completely relaxed to measure resting leg force. Tap Continue when ready.
- Page 78 Iso Leg Strength 4. Tap on the up/down arrows to adjust the number of sets and reps required to mark the exercise as complete. 5. Tap on the up/down arrows to adjust the hold time for the exerciser to reach above the goal band in a single rep.
- Page 79 2. Hold the blue active force bar at, or over, the green target band for the set hold time. 3. Repeat the exercise for the selected number of reps and sets. NOTE: Screen prompts will communicate when the exerciser completes the reps and sets and the program. Target band Active force Related TRANSITT™ programs:...
-
Page 80: Pace Partner
Pace Partner Main Purpose For reaching and maintaining a set stepping pace and monitoring the extension length of each step. Activity Description Dynamic – exerciser steps to maintain a target pace around a track. Quick Facts Exercise Type Body Region Common Use Cases •... - Page 81 Pace Partner 5. Unlock the arm handles and foot pedals by pressing down on the StrideLock lever. It will stay in the DOWN position. StrideLock lever in the DOWN position 6. Place NuStability pads on the pedals (optional). NuStability pads (optional) 7.
- Page 82 Pace Partner 8. Adjust handles so there is a slight bend in the elbows when the handles are extended to their furthest points. Elbow with slight bend Program Setup PART 1. Select Target Pace The program defaults to a pace of 60 steps per minute (SPM). To adjust the target stepping pace: 1.
- Page 83 Pace Partner desired target pace. Press Continue. 2. Tap on the blue ball and slide to NOTE: The pace target circle can be turned off by sliding the ball all the way to the left. PART 2. Set Extension Length Target The Extension Length Target display provides visual feedback of step length.
- Page 84 Pace Partner 5. Use up/down arrows to set initial resistance. PART 4. Set Timer Type There are two possible timer settings: Count Up or Count Down. 6. Tap on the Timer option to switch between timer types. Timer 7. Select timer option. a.
- Page 85 Pace Partner 8. To change one of the three displays, tap on a metric in the Metric Bar. Metric options 9. Select metric to display from the expanded list that opens. Using the Program 1. Begin stepping. The exerciser’s SPM pace is represented by the green ball. The target pace is represented by the white circle.
- Page 86 The blue bar columns provide feedback on the stepping length performance of the left and right legs. 4. Refer to the Laps display to see how many laps have been completed. Set Pace Current Pace Blue bar column Laps Related TRANSITT™ programs:...
-
Page 87: Paddle Ball
Paddle Ball Main Purpose Training for motor control, muscle endurance and strength for arms, legs, ankles and feet. Activity Description Isometric – Use push or pull force in a variety of modes to move paddle(s) and keep ball in motion. Quick Facts Common Use Cases Exercise Type... - Page 88 Paddle Ball Arm Modes 1. Adjust handles to the same length. 2. Move the left and right pedals to an adjacent position. NOTE: The right pedal position is shown as 0.0 on the screen when adjacent to the left. 3. Lock arm handles and foot pedals by pressing down and releasing the StrideLock lever.
- Page 89 Paddle Ball 4. Fasten foot straps for Pull exercise. Leg modes targeting ankle movement 1. Move right and left pedals so that they are adjacent. NOTE: The right pedal position is shown as 0.0 on the screen See image on previous page.
- Page 90 Paddle Ball 5. Rest arms at sides, on lap or arm rests to keep movement restricted to legs. Program Setup Part 1. Define program settings Paddle Ball has nine modes that use push and/or pull exercises for arms and/or legs. 1.
- Page 91 Paddle Ball 4. Select exercise mode. There are 4 two-paddle modes and 5 single-paddle modes. Two-paddle options The left limb competes against the right. The left limb controls the paddle on the left side of the screen and the right limb controls the paddle on the right. Two-Paddle screen Left paddle Right paddle...
- Page 92 Paddle Ball Single-paddle options The left and the right limbs work together to control the movement of the paddle - regardless of which paddle (left or right) is active. Single-Paddle screen Left paddle Single-paddle options include: Left-Right Balance – Arms or Legs. The left-right motion of the paddle is controlled by the balance of force applied to the handles or pedals by the left and right limbs.
- Page 93 Paddle Ball Part 2. Adjust Paddle Controls The size of the paddles can be adjusted to increase or decrease the level of difficulty. 5. While in the Settings screen, tap Paddle Controls to open the menu. Paddle Controls 6. Use the up/down arrows to increase or decrease the paddle size.
- Page 94 Paddle Ball 8. Move the sliders to set the force for Ceiling (up) and Floor (down) movement. Tap Continue. Minimum force value Maximum force value 9. The minimum and maximum forces represent the range of force needed to get the middle of the paddle to the top and bottom of the screen. a.
- Page 95 Paddle Ball Adjust Ball Speed 11. Select desired speed. Tap Continue. Using the Program 1. Tap the start button in the lower left corner to begin. The green ball will begin moving across the screen. 2. Depending on the limb mode and paddle mode, apply force or shift the center- of-pressure on the pedals to move the paddle(s).
- Page 96 Paddle Ball toes, and downward when the center-of-pressure shifts toward the heel. NOTE: The amount of force applied to the pedal does not contribute to paddle movement. Only the foot’s center of pressure will affect the paddle. e. Left-Right Balance (Single-paddle mode) To move the paddle to the left, apply more force with the left arm or leg than with the right arm or leg.
- Page 97 5. Note the Force Readouts to see how much force is being applied by each limb. 6. Note the Runtime as it counts up during the exercise session. Related TRANSITT™ programs:...
-
Page 98: Weight Bearing Program
Weight Bearing Program Main Purpose To allow isometric and dynamic training for exercisers with weight bearing limits for one or both legs. Activity Description Isometric and Dynamic – The exerciser is notified when the force applied to the pedal(s) exceeds the set weight bearing limit. - Page 99 Weight Bearing Program 2. Lock arm handles and foot pedals by pressing down and releasing the StrideLock lever. It will be in the UP position. StrideLock lever in the UP position. 3. Move the seat and handles to the desired position for isometric exercise. For Dynamic Exercise: 1.
- Page 100 Weight Bearing Program PART 2. Set Force Limits The limit is displayed in percentage of body weight (%BW). 2. Enter the limit. Tap Set Limit. NOTE: Setting force limits for one leg will automatically set the same force limit for the other. The limit notification for the other leg will not be active until the toggle is switched to On.
- Page 101 3. Refer to Count Over Limit for the number of times the force limit was exceeded in the Weight Bearing program and while using other TRANSITT programs. 4. Refer to Seconds Over Limit for the number of seconds spent over the limit in the Weight Bearing program and while using other TRANSITT programs.
-
Page 102: Maintenance
Check sensor of use. Recommend health in accordance quarterly checks at with the applicable minimum. instructions published by NuStep. * Use a non-abrasive spray cleaner and a soft cloth to clean the Transitt. Unplug the equipment before cleaning. -
Page 103: Warranty
Warranty To view or print your Transitt warranty or software end user license (EULA) online, go to: www.nustep.com If you have any questions about your warranty or EULA, please contact Customer Service, 800-322-4434 or support@nustep.com. Customers outside the United States and Canada may obtain warranty information from the local distributor in the country where the product was sold. -
Page 104: Customer Service
Customer Service Contact NuStep, LLC customer service for assistance with your Transitt. Please have the serial number and a complete description of the problem so our product specialists can better assist you. Product specialists can be reached via e-mail or phone at: E-mail: support@nustep.com... -
Page 105: Technical Data
340 lbs (154 kg) Dimensions: 73” (185 cm) (length/height/width) 49” (125 cm) 30” (76 cm) USB Port The Transitt console includes a USB host port. Standards UL 1647, CSA C22.2#68 Generator resistance Range 0 - 1400 watts Braking system and stepping... -
Page 106: Us Fcc Compliance
US FCC Compliance US FCC Compliance Statement: Note: This equipment has been tested and found to comply with the limits for a Class B Digital Device, pursuant to Part 15 of the FCC Rules. These limits are designed to provide reasonable protection against harmful interference in a residential installation. - Page 108 No part of this manual may be reproduced or transmitted in any form or by any means, electronic or mechanical, for any purpose without the express written permission of NuStep, LLC. © Copyright December 2018 by NuStep, LLC. NuStep® and Transforming Lives® are registered trademarks of NuStep, LLC.
Need help?
Do you have a question about the TRANSITT and is the answer not in the manual?
Questions and answers