Advertisement
Table of Contents
- 1 Your New VHX-64P-GTO Kit Includes
- 2 Installation
- 3 4. Place the VHX Spacer over the Back of the Bezel.
- 4 5. Secure the VHX System to the Spacer.
- 5 6. Connect the CAT5 Cable to the System.
- 6 7. Re-Install the Cluster into the Vehicle Using Stock Hardware.
- 7 WARNING: this Product Can Expose You to Chemicals Including Lead.
- Download this manual
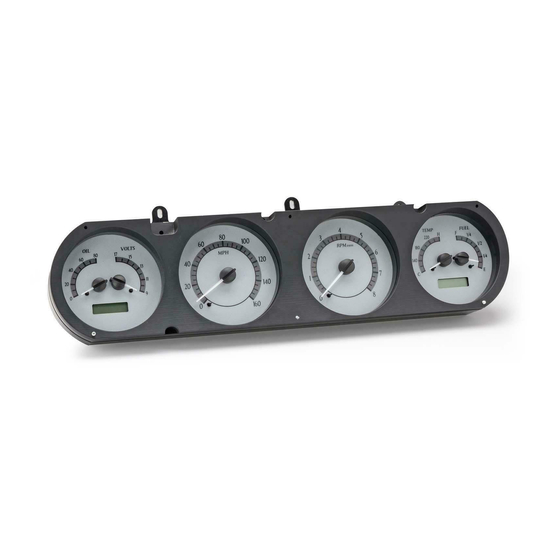
Your new VHX-64P-GTO kit includes:
VHX Display
VHX Spacer
Universal Sender Pack
Switch Assembly
Installation
1. Remove the stock gauge cluster from the dash and save all hardware for reassembly.
VHX-64P-GTO
Dakota Digital VHX Instrument Installation
For 1964-'67 GTO/LEMANS/TEMPEST
Installation Manuals
CAT5 Cable
(3) Block Off
Lenses
(6) 2" 6-32 Pan Head Screws
(3) 1/2" 6-20 Pan Head Screws
(3) 1/2" 6-20 Flat Head Screws
Control Box
Manual # 650421B
Advertisement
Table of Contents

Related Manuals for Dakota Digital VHX-64P-GTO


Summary of Contents for Dakota Digital VHX-64P-GTO
- Page 1 VHX-64P-GTO Dakota Digital VHX Instrument Installation For 1964-’67 GTO/LEMANS/TEMPEST Your new VHX-64P-GTO kit includes: (3) Block Off Lenses VHX Display VHX Spacer Universal Sender Pack (6) 2" 6-32 Pan Head Screws (3) 1/2" 6-20 Pan Head Screws Installation Manuals (3) 1/2" 6-20 Flat Head Screws...
- Page 2 2. Remove the stock gauges, separator plate, and lens from the bezel. The only item to be reused is the original front bezel; the other pieces can be discarded. Now is a good time to clean or refinish the bezel. 3.
- Page 3 5. Secure the VHX system to the spacer with the provided six (6) 2” screws (white arrows), and then to the bezel with the three (3) ½” pan head screws (black arrows). 6. Connect the CAT5 cable to the system. As the assembled cluster is installed into the dash, take care when routing this cable to the control box mounting location.
Need help?
Do you have a question about the VHX-64P-GTO and is the answer not in the manual?
Questions and answers