Christie Mirage SST User Manual
Hide thumbs
Also See for Mirage SST:
- Installation and setup manual (78 pages) ,
- Technical reference (66 pages) ,
- Instruction sheet (5 pages)
Table of Contents
Advertisement
Quick Links
Advertisement
Table of Contents

Related Manuals for Christie Mirage SST


Summary of Contents for Christie Mirage SST
- Page 1 User Guide 020-102993-01 Mirage SST...
- Page 2 The warranty does not apply to any product where the serial number has been removed or obliterated. The warranty also does not apply to any product sold by a reseller to an end user outside of the country where the reseller is located unless (i) Christie has an office in the country where the end user is located or (ii) the required international warranty fee has been paid.
-
Page 3: Table Of Contents
Setting the image resize preset......... . 26 Mirage SST User Guide 020-102993-01 Rev. 1 (06-2019) Copyright 2019 Christie Digital Systems USA, Inc. All rights reserved. ©... - Page 4 Setting up 1D color uniformity......... . 38 Mirage SST User Guide 020-102993-01 Rev. 1 (06-2019) Copyright 2019 Christie Digital Systems USA, Inc. All rights reserved. ©...
- Page 5 Setting the remote access level......... . 40 Communicating with Mirage SST through Art-Net....... 41 Art-Net channel listing.
- Page 6 Running the Mirage SST interrogator........
-
Page 7: Introduction
For complete Mirage SST product documentation and technical support, go to www.christiedigital.com. Third-party products This projector is certified to work only with certain specified third-party components. Use only Christie approved third-party components with the projector. Using non-approved components with the projector can lead to potential safety hazards and void the projector warranty. -
Page 8: Installation Safety And Warning Guidelines
Caution! If not avoided, the following could result in minor or moderate injury. • ELECTRICAL and BURN HAZARD! Use caution when accessing internal components. • Only Christie qualified technicians are authorized to use the tools provided in the toolbox. Mirage SST User Guide 020-102993-01 Rev. 1 (06-2019) Copyright 2019 Christie Digital Systems USA, Inc. -
Page 9: Ac Power Precautions
• SHOCK HAZARD! A dedicated, protected ground or earth wire must be installed on the product by Christie qualified technicians or electricians before it can be connected to power. • SHOCK HAZARD! Disconnect the product from AC before installing, moving, servicing, cleaning, removing components, or opening any enclosure. -
Page 10: Light Intensity Hazard Distance
2.0 meters (global installations) above any surface upon which any persons are permitted to stand. • E—Represents the top view of the projector. • F—Represents the side view of the projector. Mirage SST User Guide 020-102993-01 Rev. 1 (06-2019) Copyright 2019 Christie Digital Systems USA, Inc. All rights reserved. ©... - Page 11 Controlled Area No Direct Exposure to Beam Shall be Permitted". • The Christie Laser Projection System Installation Checklist must be fully completed after the installation and sent to lasercompliance@christiedigital.com. A copy can remain on-site. This checklist can be found as a separate document in the accessory box with the manual.
-
Page 12: Product Labels
Learn about the labels that may be used on the product. Labels on your product may be yellow or black and white. General hazards Hazard warnings also apply to accessories once they are installed in a Christie product that is connected to power. Fire and Shock Hazard To prevent fire or shock hazards, do not expose this product to rain or moisture. -
Page 13: Mandatory Action
Laser Product - Risk Group 3 according to IEC 60825-1: 2014 and IEC 62471-5:2015 Indicates the product is certified for use with IPG Photonics Model RGB-100-3P Part number 168-101103-XX laser. Mirage SST User Guide 020-102993-01 Rev. 1 (06-2019) Copyright 2019 Christie Digital Systems USA, Inc. All rights reserved. ©... -
Page 14: Additional Safety Hazards
Indicates high leakage current. Earth connection essential before connecting the power supply. Product documentation For installation, setup, and user information, see the product documentation available on the Christie website. Read all instructions before using or servicing this product. 1. Access the documentation from the Christie website: •... -
Page 15: Projector Overview
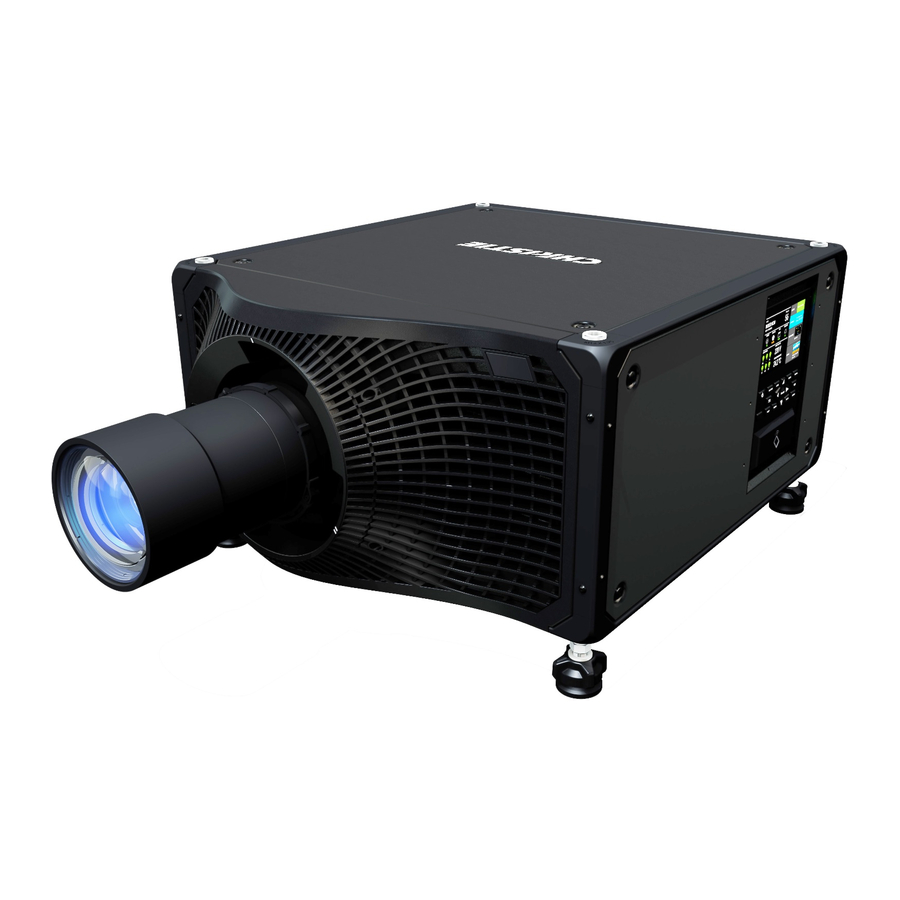
4K images at 120 frames per second. Mirage SST provides several design and installation advantages. Its small form factor allows it to be installed independently, or as part of a multi-projector array, into tight, challenging environments. The remote light source also allows the chilling equipment to be located away from the projector head where its noise will not impact the audience’s enjoyment of the show. -
Page 16: How The Projector Works
LCD display to provide information at-a-glance How the projector works The Mirage SST accepts a variety of input signals for projection on front or rear projection screens, typical in commercial or other large screen applications. High-brightness light is generated by a laser illumination source, then fed to the projector through a fiber optic cable, where it is modulated by three Digital Micromirror Device (DMD) panels responding to incoming data streams of digitized red, green and blue color information. - Page 17 Provides access to the list of test patterns. Input Displays the signal for the currently selected input. Provides access to the list of input signals. Mirage SST User Guide 020-102993-01 Rev. 1 (06-2019) Copyright 2019 Christie Digital Systems USA, Inc. All rights reserved. ©...
-
Page 18: Ir Remote Keypad
The IR remote keypad controls the projector by way of wireless communications from a battery- powered infrared (IR) transmitter. Button Description Powers on the projector light source. Opens the aspect ratio dialog. Mirage SST User Guide 020-102993-01 Rev. 1 (06-2019) Copyright 2019 Christie Digital Systems USA, Inc. All rights reserved. ©... - Page 19 Shows or hides the on-screen display menus. Turns the remote backlight on. Male 3-pin XLR connector for wired option. Lock/unlock the keypad. Battery door. Mirage SST User Guide 020-102993-01 Rev. 1 (06-2019) Copyright 2019 Christie Digital Systems USA, Inc. All rights reserved. ©...
-
Page 20: Operating The Projector
Learn how to turn on and off the projector and the meaning of the status indicators. Performing initial system start-up Learn how to turn on all components of the Mirage SST system for the first time: chiller, laser illumination source, and projector head. - Page 21 On the projector, the Status > Laser Info > Laser Bank State menu displays the message "Warming Up". When that message disappears, the lasers are ready. It typically takes the Mirage SST User Guide 020-102993-01 Rev. 1 (06-2019) Copyright 2019 Christie Digital Systems USA, Inc. All rights reserved. ©...
-
Page 22: Turning On The System
4. If the breaker is off, on the projector beside the AC inlet, move the AC breaker/switch to the on position. The projector boots into standby mode after approximately 30 seconds. Mirage SST User Guide 020-102993-01 Rev. 1 (06-2019) Copyright 2019 Christie Digital Systems USA, Inc. All rights reserved. ©... - Page 23 10 to 15 minutes to warm up when turning on the first time from the off position. This could be longer if the start-up temperatures are approaching minimum or Mirage SST User Guide 020-102993-01 Rev. 1 (06-2019) Copyright 2019 Christie Digital Systems USA, Inc. All rights reserved. ©...
-
Page 24: Turning Off The System
Turning off the system Learn how to turn off all components of the Mirage SST system: projector head, laser and chiller. When powering off in preparation for inspection or maintenance, always disconnect from AC. 1. To turn the light source off using the projector keypad or remote, press and hold the button until you hear a beep. -
Page 25: Projector Led Shutter Indicators
The shutter is closed. In standby, the shutter is always automatically closed and the magenta light is muted. Shutter open The shutter is open. Mirage SST User Guide 020-102993-01 Rev. 1 (06-2019) Copyright 2019 Christie Digital Systems USA, Inc. All rights reserved. ©... -
Page 26: Adjusting The Image
Adjusting the image Adjust the projector image. Christie recommends warming the lens before completing these procedures as focus may change as the lens warms. Selecting screen image orientation Specify the orientation to use for the image. The projector supports front projection, rear projection, front projection inverted, or rear projection inverted. -
Page 27: Resetting The Lens To Home Position
Controls the level of lens warnings displayed. 1. Select MENU > Configuration > Lens Settings > Lens Warnings. 2. Select the appropriate lens warning level: Mirage SST User Guide 020-102993-01 Rev. 1 (06-2019) Copyright 2019 Christie Digital Systems USA, Inc. All rights reserved. ©... -
Page 28: Adjusting Primary Colors
1. Select MENU > Configuration > Color Correction by x,y. 2. Adjust the slider or enter the measured color values of the primary color component you selected. Mirage SST User Guide 020-102993-01 Rev. 1 (06-2019) Copyright 2019 Christie Digital Systems USA, Inc. All rights reserved. ©... -
Page 29: Adjusting Color By Saturation
Signal color correction Adjust the video signal color as required. For best results, Christie recommends setting all color and gamma settings to Auto Detect. Adjusting the color space Determine how the color components are decoded for accurate color in the display. -
Page 30: Selecting The Color Correction Mode
Enables or disables the detection of film motion. 1. Select MENU > Image Settings > Advanced Image Settings > Film Mode Detect. Mirage SST User Guide 020-102993-01 Rev. 1 (06-2019) Copyright 2019 Christie Digital Systems USA, Inc. All rights reserved. ©... -
Page 31: Adjusting The Image Sharpness
Combine several projected images into one single, seamless image with edge blending. Adding edge blends to the projector Use Christie or to create edge blends and upload them to Mirage SST. 1. Create an edge blend file using the Christie or application. -
Page 32: Resetting Edge Blending
1. Create a warp file using the Mirage SST or application. To connect Mirage SST with or , use port 3003. Christie Twist Premium, Twist Pro, and offer advanced warping options. Refer to the Christie website (www.christiedigital.com) for product information and documentation. - Page 33 If horizontal keystone adjustments have been made, starting vertical keystone adjustments erases the horizontal settings. Mirage SST User Guide 020-102993-01 Rev. 1 (06-2019) Copyright 2019 Christie Digital Systems USA, Inc. All rights reserved. ©...
- Page 34 1. Select MENU > Configuration > Geometry Correction. 2. Select Reset Keystone Correction. 3. At the confirmation prompt, select Reset. Mirage SST User Guide 020-102993-01 Rev. 1 (06-2019) Copyright 2019 Christie Digital Systems USA, Inc. All rights reserved. ©...
-
Page 35: Configuring System Settings
Choose one of the pre-defined locations for the display of the on-screen menus. 1. Select MENU > System Settings > Menu Preferences > OSD Position. Mirage SST User Guide 020-102993-01 Rev. 1 (06-2019) Copyright 2019 Christie Digital Systems USA, Inc. All rights reserved. ©... -
Page 36: Changing The Language
1. Select MENU > System Settings > Power Settings. 2. Select Keep Electronics On In Standby. 3. To enable electronics remaining on in standby mode, select Enter. Mirage SST User Guide 020-102993-01 Rev. 1 (06-2019) Copyright 2019 Christie Digital Systems USA, Inc. All rights reserved. ©... -
Page 37: Enabling Direct Pass-Through Of Hdmi, 3G, And Displayport Input Signals
Enter. Informing the source of signal preferences Configure Mirage SST to automatically inform the video source of the preferred signal formats. 1. If you need a specific frame rate, from the display panel, select MENU > Configuration > Input Settings > EDID Timing. -
Page 38: Setting Up 1D Color Uniformity
1. Ensure the projector is running in representative ambient light. 2. Setup a spectroradiometer, such as the CR-250, on a tripod. If not using the CR-250 or better, Christie recommends placing the meter perpendicular to the screen to achieve accurate measurements. -
Page 39: Turning On The Projector With Low Voltage
3. Select Ignore Low AC Input Voltage Error. 4. To ignore the Low AC Input Voltage error when turning on the projector, select Enter. Mirage SST User Guide 020-102993-01 Rev. 1 (06-2019) Copyright 2019 Christie Digital Systems USA, Inc. All rights reserved. ©... -
Page 40: Configuring Communications
6. To determine the remote access for the RS232 IN port, select Remote Access Level (RS232 IN). 7. Select the appropriate remote access level: Mirage SST User Guide 020-102993-01 Rev. 1 (06-2019) Copyright 2019 Christie Digital Systems USA, Inc. All rights reserved. ©... -
Page 41: Communicating With Mirage Sst Through Art-Net
There are 512 channels per universe. Mirage SST specifies 24 channels. Mirage SST has multiple methods of being controlled in addition to Art-Net. If a setting is changed through another interface, the DMX controller can re-assert control by changing the value on the appropriate DMX channel. - Page 42 255 = Full upper position Lens Vertical Position • A 250 ms delay exists (100%) (Fine) before sending this channel to the projector. Mirage SST User Guide 020-102993-01 Rev. 1 (06-2019) Copyright 2019 Christie Digital Systems USA, Inc. All rights reserved. ©...
-
Page 43: Index List For The Input Channel
Not all options listed in the table are available on all products. Available options depend on the projector model and the cards installed on the projector. The QSFP+ options require the Enable Christie Link option to be set. - Page 44 QSFP+ [0-1] Four-Port [3-1][3-2][3-3][3-4] QSFP+ [0-2] Four-Port [4-1][4-2][4-3][4-4] QSFP+ [1-1] Four-Port [1-1][1-2][2-1][2-2] QSFP+ [1-2] Four-Port [3-1][3-2][4-1][4-2] QSFP+ [2-1] Four-Port [1-1][2-1][3-1][4-1] QSFP+ [2-2] Mirage SST User Guide 020-102993-01 Rev. 1 (06-2019) Copyright 2019 Christie Digital Systems USA, Inc. All rights reserved. ©...
-
Page 45: Working With Macros
Configuring communications Working with macros Automate tasks in Mirage SST with macros so the same tasks can be done on a regular basis. If the date and/or time is changed on the projector, a macro may be unexpectedly executed. Adding a macro Create a macro to automate a repetitive task. -
Page 46: Editing A Macro
To delete all the macros in the list, click Select All. the number of macros you want to delete is displayed next to the trash can. 3. Click Delete. 4. At the confirmation prompt, click Delete. Mirage SST User Guide 020-102993-01 Rev. 1 (06-2019) Copyright 2019 Christie Digital Systems USA, Inc. All rights reserved. ©... -
Page 47: Configuring The Gpio
GPIO 2 75mA max (e)fused to prevent Pin 3 GPIO 4 damage Pin 4 GPIO 6 Pin 5 Ground — — Mirage SST User Guide 020-102993-01 Rev. 1 (06-2019) Copyright 2019 Christie Digital Systems USA, Inc. All rights reserved. ©... - Page 48 Pin 7 GPIO 3 damage Pin 8 GPIO 5 Pin 9 GPIO 7 All GPIO pins are weakly pulled up to 3.3V. Mirage SST User Guide 020-102993-01 Rev. 1 (06-2019) Copyright 2019 Christie Digital Systems USA, Inc. All rights reserved. ©...
-
Page 49: Setting Up Projector Profiles
2. Select an existing profile. 3. Select Restore Profile. 4. From the Restore dialog, select the settings you want to restore. 5. Select Restore. Mirage SST User Guide 020-102993-01 Rev. 1 (06-2019) Copyright 2019 Christie Digital Systems USA, Inc. All rights reserved. ©... -
Page 50: Renaming A Projector Profile
1. Select MENU > Admin > Projector Profiles. 2. Select the profile you want to delete. 3. Select Delete Profile. 4. At the confirmation prompt, select Delete. Mirage SST User Guide 020-102993-01 Rev. 1 (06-2019) Copyright 2019 Christie Digital Systems USA, Inc. All rights reserved. ©... -
Page 51: Backing Up, Restoring, And Upgrading Files
5. Select an upgrade file and select Enter. 6. To automatically restart Mirage SST, select Restart Now. If you decide restart Mirage SST at a later date (Restart Later), you cannot perform another upgrade until the Mirage SST is restarted. -
Page 52: Importing A File From An External Device To Restore Settings
The backup settings file is imported to the projector. Restoring projector default settings Restore the Mirage SST settings back to the default values. Network configurations and calibration values are not reset. 1. From the display panel, select MENU > Admin > Backup & Restore. -
Page 53: Diagnostic Tools
Follow these procedures to help with diagnosing issues with Mirage SST. Viewing Mirage SST information View the licenses for the software added to Mirage SST and the licenses of the software used to operate Mirage SST. The information is read-only. -
Page 54: Modifying Grey Level Test Pattern Characteristics
7. To change the color of the grid, select Test Pattern Grid Color and select Enter. 8. To enable movement of the test pattern, select Test Pattern Grid Motion and select Enter. Mirage SST User Guide 020-102993-01 Rev. 1 (06-2019) Copyright 2019 Christie Digital Systems USA, Inc. All rights reserved. ©... -
Page 55: Enabling A Specific Test Pattern Color
The interrogator captures diagnostic information Christie personnel uses to help diagnose and correct any issues. 1. Insert a USB flash drive in the USB port on Mirage SST. The USB flash drive must be formatted using the FAT 32 file system. - Page 56 3. To confirm your selection, select Enter. Configuring traps A trap is a condition that SNMP monitors on Mirage SST. 1. Select MENU > Communications > SNMP > Trap Configuration. 2. Select the trap you want to enable and select Enter.
- Page 57 Diagnostic tools All customized settings are set to the default factory settings. 3. At the confirmation prompt, select Reset. Mirage SST User Guide 020-102993-01 Rev. 1 (06-2019) Copyright 2019 Christie Digital Systems USA, Inc. All rights reserved. ©...
- Page 58 China Ministry of Information Industry (along with 7 other Government Agencies) Order No.32 (01/2016) on the control of pollution caused by electronic information products, hazardous Mirage SST User Guide 020-102993-01 Rev. 1 (06-2019) Copyright 2019 Christie Digital Systems USA, Inc. All rights reserved. ©...
- Page 59 • Regulation (EC) No. 1907/2006 on the registration, evaluation, authorization and restriction of chemicals (REACH) and the applicable official amendment(s). Mirage SST User Guide 020-102993-01 Rev. 1 (06-2019) Copyright 2019 Christie Digital Systems USA, Inc. All rights reserved. ©...
- Page 60 Corporate offi ces Worldwide offi ces Christie Digital Systems USA, Inc. Africa United Kingdom Columbia Korea (Seoul) ph: 714 236 8610 ph: +27 (0)11 510 0094 ph: +44 (0) 118 977 8000 ph: +57 (318) 447 3179 ph: +82 2 702 1601 Christie Digital Systems Canada Inc.
Need help?
Do you have a question about the Mirage SST and is the answer not in the manual?
Questions and answers