Advertisement
Quick Links
Advertisement

Related Manuals for TOORX TRX-65 S EVO


Summary of Contents for TOORX TRX-65 S EVO
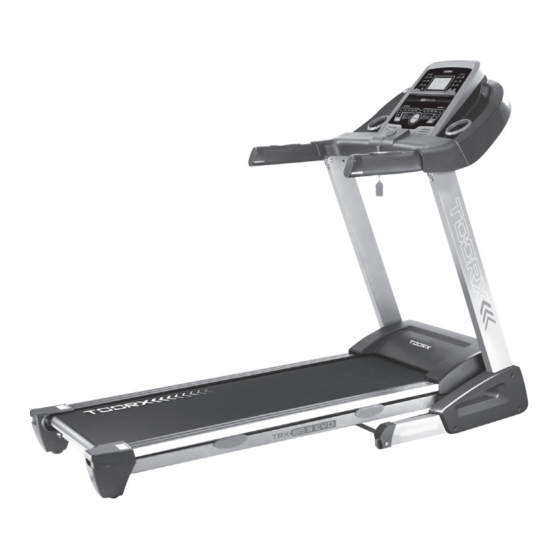
- Page 1 INSTRUCTION APP REAdY...
-
Page 2: Table Of Contents
CONTENT CONTENT --------------------------------------------------------------------------------------------------------------------------------2 IMPORTANT SAFETY PRECAUTIONS -----------------------------------------------------------------------------------3-4 MAIN TECHNICALPARAMETERSAND PRODUCT OVERVIEW----------------------------------------- ASSEMBLY INSTRUCTIONS -------------------------------------------------------------------------------------------------5-8 FOLDING & UNFOLDING INSTRUCTIONS -------------------------------------------------------------------------------9 GROUNDING METHODS ----------------------------------------------------------------------------------------------------------10 OPERATION GUIDE ---------------------------------------------------------------------------------------------------------------11-17 GETTING STARTED GUIDE ----------------------------------------------------------------------------------------------------18 SAFETY EXERCISES --------------------------------------------------------------------------------------------------------------19 WARM-UP EXERCISES -----------------------------------------------------------------------------------------------------------20 MAINTENANCE INSTRUCTIONS --------------------------------------------------------------------------------------------21 BELTADJUSTMENT ---------------------------------------------------------------------------------------------------------------22 EXPLODED DRAWING ------------------------------------------------------------------------------------------------------------23 PARTS LIST... - Page 3 The main technical parameters Working temperature: 0-40 ℃ Input supply voltage:220V Speed range: 0.8-20KM/ H Incline range:15 level Motor incline Max. user weight: 130kg Distance display range: 0.00-99.9km Calories display range: 000-999 Time display range: 00: 00-99: 59 (min : sec) Heart rate range: 50-200 (time / min) Running surface: 400X1400mm Product size: 1880x810x1410mm...
-
Page 4: Assembly Instructions
Assembly instruction WHEN YOU OPEN THE CARTON, YOU WILL FIND THE BELOW SPARE PARTS: 1Main frame 1set D21 Flat washer M10 D8Round hex bolt C13Safety key 1set 8PCS M10*15 4PCS D2 Allen wrench T6 1 PC B18Silicon oil 1 PC D1 Screw driver 1PC D12 Round hex bolt M10*55 4 PCS... - Page 5 STEP 1:According to the following steps to lift up the computer bracket. Be careful not press the line when folding. STEP 2:According to the picture to tight the bolt M10*55(D12)and washer M10 (D21).Then Locked with M10*15(D8) and Flat washer (D21).
- Page 6 Step 3: Attach the front cover L(B11L)&R(B11R) to the base frame with bolt ST4.2*19 (D48). Step 4: Please put on the Safety key (C13).
- Page 7 Step5:Plug in bluetooth dual kit (note: voltage ofr dual kit is 3.3V, and cannot plug into computer/laptop or it will be damaged.) a. Take out the bluetooth kit and push the cover down to let USB slot appears b. Then connect the Bluetooth on treadmill Step5: To check if the running belt runs correctly, placing treadmill in folding position and tightenin g all the bolts.
- Page 8 Folding instruction Lift up the machine and force to pull up until you heard "click" that made by safety casing stuck the pneumatic cylinder. Unfolding instruction Push the safety sleeve with your foot lightly and pull down the machine at the same time as the arrow direction.
-
Page 9: Grounding Methods
Grounding Methods This product must be grounded. If it should malfunction or breakdown, grounding provides a path of least resistance for electric current to reduce the risk of electric shock. This product is equipped with a cord having an equipment-grounding conductor and a grounding plug. -
Page 10: Operation Guide
Operation Guide WINDOW DISPLAY 1.1. 1.2. START Normal start after 5 seconds countdown 1.3 PROGRAM 1 manual mode,15 pre-setprograms, 3 users, 1 body fat program, 3 countdown function, Bluetooth connecting dual kit, Polar receiver 1.4.SAFETY LOCK FUNCTION The window shows"---" when take away the safety lock and the treadmill will stop quickly with "didi" alarm noise. - Page 11 1.5.2 “PROGRAM” BUTTON When the treadmill is not running, press this button can circle choose from manual mode to pre-set mode P1-P15,U1-U3and body fat. 1.5.3 “MODE” BUTTON When the treadmill is not running, press this button to choose countdown modes:”H-1”,”H-2”,”H-3”;:H-1” is the time countdown mode, and “H-2” is the distance countdown mode,“H-3”...
- Page 12 1.6. DISPLAY FUNCTION 1.6.1 SPEED Display running speed 1.6.2 TIME Display the running time or countdown time 1.6.3 DISTANCE Display the running total distance or distance countdown. 1.6.4 CALORIE Display the calorie or calorie countdown 1.6.5 INCLINE Display the incline 1.6.6 PULSE Display pulse data 1.6.7 ALL WINDOW DISPLAY DATA RANGE...
- Page 13 1.8 PROGRAM EXERCISE CHART SET TIME /10 = EVERY GRADE TIME TIME MODE SPEED INCLINE SPEED INCLINE SPEED INCLINE SPEED INCLINE SPEED INCLINE SPEED INCLINE SPEED INCLINE SPEED INCLINE SPEED INCLINE SPEED INCLINE SPEED INCLINE SPEED INCLINE SPEED INCLINE SPEED INCLINE SPEED INCLINE...
- Page 14 1.103 COUNTDOWN FUNCTION PARAMETER DATA Countdown time initial setting 30:00 minutes,setting range 5:00---99:00 minutes , each step 1:00. Countdown calorie initial setting 50therm, setting range 10---990 term,each step 10. Countdown distance initial setting 1.0km,setting range 0.5---99.9 km,each step 0.1 Scan cycle switch order is: manual, time, distance, calories. 1.11BODY TESTER(FAT)...
- Page 15 User can use “SPEED +/-“ to adjust age (data from 13 to 80) after seeing the “30” shown on the screen. 1.12.2 Press “MODE” key to enter the setting of heart rate. The standard heart rate is fixed at different data from HRC1 to HRC3.
- Page 16 1.13 Operating procedures of Pafer's APPBluetooth 1.13.1 Afterplugging into the Pafer's APPBluetooth, then the Bluetooth indicator will light up. 1.13.2 When normal operation of communication, the user can choose to use or not to use APP to control the treadmill. a.
-
Page 17: Maintenance Instructions
Maintenance Instruction WARNING :Please make sure pull out the treadmill's power plug before cleaning or maintaining the product. CLEANSING:General cleaning or the unit will greatly prolong the treadmill's life. Keep treadmill clean by dusting regularly. Be sure to clean the exposed part of the deck on either side of the walking belt and also the side rails. -
Page 18: Beltadjustment
Belt Adjustment Place treadmill on a level surface. Make treadmill run at approximately 6-8 km/h, observe the running belt deviate condition. f the belt has drifted to the right, unplug the safety lock and power switch, and turn the right adjusting bolt 1/4 turn clockwise, then insert the power switch and safety lock, make the treadmill running, observe the running belt deviate condition. - Page 19 D21 D18...
-
Page 20: Parts List
Parts list A Welding Parts Description Description Incline bracket Main frame Base frame Filter bracket Running board support tube Left upright Right upright Motor bracket Console bracket B Plastic Parts Description Description Console set B16R Right end cap B1-1 Overlay Adjusting wheel B1-2 Membrane key... - Page 21 C Electrical parts Description Description DC motor Incline motor Running belt Safety key Single cord Rear roller Power cable Front roller Upper cable Running board Lower cable Cylinder Inductor Motor belt Filter Power switch Single cord Controller Optical sensor Left handrail button Single cord Right handrail button chest belt...
- Page 22 Round head hex bolt M8X40 Cross head self tapping bolt ST4.2X19, washer Cross head self tapping bolt Round head hex bolt M8X45 ST4.2X25, washer Nylon Nut M10 Cross head self tapping bolt M5X8 Cross head self tapping bolt Nylon Nut M8 ST4.2X16 Cross head self tapping bolt Flat washer M10...
- Page 23 GARLANDO SPA Via Regione Piemonte, 32 - Zona Industriale D1 15068 - Pozzolo Formigaro (AL) - Italy www.toorx.it - info@toorx.it...
Need help?
Do you have a question about the TRX-65 S EVO and is the answer not in the manual?
Questions and answers