
Related Manuals for Nice WIDE M


Summary of Contents for Nice WIDE M
- Page 1 ET NICE WIDE INSTRUCTIONS 2018.001 Installer Instructions High Traffic, Battery Back-up Traffic Barrier www.niceforyou.com/za...
-
Page 2: Site Preparation
Introduction. Page 3 Be Safe! Instructions, warnings and obligations. Page 4 Technical specifications. Page 5 Component identification and descriptions. Site preparation. Page 6 Pole lengths (limitations) and pole accessory kits. Page 7 Calculating the duty cycle. Page 7 Positioning the barrier. Page 8 Typical cabling requirements. - Page 3 8. All ET Nice (Pty) Ltd garage door operators are supplied with a sealed 15A safety plug on lead for use in an electrical code of practice approved plug point. Do not extend, modify or replace the plug lead unless duly qualified as an electrician. Before installing the unit, ensure the mains supply is switched off.
-
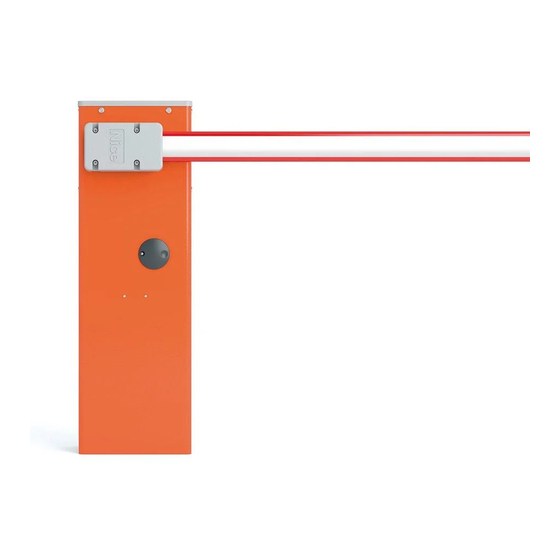
Page 4: Technical Specifications
Before removing the battery from the system the household mains must be disconnected. In the case of the motor unit being removed and scrapped, the battery must be removed first. Technical specifications. TECHNICAL SPECIFICATIONS Technical Data WIDE M and WIDE L Primary power supply. 220 – 240Vac @ 50Hz – 60Hz. Peak power consumption. 240W Electrical class. - Page 5 1m lengths strips, 45x58x4000mm strips, 69x92x3150mm strips, 69x92x5150mm Wide M 4m 1 pc 8 lengths Wide L 5m 1 pc 10 lengths Wide L 6m 2 pcs...
- Page 6 Major service interval guide. Severity index Work impact considerations Wide M Wide L Jack-knife boom pole. High dust and sand environment. High salinity environment. Aluminium fence installed. Mobile pole support installed. Ambient temperature above 40 C or below 0 Operation regularly interrupted by safety beam circuit trigger.
-
Page 7: Cabling Requirements
Cabling requirements. • Before mounting the operator ensure your cables and conduiting are in place to prevent any inconvenience at a later stage. • All 220Vac mains cabling and circuits need to be installed by a qualified electrician and signed off by a registered electrician. •... -
Page 8: Installing The Cabinet
Installing the cabinet. Establish where the traffic barrier cabinet mounting position needs to be. If an concrete plinth already exists, skip to step If no concrete plinth is in place, continue on to step 02. Begin by digging a hole for the foundation plinth to be cast in. - Page 9 Access the cabinet by removing the lid screws (a) and then the lid (b). With the lid removed, slide the cabinet access panel up (c) and then pull it away from the cabinet (d) In the case of a previously prepared plinth, where the anchoring bolts were not cast into the concrete, do the following: Position the cabinet in the required positions.
- Page 10 Installing the boom pole. Before installing the pole mount, double check whether the application requires a left hand or right hand closing barrier. Top view - Top view - Factory default = LH Closing. Left hand Right hand closing closing If the site application requires a left hand closing configuration, complete the following 3 steps: Opening for boom pole at top.
- Page 11 5. Remove the tie-rod ends from the right hand side of the power arm. 4. Remove all tension from the springs by turning the turnbuckles anti-clockwise 6. Move the boom pole into the vertical open position. Lock the gearbox in this position.
- Page 12 Adjusting the end stops.
- Page 13 Electrical and electronic installation and setup. As a motorised operator vibrates when in use, it is strongly recommended that only multiple strand flexible cables be used. Before closing the unit, always remember to double check that all connections are securely made, that there are no stray strands flaring out that can short circuit against other adjacent connections or bared wires and that no cables will be pulled loose when the cover is replaced on the unit.
- Page 14 Wiring and termination of the control card.
- Page 15 Using the control card display and dashboard. The control unit is equipped with a LCD display and interactive keys for simplified programming and diagnostics. All setup, of the various features, requires that the control card dashboard be used. Below are the functions of each key on the dashboard. Navigate backward in menus, decrease Navigate forward in menus, increase values, indicate lefthand closing barrier...
-
Page 16: Runtime Setup
Set Boom Type Display asks you to Press and release the button to select runtime select the barrier < Wide M > model. setup. Set BoomType Scroll < or > to select the Display scrolls < Wide L >... - Page 17 Selecting a safety level. Overload Setting This adjusts the force level, over and above the nominal - “Selected” mode - barrier resistance, needed to trigger the safety overload From Standby status - Standby routines. Level 1 being the most sensitive and 8 being the least sensitive.
- Page 18 BT Mode Setting Selecting a BT operating mode and adjusting the BT auto-close time. The factory default is Simplex mode. The factory default auto-close time is 20 seconds. The timer range is 1 – 254 seconds. PLEASE NOTE!! To select any of the automatic - “Selected”...
-
Page 19: Receiver Setup
Receiver programming and setup. Receiver Setup Setting up a new user: - Quick learn method. The barrier can be in any position when performing this routine. - “Selected” mode - Please note that if an ET BLU MIX © transmitter is being used and From Standby status - Standby not all of the buttons have been set to the same format, then the... - Page 20 Receiver programming and setup. Setting up a new user: - Quick learn method. Receiver Setup (Corresponding 4 function learn option) - “Selected” mode - From Standby status The barrier can be in any position when performing this routine. - Standby Response Action Description...
- Page 21 Receiver programming and setup. Receiver Setup Setting up a new user: - Advanced learn method. The barrier can be in any position when performing this routine. - “Selected” mode - Please note that if an ET BLU MIX © transmitter is being used and From Standby status - Standby not all of the buttons have been set to the same format, then the...
- Page 22 Receiver programming and setup. Receiver Setup Erasing a single user from the memory. - “Selected” mode - From Standby status The barrier can be in any position when performing this routine. - Standby Response Action Description Display Buzzer Barrier To enter the program Programming menu menu.
- Page 23 Receiver programming and setup. Receiver Setup Master erasing all users from the memory. - “Selected” mode - From Standby status The barrier can be in any position when performing this routine. - Standby Response Action Description Display Buzzer Barrier To enter the program Programming menu menu.
- Page 24 Receiver programming and setup. Receiver Setup Diagnose remotes. The barrier can be in any position when performing this routine. - “Selected” mode - From Standby status This feature can be used to determine if there is 433.92MHz radio - Standby interference.
- Page 25 Receiver programming and setup. Receiver Setup Receiver information. - “Selected” mode - From Standby status The barrier can be in any position when performing this routine. - Standby Response Action Description Display Buzzer Barrier To enter the program Programming menu menu.
- Page 26 Traffic light - This option allows for timed traffic light switching between green and red. This control unit can be used with the NICE Blue-bus two wire devices like the Blue-bus safety beam Blue-bus Setup. products. This function must be run when adding or removing any Blue-bus devices to the system.
Need help?
Do you have a question about the WIDE M and is the answer not in the manual?
Questions and answers