RGBlink GX4 Quick Start Manual
Hide thumbs
Also See for GX4:
- User manual (76 pages) ,
- User manual (44 pages) ,
- Quick start manual (32 pages)
Table of Contents
Advertisement
Quick Links
GX4
Quick Start
● Picture-in-Picture (PIP)
● Transition effects
● RGBlink instant TAKE with pre-Sync
● Audio controls
● Support for additional input options
● EDID management on board
● On board test patterns
● Support for multi-device cascade
● Two empty slots reserved for universal sender cards
and RBGlink Subito™Quatro sender module to install
● Support for XPOSE 2.0 control
● Support for RGBLink OpenAPI
Advertisement
Table of Contents

Related Manuals for RGBlink GX4


Summary of Contents for RGBlink GX4
- Page 1 Quick Start ● Picture-in-Picture (PIP) ● Transition effects ● RGBlink instant TAKE with pre-Sync ● Audio controls ● Support for additional input options ● EDID management on board ● On board test patterns ● Support for multi-device cascade ● Two empty slots reserved for universal sender cards and RBGlink Subito™Quatro sender module to install...
-
Page 2: Table Of Contents
TAKE Button...............................12 Transition Setting............................13 Set the Audio.............................13 Black Out..............................13 Save Preset............................. 14 Load Preset............................. 15 Load LED Configuration File........................ 16 CONTACT INFORMATION...........................19 © Xiamen RGBlink Science & Technology Co., Ltd. 1 / 20 Ph: +86 592 5771197 | support@rgblink.com www.rgblink.com... -
Page 3: Overview
GX4 can work as LED display controller when universal senders cards is installed. There are 2 empty slots fitting for one 2.6mega pixels sender card or two 1.3mega pixels sender cards. RGBlink dedicated sender card module Subito™... - Page 4 GX4 with Subito Quatro Sender Module SYSTEM CONNECTION DIAGRAM © Xiamen RGBlink Science & Technology Co., Ltd. 3 / 20 Ph: +86 592 5771197 | support@rgblink.com www.rgblink.com...
-
Page 5: Packing Configuration
Packing Configuration USB Cable AC Power Cord HDMI to DVI Anti-Static Cable Note: AC Power Cable supplied as standard according to destination market. © Xiamen RGBlink Science & Technology Co., Ltd. 4 / 20 Ph: +86 592 5771197 | support@rgblink.com www.rgblink.com... -
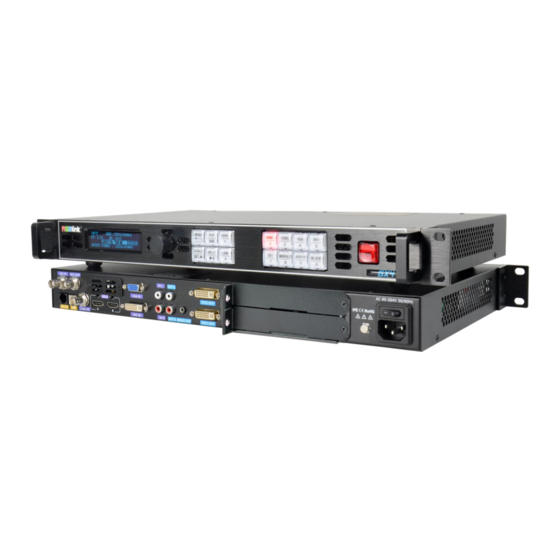
Page 6: Hardware Orientation
BLACK Black out button OLED Panel Show operation menu items MENU Menu and back button Knob Confirm and adjust OLED menu © Xiamen RGBlink Science & Technology Co., Ltd. 5 / 20 Ph: +86 592 5771197 | support@rgblink.com www.rgblink.com... -
Page 7: Rear Panel
Slots preserved for sender cards CVBS Input CONTROL PORT HDMI In/Loop DVI input USB-A RS232 Audio input POWER Power switch Power IEC-3 © Xiamen RGBlink Science & Technology Co., Ltd. 6 / 20 Ph: +86 592 5771197 | support@rgblink.com www.rgblink.com... -
Page 8: Menu Tree
Menu Tree © Xiamen RGBlink Science & Technology Co., Ltd. 7 / 20 Ph: +86 592 5771197 | support@rgblink.com www.rgblink.com... -
Page 9: Use Your Product
Same with above, switch the signals among SDI, VGA, CVBS and input module option signal. PIP Setting Enable the PIP function GX4 supports seamless switching for single image and double images. Push the [PIP/DSK] button, the LED light is on, and enter to the PIP menu items. OLED module show as follows: ->PIP... -
Page 10: Split Setting
Split Setting SPLIT is used when multiple GX4 are used in cascade mode. When do cascade, connect the signals to the signal distributor first, and then connect from the outputs of the signal distributor to each input of GX4. User can also do cascade via DVI LOOP port, and it needs to select “DVI LOOP”... -
Page 11: Set Output Format
Only digital 50 or digital 60 supports for the refresh rate. Use the digital buttons to finish the settings. 6. After input all the values, push knob to enable GX4 to output this resolution. GX4 will take 5~10 seconds to enable this output resolution. -
Page 12: Scale The Image
Adjustment function: the image width, height, width/height, horizontal position and vertical can be adjusted by means of a light knob or directly input digital mode Position equivalent, adjust to preset value, and then touch the knob to determine. © Xiamen RGBlink Science & Technology Co., Ltd. 11 / 20 Ph: +86 592 5771197 | support@rgblink.com... -
Page 13: Text Overlay Setting
. Pressing 5 seconds frequently can be able to cancel the selection of the "TAKE" key. 4.After select the signal, push the [TAKE], and the signal will be taken to the output in the way of special effect. © Xiamen RGBlink Science & Technology Co., Ltd. 12 / 20 Ph: +86 592 5771197 | support@rgblink.com... -
Page 14: Transition Setting
Black out descriptions: Black signal realizes one-key-touch to a black screen. GX4 provides black effect processing for output with cut black effect. Operation is as below: Push the [BLACK/0] button, then output will cut to BLACK, shown as below: © Xiamen RGBlink Science & Technology Co., Ltd. -
Page 15: Save Preset
Save Preset GX4 provides 16 positions for saving or recording parameters. To save current parameters and settings: 1. Push the [SAVE/1] button, the button light is on, and enable the SAVE function. SAVE TO ->SAVE 1 Button is on can be saved Button flashes will be overwrite 2. -
Page 16: Load Preset
Load Preset GX4 provides 16 positions for saving or recording parameters. To recall saved settings: 1. Push the [LOAD/6] button, the button light is on, and enable the LOAD function: RECALL SAVE ->SAVE 1 Button on is ready for recall Button flashes means just recall 2. -
Page 17: Load Led Configuration File
Load LED Configuration File For GX4 installed with Subito Quatro Sender Module, user can upload LED manufacturer’ bin file to set the LED screen parameter. 1.Prepare LED configuration file provided by the manufacturer and store it in somewhere easy to find on your computer or USB disk. - Page 18 Click Browse to open up Local file to select the Led configuration file stored before and click Set to confirm. 7.When it is done, a window showing Set Success will pop up. © Xiamen RGBlink Science & Technology Co., Ltd. 17 / 20 Ph: +86 592 5771197 | support@rgblink.com...
- Page 19 Manufacturer index set on XTOOL, there is the file name. Select the file, and press OK, the Led screen will be set as the configuration file. © Xiamen RGBlink Science & Technology Co., Ltd. 18 / 20 Ph: +86 592 5771197 | support@rgblink.com...
-
Page 20: Contact Information
All video products are designed and tested to the highest quality standard and backed by full 3 years parts and labor warranty. Warranties are effective upon delivery date to customer and are non-transferable. RGBlink warranties are only valid to the original purchase/owner. Warranty related repairs include parts and labor, but do not include faults resulting from user negligence, special modification, lighting strikes, abuse(drop/crush), and/or other unusual damages.
Need help?
Do you have a question about the GX4 and is the answer not in the manual?
Questions and answers