Rice Lake iDimension Plus Setup And Operation Manual
Static dimensioning system
Hide thumbs
Also See for iDimension Plus:
- Manager's manual (68 pages) ,
- Setup and operation manual (60 pages) ,
- Assembly instructions manual (26 pages)

Related Manuals for Rice Lake iDimension Plus


Summary of Contents for Rice Lake iDimension Plus
- Page 1 iDimension Plus ® Static Dimensioning System Setup and Operation Manual November 4, 2019 PN 195439...
- Page 2 All information contained within this publication is, to the best of our knowledge, complete and accurate at the time of publication. Rice Lake Weighing Systems reserves the right to make changes to the technology, features, specifications and design of the equipment without notice.
-
Page 3: Table Of Contents
Edit/Cancel/Save Keys............... . 29 Technical training seminars are available through Rice Lake Weighing Systems. - Page 4 Plus Display is Locked and Will Not Dimension ....... .
-
Page 5: Introduction
Introduction This manual provides an overview of the iDimension Plus setup and operation instructions. Ensure the iDimension Plus unit is fully assembled by following the instructions of the iDimension Plus Assembly Instructions (PN 197164). When interfacing this device to third parties software, please reference the software manufacturer’s documentation for setup and configuration parameters as necessary. -
Page 6: Safety
Use only supplied power adapter. Never short-circuit the power adapter or the device. Never remove the iDimension Plus head cover or the electrical connection panels at the base of the pole assembly. Never modify or attempt to repair the unit. Service must be performed by Rice Lake Weighing Systems only. -
Page 7: Installation Requirements
Protect the iDimension Plus from static electricity and connect to a clean AC power outlet. Install the iDimension Plus on a table or sturdy level work surface large enough for the base plate and scale. Ensure the location provides a large enough work surface clear from other objects in the measurement area. -
Page 8: Setup Wizard
Plus Setup Wizard This section provides an overview of how to setup the iDimension Plus. The Setup Wizard displays during the initial power-up. Skip to if Setup Wizard displays. Step 3 Figure 2-1. Setup Wizard Prompt Access Setup Wizard... -
Page 9: Time Zone
Figure 2-5. Date and Time Use the following instructions to adjust the date or time. 1. Select Time & Date. 2. Select to enter the current time and date. 3. Select to continue. © Rice Lake Weighing Systems ● All Rights Reserved... -
Page 10: Zero Height
1. Select the base type of the iDimension Plus. Figure 2-6. Zero Height Base Selection Display (NEED IMAGE OF SCALE) • If the base is a smooth top scale or no scale, only using the iDimension Plus base, select the proceed to Step 3 •... -
Page 11: Scan Zone
1. Adjust the scan area by adjusting each of the four dots (touch points) on screen. Figure 2-10. Scan Zone 2. Select when scan zone is configured. © Rice Lake Weighing Systems ● All Rights Reserved... -
Page 12: Certified Settings
Manager, see Section 7.0 on page 30 for additional QubeVu Manager configuration information. For additional QubeVu Manager information, see the iDimension Plus QubeVu Managers Guide (PN 195441). Figure 2-11. Certification Settings – US Customary Figure 2-12. Certification Settings – NTEP 19-040A1 •... -
Page 13: Next Steps
2. Upon completion of the setup wizard, the system restarts. Clear the platform of obstructions to continue. Figure 2-15. Setup Complete Next Steps The setup wizard is now complete. Additional setup requires connection of the iDimension Plus to a PC from a network connection to access QubeVu Manager. 1. Connect iDimension to network (Section 8.0 on page... -
Page 14: Touchscreen Display
Touchscreen Display This section provides an overview of iDimension Plus USB touchscreen display indicators and controls instructions. The USB touchscreen display combines the weight and dimensions from the iDimension Plus and the optional scale to be visualized. The touchscreen display provides the dimensions, a live displayed scale weight and operator access to system level controls. -
Page 15: Shape Indication
0.5'' or 0.5 cm increments. 3.1.4 Status Indication Status indicates the current status of the iDimension Plus unit. • The Ready status indicates the device is ready to perform a dimensioning transaction • The Remove status indicates a successful dimensioning transaction is complete •... -
Page 16: Zero Height Key
1. Select the base type of the iDimension Plus. Figure 3-3. Zero Height Base Selection Display • If the base is a smooth top scale or no scale, only using the iDimension Plus base, select the scale type and proceed to Step 3 on page 13 •... - Page 17 3. Ensure the platform is clear of other objects then select Figure 3-5. Ensure Base is Clear Display It is important to keep the scale or iDimension Plus base clear and unobstructed during the zero height calibration to Note set the zero height accurately.
- Page 18 Plus Configuration Menu Key The Configuration Menu function key displays the Configuration Menu. The Configuration Menu provides more configuration options when accessed through touchscreen display than when accessed through a PC. The options accommodate stand-alone deployments. All options are available from the Admin Tools menu, see the iDimension Plus Managers Guide (PN 195441) for additional Admin Tools information.
-
Page 19: Configuration Menu
Allows for a connected USB drive to update the current device firmware Section 4.1.6 on page 19 IP Address Select to view the current IP address of the iDimension Plus unit Section 4.1.7 on page 20 Table 4-1. Configuration Menu Keys... -
Page 20: Setup Wizard
Plus 4.1.1 Setup Wizard The Setup Wizard displays during initial assembly and power-up. If Setup Wizard does not display, see Section 2.1 on page Select the Setup Wizard to automatically step through the following information. Figure 4-3. Begin Setup Wizard 4.1.2... -
Page 21: Data Extract
All settings are configured in the administrator mode of QubeVu Manager. Figure 4-5. Extract Data 1. Select to refresh 2. Select to perform a manual export 3. Select the ruler icon to return to normal operating mode © Rice Lake Weighing Systems ● All Rights Reserved... -
Page 22: Restart
1. Select Enable Flats to enter Setup. 2. Select to enable flats detection. 3. Flats detection requires either a scale be connected to iDimension Plus or the white dot on the base is visible. If flats detection is enabled, selecting turns it off. -
Page 23: Upgrade Firmware
4. Select the firmware upgrade required. Select to continue. Figure 4-8. Connect USB Drive to Upgrade Firmware The firmware update is copied from the USB drive to the iDimension Plus. The file checksum is used to validate the file. Note Calculating Checksum... -
Page 24: Ip Address
Plus 4.1.7 IP Address The IP address displays the current IP address defined by the system administrator or network. Use the displayed IP address to configure the network port to access the Administrative QubeVu Manager software for full system setup and configuration. -
Page 25: Weights And Measures
For specific applications and International approvals, requires long term storage audit trail to be configured in the QubeVu Manager Measurement Settings tab. If not configured, No LTS data is available displays. Figure 4-14. Transaction Log © Rice Lake Weighing Systems ● All Rights Reserved... -
Page 26: Use And Operation
0.5'' Table 5-2. NTEP Certified Measurement Ranges - Irregular Minimum and maximum NTEP Certified capacities do not reflect non-NTEP Certified performance specifications. Note Contact Rice Lake Weighing Systems for details. The maximum sizes defined in Table 5-1 Table 5-2 do not represent the largest object size which can be dimensioned. -
Page 27: Flats
Figure 5-2. Flat Detection Circle 5.1.2 Object Types The iDimension Plus is factory configured to dimension both cube (rectangular) and irregular shaped objects. Irregular shaped objects are dimensioned as rectangles around the shape. Table 5-3 for an example of how and what types of shapes the iDimension Plus will measure. - Page 28 Plus Item Placement For best results, place the item centrally below the scanning head. If the Zone of Interest or Work Area are configured too small, errors may occur (Section 8.0 on page 37). Figure 5-3. Item Placement The maximum size of an item to be dimensioned varies due to the camera’s field of view.
-
Page 29: Performing A Measurement
This section provides an overview of how to perform a measurement. Automatic Package Detection 1. To dimension, the iDimension Plus must be in a Ready status and the scale, if used, is at zero weight Figure 6-1. Ready Status 2. Place object within the Zone of Interest. Once the scale has settled and there is no motion within the Work Area, the iDimension Plus will provide the dimensions, weights and image of the package with a blue bounding box representing the measurements displayed. - Page 30 Figure 6-3. Ready Status 4. If the system does not return to the ready state, select the Help function key on the USB display and follow the instructions to return the iDimension Plus to the Ready status. Item Out of Bounds If trying to dimension an object that is too large for the field of view of the system, the system will provide an indication of out of bounds, use the out of bounds indicator to determine if reposition is required.
-
Page 31: Network Connection
6.2.1 Connection Configuring the iDimension Plus uses the embedded firmware, QubeVu Manager, which is accessed via an IP address over a wired Ethernet connection through a web browser. The system default is set to Dynamic Control Host Protocol (DCHP). Direct Connection To connect directly to the network, see the following information: 1. -
Page 32: Admin Tools Menu
Capture Definitions Capture definitions for QubeVu (Section 8.0 on page Firmware Upgrade Update firmware (Section 9.0 on page Backup Backup and restore settings (iDimension Plus QubeVu Managers Guide (PN 195441)) Diagnostics Diagnostics settings (Section 9.1 on page Table 6-1. Admin Tools www.RiceLake.com... -
Page 33: Edit/Cancel/Save Keys
The Save key saves all changes made during the edit process within the page and a sub menu tab. Upon save, the unit may restart and return to the home screen. © Rice Lake Weighing Systems ● All Rights Reserved... -
Page 34: Setup
Plus Setup This section provides an overview of iDimension Plus setup instructions, using QubeVu Manager. For complete QubeVu Manager setup instructions, see the iDimension Plus QubeVu Managers Guide (PN 195441). Figure 7-1. QubeVu Home Setup Menu Select to enter the setup menu. -
Page 35: General Settings
1. From the QubeVu Manager menu, select 2. The QubeVu Manager login screen displays. The username is admin. The password is password. 3. Select 4. Select Figure 7-3. Setup – General Settings © Rice Lake Weighing Systems ● All Rights Reserved... -
Page 36: General Settings Parameters
Threshold (in/mm) determine a flat dimension; Do not reduce this setting, with the standard factory iDimension Plus pole mount system; When the system is installed on a pole mount at 6.5' or 2 meters; Change this setting to 2'' or 5 cm Logging Level The default setting is Info;... -
Page 37: Scale
Mettler Toledo – A scale configured for the Mettler Toledo Standard protocol MTSICS –A scale configured for using the (Mettler Toledo Standard Interface Command Set) NCI – A scale using the Avery Weigh-Tronix/NCI protocol; For Rice Lake BenchPro Postal Scales, use this setting for scales in lb/oz mode Pennsylvania7300 –... -
Page 38: Measurement Settings - Certification
500ms to allow the weight on the scale to stabilize, if experiencing incorrect weights being displayed on the iDimension vs the scales display Table 7-4. Use Scale Stable Status Selections If the required scale is not listed, contact Rice Lake Weighing Systems to purchase a BenchPro scale. Note 7.2.3 Measurement Settings –... -
Page 39: Network
Manager Tools in the future; A host name can be up to 15 characters Example: http://<hostname>/ IP Address If DHCP is checked, do not enter an IP address; If DHCP is not checked, define a unique IP address for each iDimension Plus installed; Default IP address: 169.254.1.1 Consult with the network administrator if unsure how to assign a new IP address;... -
Page 40: Network Security
7.3.1 Network Security Network Security settings allow enhanced security by encrypting communications with the iDimension Plus using the Hypertext Transfer Protocol (HTTPS). By default, communication with the iDimension Plus is via HTTPS. Selecting the Network Security tab, displays the current settings. -
Page 41: Calibration
The calibration menu provides access to the following information: • Calibration settings for the Work Area and Zone of Interest configuration • Camera calibration – if required, calibrates the iDimension Plus using the calibration object Calibration Settings The calibration settings include configuration of the Work Area and Zone of Interest. -
Page 42: Zone Of Interest Configuration Mode
Plus 8.1.2 Zone of Interest Configuration Mode To review the current camera calibration settings within QubeVu, see the following procedure: 1. From the Admin menu, select to enter the setup menu. Figure 8-3. Admin Tools to set parameters within the Calibration Settings tab. - Page 43 Ensure the Work Area is larger than the Zone of Interest. Note 6. Select Save to continue. The system restarts. Ensure the platform is clear of obstructions to return to the ready state. © Rice Lake Weighing Systems ● All Rights Reserved...
-
Page 44: Camera Calibration From Qubevu Manager
Plus Camera Calibration from QubeVu Manager For camera calibration information, see the following procedures: 8.2.1 Camera Calibration The system is factory calibrated however it is may be required to perform a calibration if the system has moved to a different location, new scale is being used or the system is providing inaccurate dimensions. - Page 45 8. Review each tab to ensure the calibration object was successfully captured and no other object had mistakenly been placed in the view of the camera. 9. Select Save. The unit automatically restarts to apply the camera calibrations. © Rice Lake Weighing Systems ● All Rights Reserved...
- Page 46 Plus Calibration Unsuccessful displays, the calibration has failed. The red cross hairs out of alignment indicate they are out of alignment and a new calibration is required. 1. Select Cancel and perform a new calibration. 2. Redraw the rectangles within the two tabs.
-
Page 47: Appendix
The Diagnostics tools can be used to test hardware components and gather diagnostic information.z The Administrator defined a username and password during the initial setup process. The username and password Note are required to log into and access the iDimension Plus Admin Tools. 9.1.1 Diagnostics Menu The Diagnostics menu provides tools to help troubleshoot the device. -
Page 48: Component Tests
Field Test Description Depth Sensor Perform a testing on the iDimension Plus main sensor to determine if operational; Use this test if the system is measuring accurately Scale Tests the scale parameters configured in the setup mode and the scale are communicating; Check the interface cables between the scale and PC if a fail displays Camera Level Uses the flat detection circle on the base plate to determine if the main head is level;... -
Page 49: Scale Test
Appendix 9.1.3 Scale Test The Scale Test tool is used to help determine the communication settings of a serial scale attached to the iDimension Plus. 1. Select the Serial Port and Scale Type from the drop down lists. 2. Select to start the test. -
Page 50: System Log
Plus 9.1.4 System Log The system log storage data is configured in the setup menu. For troubleshooting, the file may be required to be sent to the factory for engineering analysis and troubleshooting. The log view can be customized by type (view all or view info, debug or error messages only) or by order (view the latest first or the earliest first). -
Page 51: Troubleshooting
1. Select the Help function key on the USB display. Figure 9-8. Help Button 2. Follow the provided help instructions to return the iDimension Plus to Ready state: A. Device status: STARTED or REMOVE displays; Clear the scale of obstructions B. -
Page 52: Idimension Plus Display Is Off Or Blank
Plus Display is Off or Blank Figure 9-11. BenchPro Scale Display No Power 1. Check power connection on the back of the iDimension Plus and the 120 V outlet 2. Check USB connection on back of USB display 3. Press the Power button on the back of the USB display 4. - Page 53 Figure 9-14. USB Display Touch Screen Not Functioning 6. Select to restart the device. Figure 9-15. Restart Confirmation 7. The USB display will go to a green display and within 2 minutes return to the ready state. © Rice Lake Weighing Systems ● All Rights Reserved...
-
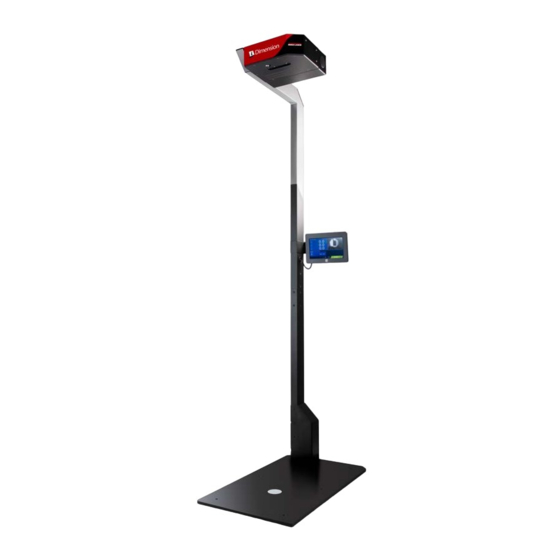
Page 54: Specifications
Height 63.8'' (162 cm) Weight 28.5 lb (13 kg) The iDimension Plus complies with Part 15 of the FCC Rules. Power Requirements Operation is subject to the following conditions: Single power source 110–240 V external power supply, US power cord •... - Page 56 Specifications subject to change without notice. Rice Lake Weighing Systems is an ISO 9001 registered company. 230 W. Coleman St. • Rice Lake, WI 54868 • USA U.S. 800-472-6703 • Canada/Mexico 800-321-6703 • International 715-234-9171 • Europe +31 (0)26 472 1319...
Need help?
Do you have a question about the iDimension Plus and is the answer not in the manual?
Questions and answers