Table of Contents
Advertisement
Quick Links
Advertisement
Table of Contents

Related Manuals for LifeGear 78300


Summary of Contents for LifeGear 78300
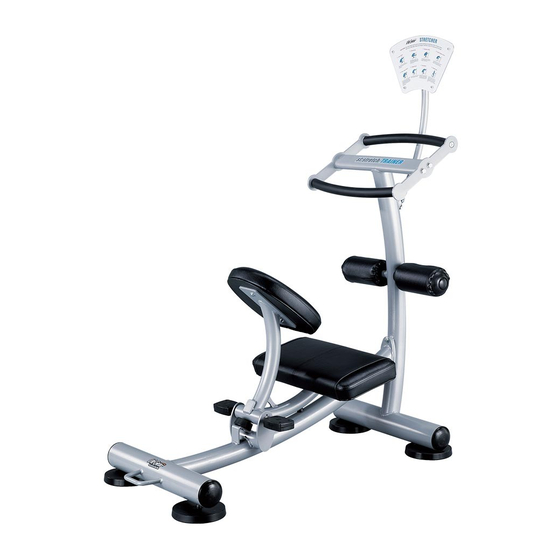
- Page 1 STRETCH TRAINER ITEM NO.: 78300 OWNER’S MANUAL IMPORTANT: Read all instructions carefully before using this product. Retain this owner’s manual for future reference. The specifications of this product may vary from this photo and are subject to change without prior notice.
-
Page 2: Table Of Contents
TABLE OF CONTENTS WARRANTY ------------------------------------------------------------------------------- 2 IMPORTANT SAFETY INSTRUCTIONS ------------------------------------------- 3 PARTS LIST ------------------------------------------------------------------------------- 4 HARDWARE AND ASSEMBLY COMPONENT LIST --------------------------- 5 TOOL ---------------------------------------------------------------------------------------- 5 EXPLODED VIEW ------------------------------------------------------------------------ 6 ASSEMBLY INSTRUCTIONS --------------------------------------------------------- 7 ADJUSTABLE LEVELER ADJUSTMENT ------------------------------------------ 16 MOVING THE STRETCH TRAINER ------------------------------------------------- 16 USING THE STRETCH TRAINER ---------------------------------------------------- 17 MAINTENANCE --------------------------------------------------------------------------- 19 WARM UP AND COOL DOWN ROUTINE ----------------------------------------- 20... -
Page 3: Warranty
ONE YEAR LIMITED WARRANTY LifeGear Inc. warrants to the original purchaser that this product is free from defects in material and workmanship when used for the purpose intended, under the conditions that it has been installed and operated in accordance with LifeGear's Owner's Manual. -
Page 4: Important Safety Instructions
IMPORTANT SAFETY INSTRUCTIONS Basic precautions, including the following important safety instructions should always be followed when using this equipment. Read all instructions before using this equipment. Before exercise, in order to avoid injuring the muscle, warm-up exercises are recommended. Do not allow children to use or play on the stretch trainer. Keep children and pets away from the stretch trainer while in use. -
Page 5: Parts List
PARTS LIST Description Qty No. Description Base Support Frame 1 020 Small Rubber Bumper Ø20x6 1150x550xØ70x2 Upright Support Frame 1 021 Bolt Cap S10 1050x550xØ70x2 Handlebar Foam Grip 003 Seat Frame 520x360xØ50x2 1 022 Ø32xØ25x460 004 Handlebar 460x340xØ25x2 2 023 Ankle Strap L=600 Instructional Placard Bracket 1 024 Wrist Strap L=400 630x330xØ25x2... -
Page 6: Hardware And Assembly Component List
HARDWARE AND ASSEMBLY COMPONENT LIST (9) Axle Ø25x157 (17) Foam Roller Cap 1 PC Ø85x20 2 PCS (18) Rod Cap (21) Bolt Cap S10 (26) Hexagon Head Bolt Ø40x45xM10 6 PCS M10x25 2 PCS 7 PCS (27) Washer Ø10 (29) Hexagon Head Bolt (31) Curve Washer M10 10 PCS M10x35... -
Page 7: Exploded View
EXPLODED VIEW 27 26... -
Page 8: Assembly Instructions
ASSEMBLY INSTRUCTIONS Step 1 Install two Adjustable Levelers (6) onto the Upright Support Frame (2). Step 2 Install two Adjustable Levelers (6) onto the Base Support Frame (1). - Page 9 27 26 21 Step 3 Attach the Base Support Frame (1) onto the Upright Support Frame (2) with two M10x25 Hexagon Head Bolts (26) and two Ø10 Washers (27). Tighten bolts with the Multi Hex Tool provided. Press both Bolt Caps (21) onto the Hexagon Head Bolts (26). Hardware: (27) Washer Ø10 (21) Bolt Cap S10...
- Page 10 31 33 Step 4 Attach the Instructional Placard Bracket (5) onto the Upright Support Frame (2) with one M10x25 Hexagon Head Bolt (26), one M10x45 Hexagon Head Bolt (32), one M10 Lock Nut (33), and three M10 Curve Washers (31). Tighten bolts and lock nuts with two Multi Hex Tools provided.
- Page 11 Step 5 Attach the Handlebars (4) onto the Upright Support Frame (2) with four M10x25 Hexagon Head Bolts (26) and four Ø10 Washers (27). Tighten bolts with the Multi Hex Tool provided. Press four Bolt Caps (21) onto the Hexagon Head Bolts (26). Hardware: (21) Bolt Cap S10 (26) Hexagon Head Bolt...
- Page 12 The Pedal Shafts are marked “R” for Right and “L” for Left. Tab (On the left side of the Axle.) Step 6 Position the Seat Frame (3) between the seat frame bracket of the Base Support Frame (1) and align the axle mounting hole. Slide the Axle (9) from the left side of the Base Support Frame (1) through the seat frame bracket of the Base Support Frame (1) and Seat Frame (3).
- Page 13 15&16 15&16 Step 7 Slide the Foam Roller (15) with Foam Roller Cover (16) onto the rod of the Upright Support Frame (2). Position the Foam Roller Cap (17) in front of the rod of the Upright Support Frame (2) and align holes.
- Page 14 Hardware: (27) Washer Ø10 2 PCS (29) Hexagon Head Bolt M10x35 2 PCS Step 8 Attach the Knee Pad (13) onto the Seat Frame (3) with two M10x35 Hexagon Head Bolts (29) and two Ø10 Washers (27). Tighten bolts with the Multi Hex Tool provided. Hardware: (27) Washer Ø10 2 PCS...
- Page 15 Step 10 Please follow the illustrations A, B, and C for proper installation of the Wrist Straps (24) onto the rod of the Upright Support Frame (2).
- Page 16 15&16 Step 11 Please follow the illustrations A and B for proper installation of the Ankle Straps (23) onto the both Foam Rollers (15) with Foam Roller Covers (16)
-
Page 17: Adjustable Leveler Adjustment
ADJUSTABLE LEVELER ADJUSTMENT Adjustable Leveler Adjusting the Adjustable Leveler Turn the adjustable leveler on the base support and seat frames as needed to level the stretch trainer. MOVING THE STRETCH TRAINER Handle Transport Wheel The unit can be carefully tilted onto its transport wheels for easy moving and storage. Firmly grasp the Handle with both hands. -
Page 18: Using The Stretch Trainer
USING THE STRETCH TRAINER Before begin your stretching exercises, please review the following guidelines. 1. Always use the wrist straps and hold the handlebar with both hands at all times during your routine. The wrist straps decrease the chance of falling if you lose your grip on the handlebar. - Page 19 Inner Thighs, Groin Hold the lower handlebar with both hands. Place both feet on the knee pad. Hamstrings Hold the upper handlebar with both hands. Keep the extended leg straight. Complete the stretch, and then switch legs. Upper Back Hold the upper handlebar with both hands. You can move your head up and down or left and right to intensify the stretch.
-
Page 20: Maintenance
MAINTENANCE CLEANING After each exercise, ensure that the unit is wiped down and any sweat is removed from the unit. The stretch trainer can be cleaned with a soft cloth, mild soap and water. Wipe the equipment down with a damp cloth and dry completely. Do not use abrasives or solvents. INSPECTION Inspect the knee and seat pads for cracks and loose stitching in the upholstery. -
Page 21: Warm Up And Cool Down Routine
WARM UP AND COOL DOWN ROUTINE The WARM-UP is an important part of any workout. The purpose of warming up is to prepare your body for exercise and to minimize injuries. Warm up for two to five minutes before aerobic exercising. It should begin every session to prepare your body for more strenuous exercise by heating up and stretching your muscles, increasing your circulation and pulse rate, and delivering more oxygen to your muscles. - Page 22 QUADRICEPS STRETCH With one hand against a wall for balance, reach behind you and pull your right foot up. Bring your heel as close to your buttocks as possible. Hold for 15 counts and repeat with left foot. INNER THIGH STRETCH Sit with the soles of your feet together and your knees pointing outward.
Need help?
Do you have a question about the 78300 and is the answer not in the manual?
Questions and answers